Follow along with the video below to see how to install our site as a web app on your home screen.
Note: This feature currently requires accessing the site using the built-in Safari browser.
We noticed you are blocking ads. DO THE TON only works with community supporters. Most are active members of the site with small businesses. Please consider disabling your ad blocking tool and checking out the businesses that help keep our site up and free.
I am having trouble getting the half inch myself... I am barely touching the mechanism now. I think I need to touch and back off an eighth. The blue Rotella did make a difference... But my release is really towards the beginning. No slipping except at the shift at higher rpm. I also have hd Springs and original plates.
Sounds like it's a little overadjusted. K&L cable? (did we already go through this? ;D )
Check the friction plates sometime, if they are not burned you should be fine with just correct adjustment
PO may have used a K&N cable.... Damn thing only stayed adjusted for about 2 short rides when I got it. I had to adjust about a half dozen times... Good practice, but a PITA when you just want to jump on for quicky after work. I was hard on it but I figured the cable was a POS... I guess I need to ditch it it for a better one... Any suggestions as to the best?
PO may have used a K&L cable.... Damn thing only stayed adjusted for about 2 short rides when I got it. I had to adjust about a half dozen times... Good practice, but a PITA when you just want to jump on for quicky after work. I was hard on it but I figured the cable was a POS... I guess I need to ditch it it for a better one... Any suggestions as to the best?
Sounds like it's a little overadjusted. K&L cable? (did we already go through this? ;D )
Check the friction plates sometime, if they are not burned you should be fine with just correct adjustment
We did not go through this in this way. We worked out the actuator before. I was missing the triangular piece to the actuator, so I had to order actuator parts. I haven't switched out the cable from the PO. It's been greased, but otherwise is as it was.
Probably the best thing to do is get a tiny cut off wheel on Dremel and shorten the outer sheath about 1/4"
The other alternative is to melt off the nipple at handlebar end (it's cast on zinc alloy) shorten outer for the bars and routing, set up length of inner and solder a brass nipple on
I've got the clutch slip sorted, but it still wants to hang up on the downshift between 2nd and 1st when its hot. It's not an every time affair, but when it happens a slight release on the clutch pops it into 2nd so I can drop it into 1st.
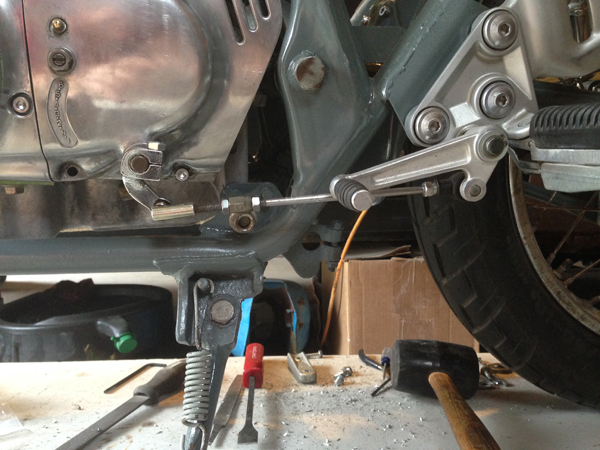
Haha. That was because I had considered going with a taller front sprocket. I decided to stay stock. I need to change out the linkage. You just confirmed that.
Sort of. I got the angles sorted out, but the shaft needs to be changed. It flexes too much. I need to find someone who does custom sizes- hopefully Fast from the Past. The Hayabusa sets use 5mm, where everyone makes shafts threaded for 6mm.
I need 5mm ends. One side threaded right, and the other threaded left. I supposed I could buy the 6mm and rethread it to 5mm? The Hayabusa end has 5mm left hand thread.
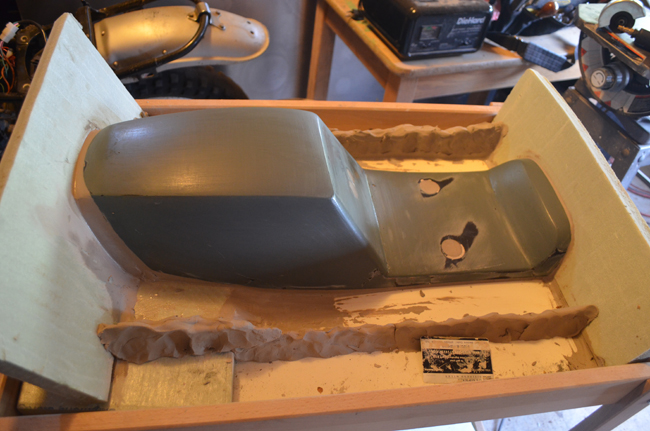
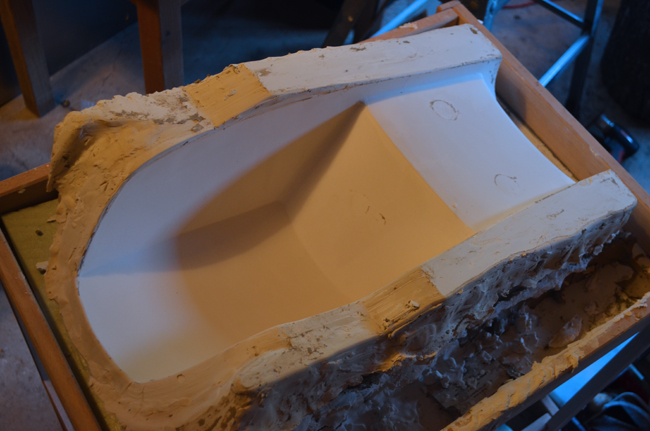
A short respite from the shift and clutch to go over the casting of my seat. There are many ways to do this, but the cheapest is plaster. I work in ceramics, so i commonly use #1 Potter plaster and have hundreds of pounds of it in my studio. Hydrocal is a much harder and more durable plaster for long term use in a mold like this. The first thing to do is set up the seat and prep it for casting. As a release, I use Murphy's oil soap. It's cheap and we use it all over the house, so no special effort to get it. I paint on a few layers letting it dry in-between, then polishing to insure no texture is left. Pam cooking spray also works, as does motor oil or beeswax. There is a product McMaster-Carr sells thats a carnuba/beeswax mold release that I also use. The nice thing about Murphy's is it cleans up easily with water.
The seat is set up for casting with the mold soap and I use clay to fill undercuts and voids I don't want to cast. I use regular water-based clay because, like plaster, I have tons of it. Non-sulphur oil clay is nice because you can use it for years if you keep it stored and clean. Non-sulphur is key because certain rubbers won't set if you use it to cast. Most cafe style seats are simple and require only one part. The back of my seat angles inward creating an undercut that requires me to cast a second part. Undercuts act like a key and prevent whatever you're casting from being released from the mold. I am also using clay as a dam, which I'll get into in the next post.
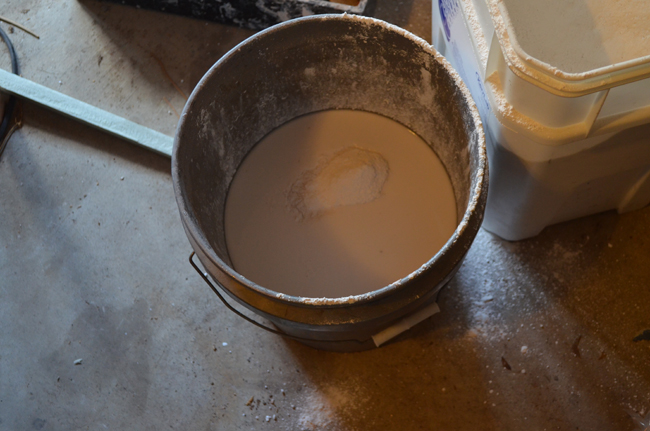
Oftentimes, I cast with boards (called coddle boards) and large C-clamps making a box. For small objects, it's no big deal as the mold won't require a large volume of plaster. The size of this seat would have required more than 100# of plaster had I cast that way. Instead, I create dams around the mold and add plaster to the seat as it thickens. I used around 50# of plaster. Normally (and especially with the box method) there is a proper, more scientific way to measure the plaster and water. US Gypsum created a slide rule to help with the calculations. I won't go into all that, and since we're not casting ceramic, it's not that important. The main thing is to avoid the mold being too soft. So for this, we use the mound method. I filled the bucket more than a third with cool water, not hot, but cool water. Hot will make the plaster set too fast and not cure as hard. It also effects shrinkage which can cause the object to get stuck in the mold. Never use water that is more than 108F. Then, slowly sift the plaster into the bucket until a mound forms that doesn't melt away.
Mix with a blunger on a drill or your hand. Whatever you use, keep it in the plaster and don't draw too much air in that creates bubbles. If you do get bubbles, spritz the surface with a mixture of isopropyl alcohol and water. The mixture breaks the surface tension and pops the bubbles. Bubbles=positive "warts" that you'll have to sand away later.
As soon as the plaster is mixed, coat the piece with a splash coat. This insures all details, especially fine ones, are picked up in the casting.
Then, let the plaster begin to gel up. At first mix, it's the consistency of heavy cream. When you submerge your hand into the bucket, the plaster should coat your hand and you shouldn't see skin. After the splash coat, you want it more like greek yogurt. Plaster is thixotropic, so when you're laying it up, shaking hand will loosen it up and help to move it around and fill voids. Oddly, when plaster still has water in it, it'll turn to liquid where the blade is if you try to saw it in half. I use the plastic AAA type cards that come in junk mail to squeegee the plaster and coat the seat like frosting. You want the mold to be a minimum of 1 1/2" thick at all points in the mold. A box mold, we would just mix it, pour and walk away until it sets. Another potential issue with a box mold is if you don't seal them well, they can blow. I've seen it hundreds of times and it never quits being funny. After the plaster sets (minimum 45 minutes or after it gets hot then cools) the master is ready to be released from the mold.
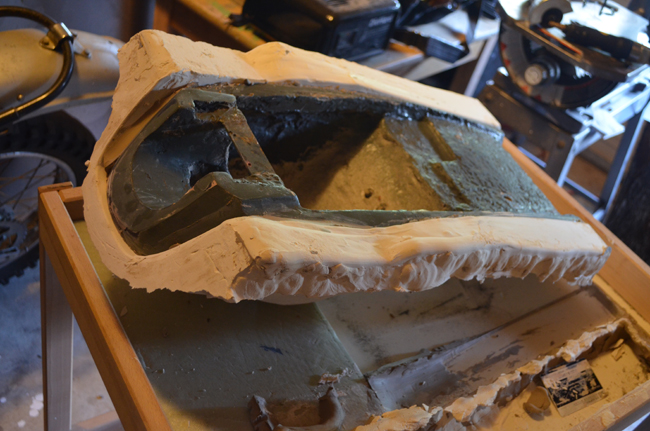
For the back section, I'll need to put the seat back in the mold. Truthfully, it's best not to remove the object you're casting until all parts are made, but I was concerned it wouldn't release so I checked. Typically, you want to create keys so that the multiple parts fit together a specific way. I just shape the edges to make it work like a key. A great way to make a key is to hold a quarter in a drill chuck and drill into the plaster about 1/2" in.
I dam and prep the back section and bottom. I'm not making this mold to be cast together. Instead, I cast the top then the back and "sew" them together. I use foam and clay to fill voids that will later be cut out of the casting. Repeat the steps and now I have the mold.
Most of my mold making supplies I get from either Smooth-On or Polytek. Polytek more for rubber molds and Smooth-On for plastic, resins, and rubber. Before glassing, the mold must be sealed and a release applied. Smooth-On makes a universal mold release that can be sprayed on. PVA with wax and FibRelease also work well.
This site uses cookies to help personalise content, tailor your experience and to keep you logged in if you register.
By continuing to use this site, you are consenting to our use of cookies.

") That was because I had considered going with a taller front sprocket. I decided to stay stock. I need to change out the linkage. You just confirmed that.
That was because I had considered going with a taller front sprocket. I decided to stay stock. I need to change out the linkage. You just confirmed that.