1980 CB750F for $180, modern suspension and upgrades for a cafe racer build

keep at it and check the important stuff ,the service limit values for the engine parts in the fsm
do not scrape or "clean" the pistons on the sides leave them be the buildup on the sides helps the pist fit better than it would "clean" do not use anything to clean the ring grooves besides compressed air and a very soft non metalic parts cleaning brush
dont polish the top of the pistons you want some carbon up there,get them shiny the carbon will never stick
a good running motor the exhaust valves would be almost white after al,l they are near red hot during hard running
the marvel mystery oil was a waste of money for the purpose of cleaning the engine before you tear it down it can actually do more harm than good on a plain bearing crankshaft
the internal parts that you pull out as long as you dont shovel dirt on them they can be bagged and put back in when you are ready, total waste of time to "clean" most of that stuff exceptions can be clutch basket if it has collected a lot of frictioin material
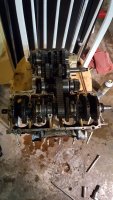
i repeat the most important part measure everything as per the specs in the fsm
critical things being small end of rods and crank runout piston to wrist pin lots of stuff nreeeds checking
 
Got the Pistons out, and crankcase split. That was absolutely horrible because I left the alternator rotor attached until the case came apart, then realized that it's not gonna come apart with that rotor still on. Lots of scraped and bleeding knuckles, a shot of fine ass tequila and some ingenuity thinking got it off. I tried using a store bought strap wrench, which busted on the first try. Stupid rubber. Tried a metal oil filter strap wrench, just deformed and didn't budge. I then placed a socket extension through the he open piston connecting rod holes underneath and spun the engine till the socket extension rested against the open face of the crankcase, gave the locknut wrench a Solid whack with a hammer and out it came. Next up was threading the rear axle into the rotor till it bottomed and hammered on that till the rotor popped off. All looked good except for a very minor marred dent where the socket extension in the piston rods rested against the crankcase. Hope that the new gasket covers it up. I called it a night here, it was very very discouraging getting to that point and I really felt bad about that little bit of damage. Other than that I've got piston one bathing in the carb cleaner dip bucket to fully clean, and will start on the 2nd piston tomorrow. A good thing I'm getting rings, my piston #1 compression ring snapped on me while pushing it up and out of the ring groove... didn't really take much either.
 

Attachments

  • 20161010_184917.jpg
    20161010_184917.jpg
    1.9 MB · Views: 246
Okeeee duders. Man life has some interesting ups and downs, ive decided to take it all out on my bike. Ive spent the last few days scrubbing grime out ofnthe split cases, i inspected the bearings and have determined to leave them alone. Transmission looks brand new... weird. It took me around 8 total hours of scrubbing to get the bottom case half cleaned, and the oil pan too. Just nasty. Ive got cam chan tensioners in the mail along with new rings too. Tonight I am gonna bust some ass and get the valves out of the head and bring the head and cylinder over to my machine shop to have them hot tank, hone, and bead blast them. I will also tonight make the CB1100F.net custom cam chain oiler mod in the primary chain oiler block, as well as replacing the flattened and caked o rings. Thinking of painting the engine a gloss black, and the valvecover and side covers that VHT wrinkle, or unless theres a better option like spray on truck bed liner.... i want em durable cause I might drop the bike in the dirt.

In other news, ive gotten PRK eye surgery, which set me back some time for recovery, but they paid me so Im using that money to finish this bike! Its all looking good, small steps, I hope to have the engine running by end of January.
 
dont over clean the pistons its best to not do anything to the sides and skirts,if there is patches of black carbon leave it on the piston you dont need a piston looser than it was
do not try to cleanout the ring grooves ! unless a ring was stuck in carbon
do not polish the piston tops in fact do not remove the carbon unless it is very thick or flaking off
you will have a hotter running piston and loose hp if you polish the tops

painting cases is for somebody that doesn't like riding their bike just want it to look good
but paint does not belong on any engine case if you want to color them you have to use a durable coating
paint will look like shit in short order especially wrinkled dick paint
kg coatings "gunkote" is a great sprayed bake to cure coating, easy to apply the biggest job the prep
its the only thing you can use on an engine and have it really last
bead blasting the head is risky,it must be sealed all holes and interior must be securely bead tight.it is impossible to get all the beads out if you expose the interior
....and paint does not stick well to bead blasted aluminum

but center cases cannot even be seen by anybody but you,and then only close up
its a fools mission to paint them and will only make the engine run hotter it dores nothing for the looks,because it cannot be seen
check for crack pistons around wristpin bores and mike the wrist pin bores to verify they are still viable ass well as observing wrist pin to rod end wear and clearance
 
Well its too late for the pistons not being cleaned, they each got a couple days soak in the chemdip, and all the carbon wiped off. Planning on a simple green ultrasonic clean on them before install too just to make sure the ring grooves are completely cleaned. I have decided NOT to polish ANY of the internals either. As of last night I found two burnt exhaust valves, so im talking with a member of CB110F.net to see about getting some used ones sent my way.

As for the beadblasted head, Ive dropped the head and sylinder block off this morning at an automotive mavhine shop, these cleanups are kind of thier specialty. I trust them.

And the paint job. Youve got me there, along with my custom shop fellas, theyve definitely shot the shit about that wrinkle shit. I was thinking about options for laint but havent come up with anything truly amazing yet. Unless I spend good money on polishing, or that HD texture engine paaint. Ive even considered Rhino Line for the side covers, seeing as I might dump the bike in the dirt camping... do t know yet. Previous owner dumped the bike on both sides, so the covers are scraped. Not really polish worthy unless the scrapes are somehow more desireable to look at and nobody told me? Haha. Im open to suggestions. Since the head, and the cylinders will be freshly beadblasted, do I havr to protect the aluminum with a clearcoat? What about using aircraft remover on the crankcases, will I have to paint them again to protect the open metal? Anyone here ever use Rhinoline on sidecovers?
 
kg coatings gunkote for engine finned parts like heads and barrels it is no more expensive than rattle can paint less costly than auto paints and 100 times better than either
gearkote for piston skirt thrust faces cam lobes,cam followers etc i use both gunkote and gearcoat have been for 30 years
http://www.kgcoatings.com/products/motorcycle-and-automotive
you will never put paint on an engine part ever again if you use it
kg was kalgard back in the day big time sponsors of privateer superbike and sidecar racers
https://www.google.com/search?q=kalgard&rlz=1C1FLDB_enUS562US569&espv=2&biw=870&bih=408&source=lnms&tbm=isch&sa=X&ved=0ahUKEwjp7MOO7eLQAhVKImMKHVKWBe0Q_AUIBygC#tbm=isch&q=kalgard+coleman+bevins+&imgrc=6AbUkPk8XS-ZhM%3A


1980_coleman.jpg
 
I emailed VHT last week, they finally got around to answering me. I inquired the best product and the application process for an air cooled engine, and they stated that the VHT engine Enamel would be the best option, and with proper prep work a primer is not needed.

So, it looks like I'm going VHT engine enamel, I just need to pick a color. The Cast Iron color looks great, and if I paired that with a roll on bed liner that textures on all the side covers I'd be set for looks and durability .
 
I used the VHT cast iron high heat header paint on my GL1000 pipes and it looked good and lasted until I go smucked by the deer, I now have new aftermarket pipes on her. I liked the colour and agree it would go well with the texture bits.
 
In my head I think it looks good, especially with the polished stainless engine dress bolts. Now my imaginations got me going again, I am looking in to Monstaliner. Its a huge hit in my Jeep crew community as being the best roll on bedliner/ paint out there, along with having the largest color selection of them all too. So, I got to thinking if I got the Gallon kit of desert tan, roll painted the frame that color, powdercoated the rims black, have the engine cast iron gray with rattlecan black bedliner sidecovers and valvecover with stainless bolts, a tan or brown scrambler style seat, Id just have to decide what to do with the tank. I guess I could Monstaline the tank desert tan and then use the textured black bedliner to touch up the trim it would look good, and be durable as all hell.
 
xb33bsa said:
dont forget the oil cooller so the injun dont melt from all the heat trapped ;)

Its on my list of post rolling mods. Right now priorities are focused on budget and getting it ready to ride. Some of the real race experienced CBF builders ive talked to say that in my stock engine ill have absolutely no issues having the engine painted. But believe me, I want that cooler for... um. Cool appeal. Haha.
 
you really should use a coating not a paint
its a huge mistake to paint center cases for one thing nobody can see them anyway durability issues ? yes you will have durabity issues painting over metal that is constantly expanding and contracting thru a 300 degree range of heat.metal that will be fuming out oil vapors from in its porosity
you talk about durability that roll on crap for side covers ?same thing its not a jeep fender
maybe its a show bike ? never going thru hundreds of heat cycles maybe it will not be on the street
but my point is you are totally throwing away good money and lots of your valuable time,for nothing that improves the bike to the contrary degrades performance .....
the ill spent money and wasted time could be used for performance upgrades silly boy
 
Well, I went with paint. VHT Cast Iron Gray for the main enginr body, and Rustoleum Professional series Truck Bed Liner for the pulse cover, clutch cover and rotor cover. Looks fantastic. I painted most each parts separate, then installed them all and buttoned the engine up. Turns out I only need to source 4 valve shims, then its ready for running. I got new valvecover grommets on the way, I got a used airbox delivered that surprisingly had all of the rubber boots in excellent condition. Ive been spending my time getting everything scrubbed and cleaned up, and ultrasonic cleaned in preparation. The airbox appeared perfect from the pics, but has some warpage or signs of being melted underneath, but its all in one piece compared to the last two ive been working with. Sanded most of it down, and will be painting the truck bed liner on the main body of the airbox to match the side covers, and then the airbox trim will be painted the same cast iron gray. Kind of like a reverse matching trim to the engine.

This week I will be sorting my body trim parts to prepare for powdercoat, and rebuild the swingarm. Im thinking ill paint the swingarm the same cast iron gray, and will have the frame done in the cheaper black powdercoat to match the rims. Just need to get the swingarm over to the custom shop so we can pull the old bearings. I want to start fresh with them, especially since the PO was a bigger samoan guy, and probably only serviced the bike once except for oil changes. Same with the front forks, ill rebuild those with progressives, and then I have to shop for rear shocks.
 

Attachments

  • IMG_20170119_131405_443.jpg
    IMG_20170119_131405_443.jpg
    2.2 MB · Views: 251
  • IMG_20170117_135259_889.jpg
    IMG_20170117_135259_889.jpg
    1.9 MB · Views: 257
Back
Top Bottom