Follow along with the video below to see how to install our site as a web app on your home screen.
Note: This feature currently requires accessing the site using the built-in Safari browser.
We noticed you are blocking ads. DO THE TON only works with community supporters. Most are active members of the site with small businesses. Please consider disabling your ad blocking tool and checking out the businesses that help keep our site up and free.
I got sent this way from a buddy who rides a sweet Brat style. He is also the guy who urged me to pick up my first bike, a 71 CL350.
Scored this guy for 800 bucks. She ran but was quite ugly!
Dirty and old, but she ran.
I'm new to motorcycles, but very familiar with old car restoration and racing. I'm an aircooled guy (VW's and Porsches).
My buddy gray and I were checking out possible 'first bikes' for me, and decided against anything big displacement. Riding a slow bike fast is way more fun than riding a fast bike slow
We stumbled upon this CL and the side pipes are what popped. I like to be a little different, and the hi-side pipes will get me there!
The plan is for a Cafe build - get it up and running, and then take it back apart for paint. I need to get some miles of smiles out of this thing before summer is over!
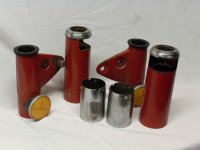
Pulled the front end, and labeled all the wires. (Turns out they're pretty easily marked by colors and wiring diagram. wasted effort - oh well )
Drained the nasty ass fluid out of the lowers.
What lies beneath the covers isnt very pretty. Surface rust/pitting.
Also saw an opportunity to clean up the bike, and more minimalist in me coming out. Off with the steering lock. Grind and will smooth...
Some of this work was done a few weeks ago, I'm kind of playing catch up.
Things went sideways.
I saw a cafe'd out CB and definitely like those forks better than the CL style with boots.
I scored a CB front end off ebay....
the stanchions were actually worse off than my CL ones. SO, I decided to mix and match after I read the shop manual on the forks.
CB lowers with CL stanchions. I like the fork cover way better than the gaiter boots.
I ended up wire wheeling the upper stanchions, and hit them with WD40 to stop from rusting.
Still need to body work and paint the fork covers, but we're off to a good start
Got a metal seat pan from ebay for a cb350...
some clubman bars and some simplified controls...
I also chopped the side pipes some
I also cut the frame behind the shock mounts, and rounded/frenched it out some. I may lop it all the way back to the shocks and loop it? (ehh, I'll get it up and running first)
So in between studying for a masters class, and a work week I got some work done.
I got the pipes wrapped with header wrap - pulled the stock wiring harness and began running the new simpler wiring harness I'm building. No blinkers, no horn, no starter, just the basics
Still trying to figure out a battery box that will be super sleek and not stick out at all. Got the little 'ballistic' battery, and I need to stick the ignition switch, rectifier and voltage regulator in the same area....
hey, oregonmotorcycleparts.com makes this tiny rectifier that replaces the giant orange one... might help with your space issues...
also, you might as well (if you haven't already) get rid of the crap behind the alternator rotor that is all in support of the electric start... there's a clutching device as well as the sprocket that can all go and get rid of a bit of extra rotational weight
I may just break down and build a small battery box in the stock location, albeit a whole lot shallower/smaller. I need to tuck small battery, voltage regulator and the rectifier (and probably the factory ignition switch) into the same location.
Another update - Decided for the time and effort of body-working the fork covers, I found a set on ebay for cheap. Well worth the time savings.
hey, oregonmotorcycleparts.com makes this tiny rectifier that replaces the giant orange one... might help with your space issues...
also, you might as well (if you haven't already) get rid of the crap behind the alternator rotor that is all in support of the electric start... there's a clutching device as well as the sprocket that can all go and get rid of a bit of extra rotational weight
So pull the alternator rotor, and then the sprocket, etc will slide right off? Do any spacers need to be fabricated to take the place of the clutching device etc?
the sprocket slides off, then the little clutch rollers and springs fall out of their cages causing you to panic if you don't already know that they're unnecessary and then there is the clutch housing itself that is attached to the back of the rotor. it's held on with 3 Philips head machine screws which are staked in place with a punch, but I see you're no stranger to removing recalcitrant fasteners so you'll beat that no problem. then just put the rotor back on. it's on a taper so theres no spacers required, it just sits snugly where it belongs. don't forget the woodruff key on the taper when you reassemble!
This site uses cookies to help personalise content, tailor your experience and to keep you logged in if you register.
By continuing to use this site, you are consenting to our use of cookies.


") (VW's and Porsches).
(VW's and Porsches).