We noticed you are blocking ads. DO THE TON only works with community supporters. Most are active members of the site with small businesses. Please consider disabling your ad blocking tool and checking out the businesses that help keep our site up and free.
You are using an out of date browser. It may not display this or other websites correctly.
You should upgrade or use an alternative browser.
You should upgrade or use an alternative browser.
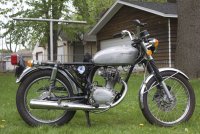
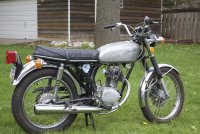
'74 CB 125 1st Build
- Thread starter MinneMotors
- Start date
MinneMotors
New Member
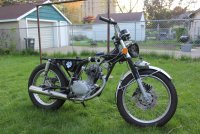
Well, I know for sure I'm going to repaint. I'm going for a very classy clean show quality cafe, not a dirty race bike (also awesome!). I've never actually painted anything before so I did a lot of research and how to best rattle can it. Obviously I wasn't going to get good results that way so I craigslisted spray guns and found a great deal on a GRACO 3800 Gun/Turbine System. I got it serviced and am ready to go!
Now I just need to strip all the paint:
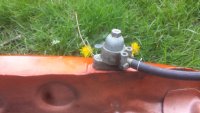
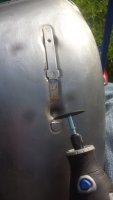
It seems my petcock was riveted on. Any solutions? I've just decided to work around it for now.
I used a paint stripper and it came off in seconds.
Now I just need to strip all the paint:
It seems my petcock was riveted on. Any solutions? I've just decided to work around it for now.
I used a paint stripper and it came off in seconds.
Attachments
MinneMotors
New Member
I went to clean the carb since it was having trouble running without the choke engaged a bit. To my surprise it was very clean. Then I noticed the choke lever was installed (crammed) in backwards or something weird. I fixed that and hope it makes it run better when put back together.
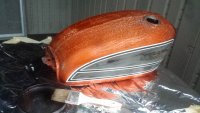
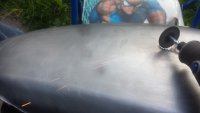
I also spent some time sanding the tank. By some time I mean 4 hours.
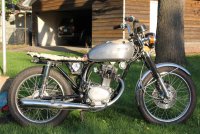
I slapped it all back together and love the bare metal look! I have a goal in mind and must carry through though.
The side covers are both broken and covered in bondo fingerprints. I'm going to sand and paint them first as practice.
I also spent some time sanding the tank. By some time I mean 4 hours.
I slapped it all back together and love the bare metal look! I have a goal in mind and must carry through though.
The side covers are both broken and covered in bondo fingerprints. I'm going to sand and paint them first as practice.
Attachments


MinneMotors
New Member
I made a mock up. After making the decal I decided to "paint" the black behind it and had to inverse all the colors on the decal. I also drew it with the tank in my lap instead of on the bike. This made it very crooked when finished.
It is an ugly ass mock up. There is no way I'm going with it.
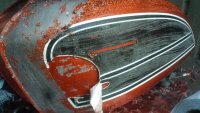
The last pic is a semi sanded side panel. I'll get at it a bit more, though I'm not sure I need too?
It is an ugly ass mock up. There is no way I'm going with it.
The last pic is a semi sanded side panel. I'll get at it a bit more, though I'm not sure I need too?
Attachments


MinneMotors
New Member
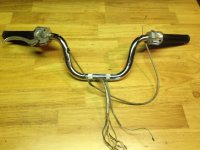
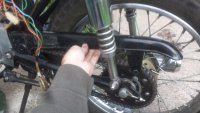
Ok my first real problem! I took off the throttle grip and found out there is a thing called a tube throttle. It looks like its going to make changing bars a bitch. I'm really hoping you all can help point me in an easy direction here. I was hoping for some clip ons. There doesn't seem to be much info on google about switching out these style bars. There is also about 1/4 inch of free play in the throttle before it actually gives it gas. How do I tighten this up?
For those who don't know the throttle cable goes into the bars before the grip and is attached to a little sliding mechanism that slides in a groove inside the hand grip. So the bars have a cut out groove that is sticks through.
HOW DO I CHANGE MY BARS?
For those who don't know the throttle cable goes into the bars before the grip and is attached to a little sliding mechanism that slides in a groove inside the hand grip. So the bars have a cut out groove that is sticks through.
HOW DO I CHANGE MY BARS?
Attachments
MinneMotors
New Member
trek97 said:If you would please take some detailed shots of the throttle disassembly. I am getting ready to take mine apart to restore and lube the action.
Thanks!
Thanks, I'll take some pictures probably in the morning. I have to work on it outside and don't have good light.
MinneMotors
New Member
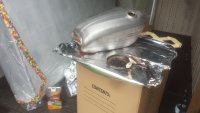
I wanted to finally get rid of all the extra stuff. In removing the rear fender/signals I had to remove the tool kit. I also took off the front signals which required opening the headlight to unplug them.
I also decided its time to tear the seat apart. I carefully took off the leather and tore the foam out in one solid piece. I plan on using the stock seat pan and building up from it. There are a few shots of seat mock ups before and after the fender was removed.
I also decided its time to tear the seat apart. I carefully took off the leather and tore the foam out in one solid piece. I plan on using the stock seat pan and building up from it. There are a few shots of seat mock ups before and after the fender was removed.
Attachments


MinneMotors
New Member
trek97 said:If you have plans to change out the front fender pm me. I may be interested in your original.
I read that It is actually providing structural support for my front fork. If thats not the case, and I don't cut it down to s smaller size I'll hit you up for sure.
MinneMotors said:I read that It is actually providing structural support for my front fork. If thats not the case, and I don't cut it down to s smaller size I'll hit you up for sure.
Yes, Absolutely does provide structural support.
Dont cut that one. It looks to be pretty good shape, and would be a shame. Find a cheapy on ebay to cut. Or, I would swap you mine. Its the shorter CL100 version, no factory bracket stays, so no drilled holes to fix. The chrome is in poor shape. But its not dented, bent or warped. So, if you are interested in swap I could blast it and have it ready for you to prime/paint. Right out the box.
Perfect to cut down, sand blast for paint to match your tank. 8) Blast and paint is exactly what I will do w mine.
you can see mine here...
http://www.dotheton.com/forum/index.php?topic=65898.0
MinneMotors
New Member
I'm not as big a fan of the curve of the cl's. However, if I would be able to cut just a little 2-3 inch wide section out of it to act as a fork brace I would be happy to trade. Do you think it would hold its structural support if I did that?
MinneMotors
New Member
Akastus said:For your throttle, why don't you just switch it over to a CR style throttle assembly. Cycle gear has their Trackside brand CR assemblies for 20 bucks or so, and it comes with a new throttle tube
Great, thanks! Will I be able to use the same cable?
MinneMotors
New Member
I have a few questions I'd like your opinion on.
1. Should I strip her all the way down and paint the frame? It's still in decent shape, but it is 40 years old.
2. Should I, and how do I paint the engine? I'm thinking most likely black everywhere except the crank case which I will polish up real nice. But I'm also considering hitting a few of the peices like the crank case and a few others red (my other color). Do I need special paint, and will I need to tear the engine apart?
3. Should I leave the rear sets on? Being a little 125 sometimes I like to kick my feet back. It also allows for a more aggressive riding position. Is it possible to easily move my brake and gear lever back there?
Akastus
Been Around the Block
MinneMotors said:Great, thanks! Will I be able to use the same cable?
That all depends on the length of your cable. For 20ish bucks its not that bad to experiment
MinneMotors
New Member
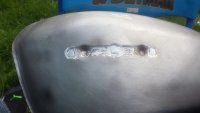
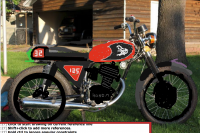
A few more updates. I ground down the bracket that holds the honda emblem. Now I just need to fill it in with bondo and smooth that down.
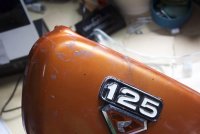
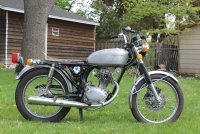
I also hired the professionals over at Mockmeup.com for this sweet mock up. What do you think? Should my race number be 125?
I also hired the professionals over at Mockmeup.com for this sweet mock up. What do you think? Should my race number be 125?
Attachments

Looks awesome dude!
So here is what I do.
Clean, clean, clean then clean again w acetone.
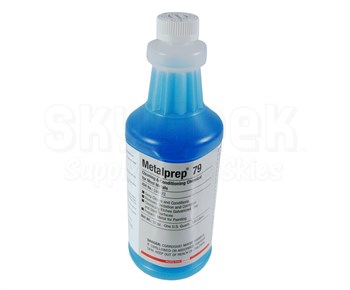
I use a metal etching chemical first. Any auto paint store should have bottles of it. This etches the surface of the aluminum so primer will stick good.
Then rinse w clean water according to etcher instructions.
Use VHT engine primer, VHT engine paint and VHT engine clear coat. Follow the instructions on each can precisely.
Done. The red was painted "in the frame" and cured by running the engine. Black and red was painted, and Oven cured, individual parts during rebuild.
Now jsut the jugs are black w fin edges sanded off.
So here is what I do.
Clean, clean, clean then clean again w acetone.
I use a metal etching chemical first. Any auto paint store should have bottles of it. This etches the surface of the aluminum so primer will stick good.
Then rinse w clean water according to etcher instructions.
Use VHT engine primer, VHT engine paint and VHT engine clear coat. Follow the instructions on each can precisely.
Done. The red was painted "in the frame" and cured by running the engine. Black and red was painted, and Oven cured, individual parts during rebuild.
Now jsut the jugs are black w fin edges sanded off.
The bracket under the fender makes a perfect fork brace. They look ok painted black. Also, black helps to hide it against the tire.
Best to sandblast the frame for painting. But plenty of guys have stripped them and sanded them w good results. If you choose not to blast, You could also use metal etcher for that.
Best to sandblast the frame for painting. But plenty of guys have stripped them and sanded them w good results. If you choose not to blast, You could also use metal etcher for that.