1979 CB750f Cafe Racer Build

Augydog1

New Member
So this is my first CB750f Café racer build.
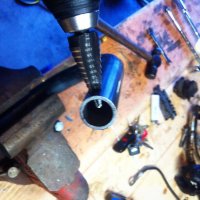
Bear with me, im new to the forum and will probably have a lot of questions. I also plan on doing a pretty in-depth (picture heavy) build on this bike. Im going to try and do everything myself either in my garage or in my shop and i'll try and document everything.

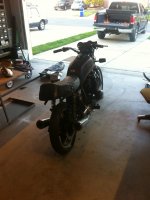
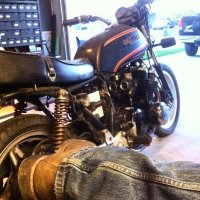
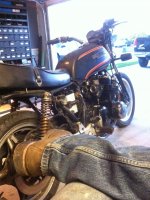
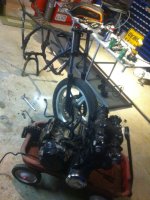
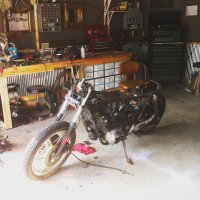
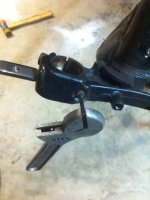
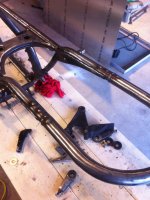
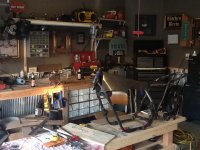
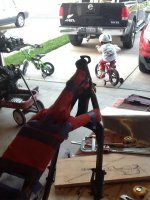
To start off, I bought this bike two weeks ago for $500. The bike started however it would not stay running unless the choke was all the way pulled out. Any thoughts on why this would be happening??? Other than that the rear brakes were locked up (not a problem because I plan on changing/replacing pretty much all the old parts off this bike unless I can rebuild them). Anyways, here's the bike when I got it;
 

Attachments

  • IMG_7077.JPG
    IMG_7077.JPG
    1.4 MB · Views: 278
The body is in good shape and no leaks that I can tell. The air box was missing however the previous owner had the carbs completely covered. also, the wiring harness was a complete mess.. This is right before I started tearing it down.
 

Attachments

  • IMG_7080.JPG
    IMG_7080.JPG
    527.2 KB · Views: 277
  • IMG_7079.JPG
    IMG_7079.JPG
    1.5 MB · Views: 264
Started going over and making a list of all the issues I can see before I start digging into it. Once I was done with that, I started tearing the bike apart.
 

Attachments

  • IMG_7120.JPG
    IMG_7120.JPG
    1.9 MB · Views: 260
Here's a quick question...How can I clean this motor so it looks half decent without tearing the entire motor apart?? I have experience rebuilding Harley motors top to bottom however, I've never done a 4cyl motor..I plan on removing the top of the motor/jugs and inspecting the top end/pistons to see how it looks but if I don't have to tear into the bottom I wont. Therefore, any good tips on how to clean the crap/rattle can paint off it without tearing the whole thing apart?
 
here are a couple more shots before I hacked the rear end off and welded the loop in.
 

Attachments

  • IMG_7116.JPG
    IMG_7116.JPG
    455.6 KB · Views: 258
  • IMG_7140.JPG
    IMG_7140.JPG
    1.9 MB · Views: 237
  • IMG_7176.JPG
    IMG_7176.JPG
    1.8 MB · Views: 262
  • IMG_7177.JPG
    IMG_7177.JPG
    526.9 KB · Views: 230
So I cut took my measurements and cut the rear of the bike frame off for the rear loop. I am using 3/4" SCH 40 Pipe for my rear loop (have a bunch of it laying around the shop). I extended the rear of the bike about 8 1/8" longer, to put the ass end of the bike slightly over the center of the rear wheel (about 3"). I also used some 1/2" SCH 40 Pipe for the slugs that I drove into the frame and the rear loop. When you use pipe, there is a slight ridge on the inside of the pipe where the sides were fused that you will have to file down in order to sleeve the 3/4" over the 1/2" pipe. I also drilled holes in both the frame and the loop before I sleeved them to allow for some nice plug welds. Once the holes were plugged, I then welded up the loop to the frame. I did a quick, hot pass on the butt welds to give me some solid penetration and will probably run one more quick pass over them to fill in the divots before I sand them down completely.
 

Attachments

  • IMG_7197.JPG
    IMG_7197.JPG
    2.2 MB · Views: 242
  • IMG_7192.JPG
    IMG_7192.JPG
    464.2 KB · Views: 267
  • IMG_7188.JPG
    IMG_7188.JPG
    1.7 MB · Views: 249
Im thinking im going to do the body work first, then move to the engine. So for the body work, im torn between two different routes;
1. I can make an all aluminum tank connected to the aluminum cowl so the entire assembly is removed in one piece. If I go this route, i'll be using 16 GA 6061-T1 aluminum and will be soldering it using aluminum filler with a flux dip...or...
2. I'll make it easy on me and make an all steel tank which will either be connected in one piece to the cowl or they will be two separate pieces. If I go this route, i'll either be using 16 GA or 20 GA steel depending on the design and will TIG welding it.

Either way, its goin to take some time..
 
Excited to see a new DOHC CB750 build on here! I try to follow all of them on here for ideas and help. I'm building a 1979 cb750k albeit verrrrrry slowly. I like your rear hoop, looks much like mine! :D
 
Augydog1 said:
Im thinking im going to do the body work first, then move to the engine. So for the body work, im torn between two different routes;
1. I can make an all aluminum tank connected to the aluminum cowl so the entire assembly is removed in one piece. If I go this route, i'll be using 16 GA 6061-T1 aluminum and will be soldering it using aluminum filler with a flux dip...or...
2. I'll make it easy on me and make an all steel tank which will either be connected in one piece to the cowl or they will be two separate pieces. If I go this route, i'll either be using 16 GA or 20 GA steel depending on the design and will TIG welding it.

Either way, its goin to take some time..

Either way, I'm stoked to see someone make their own tank for this frame!
 
Augydog1 said:
The bike started however it would not stay running unless the choke was all the way pulled out. Any thoughts on why this would be happening???
Most likely it's because the airbox is missing. My '78 SOHC doesn't like to idle, and won't rev past about 5k rpm, with the airbox off.
The other culprits are clogged ports/jets. Those can/will be fixed with a thorough carb cleaning.
 
Augydog1 said:
Therefore, any good tips on how to clean the crap/rattle can paint off it without tearing the whole thing apart?
Autozone (and I'm sure the others) sell "Clearcoat Peeler" that will take the bulk/all of the rattle can paint off of it. But It's mild enough not to etch the chrome or polished parts. Just do the obvious covering of ports, spray it down with the Peeler, and hit it with a pressure washer. Regular pressure garden hose works well to but you might need to wirebrush some of the stickier spots.
 
Redbird said:
Autozone (and I'm sure the others) sell "Clearcoat Peeler" that will take the bulk/all of the rattle can paint off of it. But It's mild enough not to etch the chrome or polished parts. Just do the obvious covering of ports, spray it down with the Peeler, and hit it with a pressure washer. Regular pressure garden hose works well to but you might need to wirebrush some of the stickier spots.
Thanks! Yeah its got years of grease, grime, shit, and this black paint that looks like someone tried painting it blindfolded. I'll post some more pictures of the mess tonight.
 
Started molding the pan of the gas tank using 6061-T6 aluminum...as much as it sounds easy to form, what a BITCH! Especially when your doing your best not to scratch it..
 

Attachments

  • image.jpg
    image.jpg
    446.9 KB · Views: 245
  • image.jpg
    image.jpg
    1 MB · Views: 233
  • image.jpg
    image.jpg
    267.6 KB · Views: 229
I'm soo tempted to cut these two side rails out..would make it soo much easier (I know I know, it would fuck up the structural integrity of the frame)
 

Attachments

  • image.jpg
    image.jpg
    131.2 KB · Views: 251
A small update on the build. I decided to hold off on the aluminum tank and instead am going to make one out of steel first. Here's where im at with the tank as of now. Still need to finish molding the steel for the front of the tank and then weld it out, then gas cap, and finally finish with sanding. Depending on how the tank comes out when its done, I might just leave it bear steel with a sanded finish or just paint it. We'll see...
 

Attachments

  • IMG_7255[1].JPG
    IMG_7255[1].JPG
    274.7 KB · Views: 227
  • IMG_7251[1].JPG
    IMG_7251[1].JPG
    1.8 MB · Views: 224
  • IMG_7256[1].JPG
    IMG_7256[1].JPG
    435.7 KB · Views: 235
Just ordered $700 worth of parts..Thanks Dime City Cycles for emptying my wallet this fine memorial day weekend. ;D
 
Augydog1 said:
A small update on the build. I decided to hold off on the aluminum tank and instead am going to make one out of steel first. Here's where im at with the tank as of now. Still need to finish molding the steel for the front of the tank and then weld it out, then gas cap, and finally finish with sanding. Depending on how the tank comes out when its done, I might just leave it bear steel with a sanded finish or just paint it. We'll see...

Dude! That tank is amazing! I totally need you to build me one of those!
 
Thanks! I think im gonna end up making a couple tanks for this bike. I plan on keeping this one so why not have a couple different tanks/faring's to swap out. I dunno, we'll see. ::) hopefully my neighbors don't get sick of the racket and shut me down
 
QUICK QUESTION...I have the motor off the bike, plugged the exhaust outlets as well as the Carb inlets..IS IT SAFE FOR ME TO PRESSURE WASH THIS FUCKING THING? or should I take the time and scrub every nook and cranny?
 
Back
Top Bottom