Follow along with the video below to see how to install our site as a web app on your home screen.
Note: This feature currently requires accessing the site using the built-in Safari browser.
We noticed you are blocking ads. DO THE TON only works with community supporters. Most are active members of the site with small businesses. Please consider disabling your ad blocking tool and checking out the businesses that help keep our site up and free.
Hey. I'm starting a new build thread on a project I've been working/riding for the past two years. Its a CB550 1978. I've been riding it and working on it progressively (read slowly) and have just run into a major problem that I think will cause me to do a full restoration while fixing it. Here's a pic of when I bought it-
So recently I bought the CB200 tank you see in the second pic and fitted/mounted it to the frame. It was an old tank that I filled with metal rescue (which I have to mention is shit, don't buy it use vinegar). I though I had removed all the rust but apparently not. Because I attached a fuel line and filter and started the bike up. Bike fired right up everything looked fine road around the block bike engine started stumbling a bit on the last block. When I got home and then I noticed everything in the fuel line was rust colored. I Shut her off and put the original tank back on and tried running it with clean fuel. Bike still stumbled and then shut off. Took the carbs off, cleaned them. Reattached, and bike restarted but couldn't get it to drive, just idle and barely that. I noticed a ton of smoke at that point which at the time I figured was just the engine burning off whatever rust was left in the engine. I cleaned the carbs once more and just to cross my t's and dot my i's I put in a new barb gasket kit, bench sync'd and returned the fuel/air screws and idle screws back to spec. Bike turned on afterward, idled correctly, could put it into drive and ride it to about the point that you would switch into 2end, engine shuts down at this point. And takes a couple minutes to get her restarted. Noticed the smoke from the exhast is of light whitish color (fuck!) pulled the plugs. All are black two seem to have a bit of oil on the tips. Did a cold dry compression test (cold/dry) just now reading 90 / 100 / 90 / 100. I should mention I replaced the top end gaskets and gave her a valve job 3,000miles ago. Interior was heavily carboned. All carbon was removed and rings replaced. So what do you think it is? I know what I think it is but I think I need to hear someone else say it before I go tearing her apart HaHa.
If it is what I think it is then a lot of cool shit is about to happen to this bike real quick! Already started ordering parts lol. Hit me up with your opinons insights and whatever else, thanks.
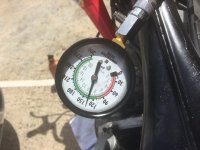
Did a wet test numbers came back considerably higher. Wasn't able to get a # off 1 because I think I over filled with oil? All numbers are close in range from gauge pictured.
numbers are a little low
can you see in the sparkplug hole and see the condition of the cylinder wallS?
at least maybe on the outer ones with a strong light,i have a tiny light that actually goes in a plug hole
hopefully rust has not fouled things up in there
No can not get a good enough look at walls from outside. I think my next step is to drop the engine and take a look in side. As far as higher #'s off a wet test verse dry, what does that indicate? I did have a fuel filter in place when rusted fuel entered the chambers but what is worst case scenario from the symptoms so far? Stuck valves? Blown rings? Possible need of boring? Also I have not done a timing test yet, from the symptoms could the timing just be off and causing all this (although I'm familiar with how engine timing works, I have not worked on timing adjustments before nor do I have a light). Any educated insight is valued.
Here's what I think it could be... Rust plus an already rich fuel condition caused one or more rings to fail (I'm thinking #4 because it's the only plug with oil on it when pulled). Oil is seeping into chambers and eventually causing bike to "flood"/not allow combustion after reaching a certain rpm?
It's going to be a week before I get another day off to open her up but will be posting pics of everything I do this time. I actually was stock piling parts/paints and such for the next time I had the time/need to work on her. My next post will go through those and show where this build will be headed.
plugs can become oil fouled
wet compression increase indicates rings are leaking
as far as timing yes it wil def effect the performance make sure the advancer is free and operating
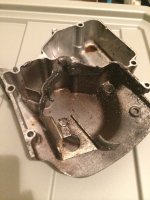
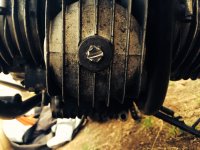
Ok, started taking her apart today. Ran into my first problem. Oil filter housing screw is stuck, tried everything I had in my tool bag to remove it but no give. Gonna get a torch from work and see if I can heat it out. If that doesn't work gonna buy a small wheeled angle grinder (i'll need one later to trim the "tri area" anyways) pray and cut a flat head impression on the bolt face and impact it out. Wish me luck. I'm removing the whole engine from the frame, before I start pealing off layers of the engine to investigate for valve and ring problems suspected because id like to paint the engine while Im at it and honestly a bike this old needs it. Found allot of grime and old oil in the sprocket case. And even a shredded piece of cardboard wrapped around the back of the sprocket lol. Has anyone ever removed a whole engine of this kind without removing the oil housing? Doesn't seem like enough clearance room to do so but im curious.
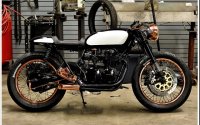
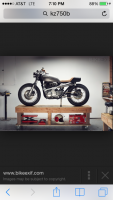
Now onto inspiration and what parts I have or have lined up for this one. These are my inspiration bikes-
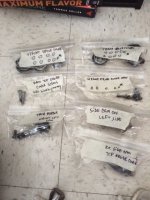
The engine is going to be paint gloss black with copper accents on the starter cover, valve covers and I bought one of the "see through" points covers from fb-stuff.com that will also be a copper painted. I've also got on hand an awesome allen head stainless engine and frame bolt set I bought off ebay from this guy - http://www.ebay.com/usr/alloyboltz?_trksid=p2047675.l2559
His stuff came quickly and looks like good quality bolts. Also it was bagged and different engine section bolts are clearly labeled. Gonna save me allot of frustration when I put humpty dumpty back together again! I've never painted and engine before, Two cans will do it though? Im think im gonna do 3 coats? This engine enamel seems pretty thick.
My exhaust is a Carpy 4 into 1 (http://www.cb750cafe.com/) . The pipes make her sound like a beast and I recommend buying them if your decent at tuning a carb. They've got some rust accumulation cause I did a horrible job sealing it two years ago. Will be spraying it with VHT rust convertor to remove any ugly areas and then going back over it with VHT flat black to seal it. Also have a 50ft roll of fresh exhaust wrap and some stainless blk ties to finish the pipes with. If anyone has used this rust convertor from VHT I like to hear about it. Ive only used a flooring rust convertor used in a restaurant walk in area that came in gallon jugs and im curious about results of this stuff. And how much i'll need (I've got two cans on order).
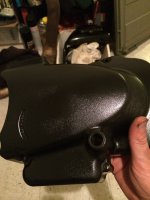
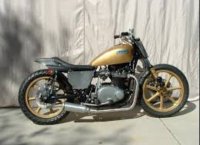
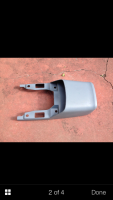
My seat has to change. Someone on here called it "a camel hump" one time lol. Its comfortable as all hell but looks like a basket ball. I've got a wood base underneath my seat I shaped and I plan on keeping it and reshaping it to be slimmer and to attach this tail piece. The tail piece is from a KZ750b I bought it off ebay for a decent price. I haven't figured out exactly how im gonna do it as the engine work is more important right now. Im going for the look of the seat in the bottom pic and still mataining the lift up/locking attachment of the original Honda model as I ride with small saddle bags and park in some shady areas. I also plan on squeezing my medium gel cell into the back of this thing if I can fit it.
The controls are all sorted for now unless I have "extra" money at the end of this build lol. I'm budgeting this at $900 and get it done in two months, hoping to squeeze through. Right now there's no tac and a dcc low prof speedo with indicators and some biltwell kung fu grips. Maybe paint the levers if have time.
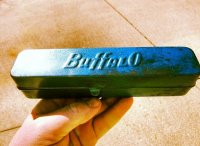
Going to be cutting the tri area and clearing it out. I plan on leaving two of the tabs there to mount this old impact driver tool box (pic at bottom, Im from buffalo originally and its cool to me) I found to hold some of the electric doo dads. What I cant fit in the box will be mounted on the bottom of seat (rectifier, etc.). This brings me to wiring. Which I suck at, just takes me a really long time to do and it my least favorite. Id just rather be turning a wrench. If ive got money at the end ill be contacting Sonreir for a custom harness, but we'll see im may get cheap about it HaHa. I've also got a cool shiny new horn and ignition from a 200 that will be mounted on there somewhere. One thing I want to do to is remove the original ignition stem but still keep a steering lock somehow. Ill worry about that later tho.
The tank is going to stay the CB200 tank. They're just so cool. I may be selling the original tank which is blk and in pretty good shape if I need the money later.
The engine internal parts cost is worry me a bit and where to buy them. I believe and we'll see on this that I may need to bore and replace the pistons. Im guesstimating the pistons and stuff to come out at $350 range and boring to be in the area of $100 a hole. Im in Hawaii and machine work can get very expensive here and finding someone that you can put some trust in to do it is even harder. If anyone can recommend anyone I could ship them to I would appreciate it.
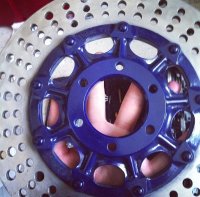
Wheels and tires- Im planning on painting the wheels and brake calipers copper and buying some decent cheap dual sport tires. Roads are shit here and I want the extra grip and the look. Shinkos or something similar. Ive also got a nice drilled router (pic) that's gonna go on there. Oh and the headlight ring is going copper while im at it too.
Its allot to do in the time I have. And any help along the way will be appreciated as lost time is something Id like to avoid. Thanks for looking
Also hit up the SOHC site. A member named Mike rieck does boring and head work which is second to none. I also had that work done by him. Or if you want to make an easier upgrade swap a 79-82 650 engine. You get a 20 percent HP increase. It is 2 lbs heavier but is a direct swap.
Thanks for the heads up. Is this the set you purchased off ebay - http://www.ebay.com/itm/161127970617?ssPageName=STRK:MEWAX:IT&_trksid=p3984.m1423.l2649 . I had looked at these previously and was worried maybe that they where of cheap condition because of the cheap price. But possibly that's the direction i'll go.Unfortunately finding a 650 motor out here is not an option. That I know of mine is one of only 2 cb550 on the island im on lol. Seeing a "vintage" type bike that isn't a Harley is an extreme rarity here unfortunately. They just don't last, the weather and conditions (salt) tear metal/rubber up here. I Pm'd Mike. How much did he charge for the bore? If you have a link to a build describing what you had done I'd definitely be interested in seeing it. Post a link up if can? And thanks again for the tip.
One thing I was wondering could I just find a good condition head off ebay that was still within factory spec and just swap that in? After checking condition/wear of pistons and changing out rings of course. Anyone ever done this? It seems like too easy of a fix lol. My next day off is part of Wednesday and Thursday so will be posting a progress report then.
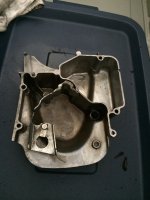
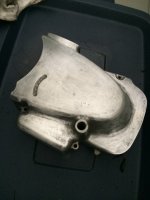
Progress report- have removed engine from frame and started dis-assembly. Had a huge problem removing the oil filter housing and after grinding a flat head impression had to ruin the housing with the grinder to get it off. Will be doing research on where to find an "exposed type" filter for easier maintenance in the future. Sprocket cover was remove, heavy grease and dirt build up. Soaked in pine-sole, scrubbed, sanded, oven heated and painted. Removed oil pan while engine was still in frame for easier clearance when pulling engine and found usual oil residue plus some metal grinds. Sand like, worries about this. Can't tell if it is actually sand or metal at this point. Will find our later I bet tho next step remove cam and valve cylinder for inspection. Hopefully tomorrow.
Tho the paint looks ok I'm gonna sand and reprint the face surface with two more coats. Hand sanded everything. Soaking the oil pan and manifolds now. They're on deck for tomorrow aswell as removing some stubborn screws from the valve cover.
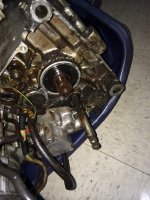
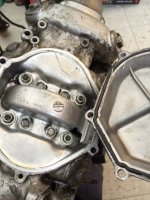
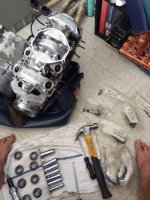
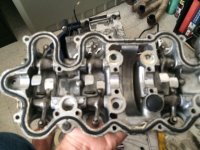
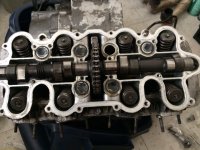
Ok allot of progress today! Tore down engine to pistons, valve and top block is off. Here's were I really need help diagnosing the bikes issue. I'm gonna follow this post with a bunch of picks of my take down, hopefully someone can point out an area of possible issue or place to investigate. The pics are also there to help others doing the same thing. If they need a visual or a point to ask questions. Note the barefoot disassembly approach haha. One thing I did notice is one of the "rubber dealings" on the bottom of the valve cover move freely and was not held down by sealer. Don't think this could be the issue tho. But let me know. Rockers moved freely and correctly. Cam shaft and chain/sprocket looked good. No rub marks or stress points. There was oil accumulation under neath the shaft (normal for oil to be in that compartment?).
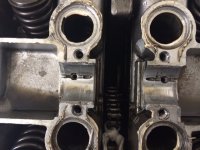
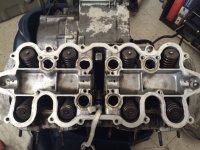
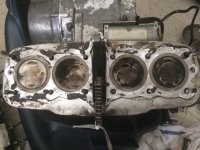
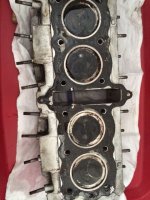
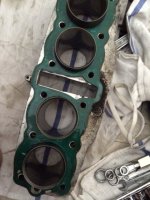
pistons show the start of carbon build up. the worst being #1. With #3 and #4 showing carbon build up mainly from right side. All valves are fully carboned. Both of these areas where clean and polished to a shine <6 months ago. I tried doing a water test on the valves and left them for and hour with water on surfaces. #4 has lost water implicating it is not sealed tightly. #2 also lost some, but much less.
This site uses cookies to help personalise content, tailor your experience and to keep you logged in if you register.
By continuing to use this site, you are consenting to our use of cookies.


") next step remove cam and valve cylinder for inspection. Hopefully tomorrow.
next step remove cam and valve cylinder for inspection. Hopefully tomorrow.