Bought in Bushels

I built the H beam that the rear mono shock will mount to shortly after. I was pretty concerned about this part taking a lot of abuse and possibly bending so I opted for some 1" tubing 0.250 wall DOM, its probably a bit overkill but at least I won't have to worry about it.
 

Attachments

  • Kawi 2 002.jpg
    Kawi 2 002.jpg
    137.7 KB · Views: 249
Got the front tank mount tackled, used a piece of 1/2" rod a couple of pieces of flat bar, and some boat trailer rollers that I turned down to the right size in my lathe. It was actually a lot faster and easier to do that I expected.
I have this tendency to look at stuff and say "oh I can do that, no problem" and then it turns into a 2 week project.
 

Attachments

  • vintage 3 008.jpg
    vintage 3 008.jpg
    206.8 KB · Views: 247
Found an old Kawi headlight at a swapmeet for $5.00. I love the shape of it and how it comes to a point at the back rather than the standard bubble, so I whittled up some brackets from a piece of 3/16 aluminum I had hangin around the shop, and mounted it as low as possible.

Now I just need to find a vintage looking headlight with a flat lens to complete the look.
 

Attachments

  • vintage 3 009.jpg
    vintage 3 009.jpg
    117.1 KB · Views: 238
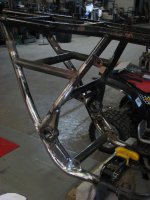
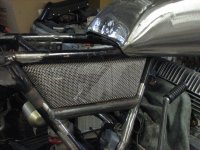
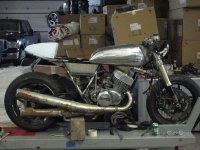
I found this place in Mississauga not far from my place that has all kinds of crazy screen and perforated sheet metals, so i found this really nice woven stainless screen. So I figured I'd make up some pretty cool side screens
I probably should have taken more pics while I was building the side screens, but again you get in there hot n dirty and forget about the camera. Sorry boys.
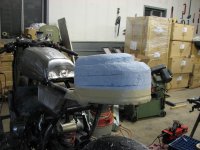
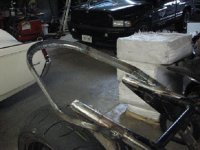
Anyways I made myself a wooden buck out of some hardwood I found in the shop, I think it was an old shipping skid and cut it to fit perfectly in the openings, then I cut the angles in it on a table saw, rounded up the corners and I had a perfect buck to work from. I then took another piece of hardwood that was about 3/4" smaller than where I wanted my radius and clamped it all together, after that it was just a hammer some heat and patience.
Actually it was fairly easy, the most time consuming part was making the wooden bucks to work from.
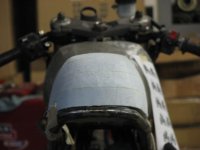
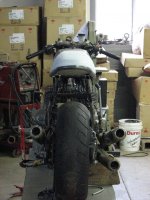
Now I just need to find a way to fix them in the opening without being able to see any hardware.
 

Attachments

  • vintage 3 011.jpg
    vintage 3 011.jpg
    238 KB · Views: 262
I made a metal hoop under my tail section out of some steel tubing and then decided to make the tail section my self out of a piece of foam.
 

Attachments

  • vintage 2 004.jpg
    vintage 2 004.jpg
    143.8 KB · Views: 233
I shaped it up but wasnt very happy with it and thought it was a bit too narrow and didn't follow the lines of the bike the way I wanted, so this is the piece I scrapped.
 

Attachments

  • vintage 2 006.jpg
    vintage 2 006.jpg
    87.9 KB · Views: 250
It seems every time I try and take the easy way out I find myself kicking myself and redoing it, so here is another start to the same project. I made a cardboard template this time to see what my end shape will be like for the tail section frame and then bent it up out of some 3/4" angle iron, and tacked it into place.
This one I'm much happier with.

Sorry for all the posts but I im really enjoying sharing my build with you guys and just want to get you up to speed to where im actually at in the build without missing too many steps.

Cheers
Dennis.
 
Welcome dude. Nice build. I really like the mesh side panels. Its kind of interesting to see how you accomplished your front and rear swaps. I think if it were me i would have gone more of a bearing and spacer route. Cool build I will be watching
 
Here is a shot of the tail section after the second try. I think it suits the bike a bit better and flows with the tank. I did weld a piece of 18ga sheet metal to the bottom of the tail section frame to close it up. Didn't take any pics of it, damn again, but it closed off the bottom nicely and gave it a real slick look.

I also fiber glassed the tail, i wrapped it in packing tape, coated it with paint wax, and just laid fibergalss over it. I'll eventually just sand it down and shape it from there, but at least I got something I can work with.
 

Attachments

  • vintage 3 013.jpg
    vintage 3 013.jpg
    215.3 KB · Views: 269
Here is another shot of it from behind, I think it follows the lines of the tank a bit better than the first one.
 

Attachments

  • vintage 3 015.jpg
    vintage 3 015.jpg
    188.6 KB · Views: 237
Here is a shot of the pipes I'm building as well.
I bought then from a guy named Walms on the Kawasaki Triples board, He designed them, and had them laser cut and sold them to me as a weld together kit in rings. He is a really solid guy if there is anyone out there looking for pipes for a kawi triple. I think he may even be a member here but I'm not sure.

It tool me forever but I think they turned out pretty trick. They definately tested my tig welding skills, and reafirmed that they still suck and I need a lot more practice. Maybe if I did this stuff every day I wouldn't loose my touch so much.
 

Attachments

  • kawak pipes 001.jpg
    kawak pipes 001.jpg
    209.6 KB · Views: 266
Here is another shot from a different angle.

Hope you guys like it. :D
 

Attachments

  • kawak pipes 002.jpg
    kawak pipes 002.jpg
    200.7 KB · Views: 260
Nice job man. I was told that after I run out of my 80# (or whatever size the dang cylinder is) on my mig, that I would have just started to get ok at it...so far that's the truth! Those look awesome, and they do indeed look time-consuming!
 
Thanks boys, hence the name Rattlecan !!! I'm sure its gonna sound nuts.
I dont plan on running scilencers!

I did hear that if you put a twisted piece of flatbar inside the stingers it takes alot of the bark away.

Do any of you know where you can buy some nice perforated pipe??? Like the stuff used on the inside of mufflers ect???
 
here is a shot of my rear sets I bought on ebay for $200. I must say I was really impressed with the quality of them when they showed up.
 

Attachments

  • kawak.jpg
    kawak.jpg
    221.4 KB · Views: 257
Back
Top Bottom