Yam RD "Blue Dream"- Ride,Maintain,Tune

more thread jack i used to do some hotsaw work and some of the chainsaws are all fins and 1 piec e jug and head we neededto cut the head off trim the cylinder base ,make billet heads with squish etc so what i did was use wood as a tight arbor to turn cut off the cylinder head
turned down a chunk of oak to where it fits the bore perfect have it slightly taperd at the last and just shove it on the wood using the tailstock and it become a secure unit to whittle away at
 
Yeah, I made a weed pipe and got booted off the lath... wish I had the skill set now and always get within an inch of buying a combo hobby machine but can't ever justify it.
 
i made weed pipes in 9th grade freshman high school they billet aluminum with cooling fins they were hot er um got hot :mad:
 
xb33bsa said:
i made weed pipes in 9th grade freshman high school they billet aluminum with cooling fins they were hot er um got hot :mad:

About 7th grade, but still went to foundry and made skate trucks :eek:
 
Re: Yam RD "Blue Dream"- Ride,Maintain,Tune

Nothing new here,collecting parts and fitting a new acewell tach since my original one broke :)

Nearly got all the parts together for the conversion,just need to get pistons and rings plus the cylinders checked and prob honed.
 

Attachments

  • uploadfromtaptalk1448148099715.jpg
    uploadfromtaptalk1448148099715.jpg
    830.5 KB · Views: 300
Hey guys!

Didnt find anything similar in the search function so maybe you guys can help me out.

I bought a RD oil pump together with other RD 400 parts this summer, in order to get my 350 conversion ready.
The oil pump came from a unidentified motor side case, for my conversion i will NEED a 350 or 400 oil pump, to spare me headache.

The oil pump has a plastic wheel (which my stock 250F has not anymore), i guess this will be the deairation wheel of earlier models.It has "1A0" stamped into the wheel that gets pulled by the right hand bowden.

Is there a SURE way to identify this pump, i need to be sure!

Will post pics later this day!

thanks in advance!
 
You should be able to check the pump volume against your 250 pump. The volume is only a function of the piston diameter and the throw, both of which are easily measured if you take the pump apart. The pumps are very easy to "rebuild", and it probably is a good idea to take them apart to replace the seals anyway. Seems like all the ones I presume to be good end up leaking and I have to take them back off to re-seal. The pumps are simple enough, but you should put it in a plastic bag when you pull the case halves apart and remove the drive gear and piston because the ratcheting mechanism is hidden and has two strong springs and very tiny pins that will fly out to the farthest corners of your shop if you do not contain them! The white plastic gear wheel that your 250 pump does not have is just a way to manually bleed the pump and lines without running the engine and another place for the pump to leak, but otherwise is a non issue. Keep in mind that the pump output is determined by several things. First, the drive ratio. If you change the primary gear and clutch basket to the 350 setup, your pump will also need the correct drive gear inside the case to mate with it. This will cause your pump to spin a bit faster increasing the output for the 350 all else being equal. Second is the amount of shimming which controls the operational pump stroke. And third is the throttle cam adjustment which controls the pump stroke at any specific throttle opening.

You can measure the output volume of however you have it set up and calculate the ratio, but it is a pain and I use a really crude "eagle eye" method. I know what the stock adjustments are for shims and cam rotation, and err on the rich side. I don't mind more smoke than necessary, but if really excessive I dial it down. Up to a point more oil is more power.

Very important on a new (old) pump is to rinse it out well. Behind the brass pressed in output nipples are springs with check balls. The can get jammed up if the pump sits a long time, so before you re-seal the pump, run a solvent like gasoline through it and determine that the check valving works. You have to spin the pump a lot by hand to do it. You can take the valves apart if needed, but it is better to leave this unmolested if you can as the press fit is far less reliable on a second assembly.
 
Shove a couple gallon shooters of Motul under the seat and ride bare back. Its a Yamaha mang...

Waits for the fallout.
 
Re: Yam RD "Blue Dream"- Ride,Maintain,Tune

Last week i finally got busy again with my RD build.
Got an immaculate MOT and since i can ride my bike now for 1 year without any MOT mechanics molesting me I can start with my mods.

First off i removed the clunky airbox and fitted the Y rubber boot with the KN filter.just a test fit since i will take out the motor next,for my 350 conversion.
 

Attachments

  • uploadfromtaptalk1450623547820.jpg
    uploadfromtaptalk1450623547820.jpg
    2.7 MB · Views: 293
  • uploadfromtaptalk1450623568596.jpg
    uploadfromtaptalk1450623568596.jpg
    2.6 MB · Views: 293
  • uploadfromtaptalk1450623606005.jpg
    uploadfromtaptalk1450623606005.jpg
    2.5 MB · Views: 288
  • uploadfromtaptalk1450623623948.jpg
    uploadfromtaptalk1450623623948.jpg
    1 MB · Views: 286
Next thing was the carb...oh man i was nervous...my aim was to fit all R5 needles and needle seats together with drilling out the air vent to the air hole on the needle seat.
I was really really careful and tested my drill and thread cutter in order to be sure that they were of use.
Then i pinned my carb down making sure i was drilling in a perfect straight line down trough to the R5 needle seat.
After drilling trough with a 3MM drill i cut a M4 thread for a 2MM mikuni air jet.
The opening in which this jet sits now can be closed by my at any point of time with a M5 brass screw,so this mod is not a one way thing.
After drilling trough i took a really fine file to carefully remove the aluminium which leaped into the needle jet shaft.
Then double checked if my 3MM holes were aligned with the opening in the needle jet....BINGO!
Can't wait for the rest of the mods come together!
 

Attachments

  • uploadfromtaptalk1450624162740.jpg
    uploadfromtaptalk1450624162740.jpg
    2.4 MB · Views: 312
  • uploadfromtaptalk1450624151404.jpg
    uploadfromtaptalk1450624151404.jpg
    802.7 KB · Views: 297
  • uploadfromtaptalk1450624127232.jpg
    uploadfromtaptalk1450624127232.jpg
    1,023.4 KB · Views: 318
  • uploadfromtaptalk1450624104187.jpg
    uploadfromtaptalk1450624104187.jpg
    981.6 KB · Views: 306
  • uploadfromtaptalk1450624084556.jpg
    uploadfromtaptalk1450624084556.jpg
    811.4 KB · Views: 314
  • uploadfromtaptalk1450624063129.jpg
    uploadfromtaptalk1450624063129.jpg
    2.6 MB · Views: 305
  • uploadfromtaptalk1450624044818.jpg
    uploadfromtaptalk1450624044818.jpg
    1.3 MB · Views: 308
Re: Yam RD "Blue Dream"- Ride,Maintain,Tune

Looking good. You got bigger balls then me I have heard about the Dave F mod or Dale A or whatever you call it but to scared to take a drill to my carbs.


Sent from my iPhone using Tapatalk
 
Re: Yam RD "Blue Dream"- Ride,Maintain,Tune

Hey ply!

The mod included removing the brass ball from the air vent,drilling and threading for a 2 MM air jet.
I also installed a KN filter.
Made a little test ride with 120 main and 30 idle (stock is 115 and 25).didnt have the impression thst the bike pulled harder or different, so maybe this was nonsense :)

I did some reading and my Aircooled RD Forun had some discussions on it,the mod is mainly for modified engines so maybe if i will my conversion this will do a difference.
 
Re: Yam RD "Blue Dream"- Ride,Maintain,Tune

Yeah I have read about it. Just not as confident in my skills to drill out a carb. Bike looks great though and even if it does nothing now but works when you mod it then it is worth it in my opinion.


Sent from my iPhone using Tapatalk
 
Re: Yam RD "Blue Dream"- Ride,Maintain,Tune

A conversion to an accelerator pump carb is a much better improvement.

https://ftzracing.com/images/AtvCarb03.pdf
 
I'm not promoting this mod, but I have done it and have ended up using the altered carbs on several bikes. I have not drilled and tapped for the removable air jet, simply drilled the fixed jet which is a permanent mod unless you drill and tap for the removable jet afterwards. I have a good supply of 350 carbs, so I have simply swapped out the modded carbs for stock ones if I didn't think the modded ones ran any better. In my experience, this is a pretty small change if any on the engines I have run it on. It is always noticeable, but often very hard to say if it is an improvement. Seems to have the most beneficial impact on slightly ported motors with pipes as a generality. I tried a modded set of carbs on my stock daily driver, which has centered and squish clearanced heads and a big K&N filter as its only mods and thought I liked it, but then when I needed to try the modded carbs on another bike and swapped back to stock carbs I decided I liked the stock better. In any event, if you machine the carbs you have like Ryan did so you can replace the main air jet, you can always go back to the stock set up. The machine work is super easy - on a drill press nearly impossible to screw up if you understand what you are doing and don't drill through the other side if the emulsion tube cavity. Evidently others have had different experiences, but I would have to have a noticeable mid throttle issue before modding my only set of carbs. Until recently I have usually had a set of modded carbs on the shelf so it has been very simple to swap them for whats a on a bike to see if helps.

On your carbs, there is no brass ball to remove, so all you have to do is just drill to the right jet size, then re-drill for the threads if you want to go back to stock.

I have run a few engines with "power (or booster) jets" like in redwill's pic - both Mikunis and Lectrons. Got them to run fine in every case, but only found they were actually better on a high output drag bike application. That said, I'd count my experience with the power jet carbs as fairly thin and not recent.
 
hey guys!

long time no hear!since my life once again collided again with my passion I had to postpone my plans concerning the RD.However, I had time get that project these christmas holidays to a new level, the 350 conversion is nearly done!!!

After getting the 250 Motor out of the frame I had an awesome day at my friends workshop, he is currently building an awesome TR1 dragbike, heaps of badassery!

First task was to recut the thread of my oil drain plug.... YES! i destroyed my thread turning the oil screw in the wrong direction.
We took the spare 400 motor first to see where the drill will go, then my friend turned a tool to make the drill go perfectly straight...thread was cut then applied the heli coil...voila!
 

Attachments

  • IMG_7397.JPG
    IMG_7397.JPG
    88.6 KB · Views: 284
  • IMG_7395.JPG
    IMG_7395.JPG
    66.9 KB · Views: 293
  • IMG_7390.JPG
    IMG_7390.JPG
    74.1 KB · Views: 298
  • IMG_7387.JPG
    IMG_7387.JPG
    79.4 KB · Views: 289
  • IMG_7385.JPG
    IMG_7385.JPG
    84.4 KB · Views: 299
  • IMG_7365.JPG
    IMG_7365.JPG
    78.2 KB · Views: 284
  • 12418979_1081947761850137_3827531758945366603_o.JPG
    12418979_1081947761850137_3827531758945366603_o.JPG
    60.7 KB · Views: 291
  • 10623418_1081947758516804_4677251620924883835_o.JPG
    10623418_1081947758516804_4677251620924883835_o.JPG
    80.7 KB · Views: 297
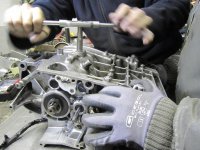
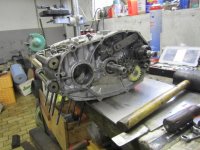
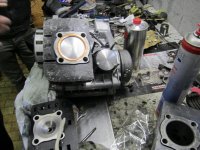
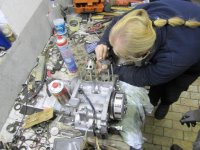
After throughly flushing the crank case with diesel to remove any bits of the thread cutting epicness unraveled.
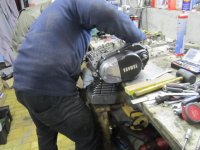
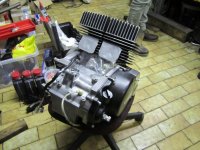
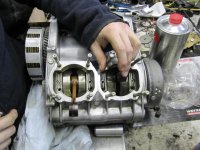
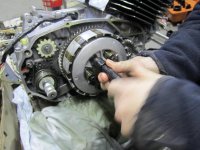
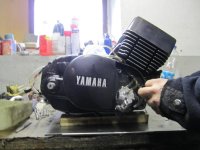
We starting taking the 250 motor apart (gearing side) and switched out the 250 clutch basket and 250 primary to the 400 gearing parts.
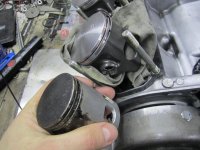
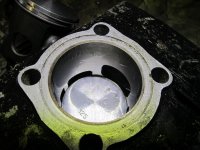
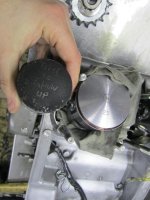
250 pistons were replaced by 350 pistons,oh yeah, theres quite a size difference ;D ;D they are pretty fancy with a graphite coating.

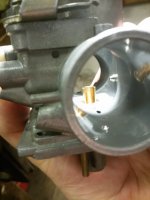
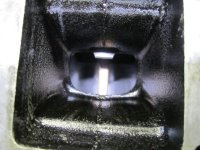
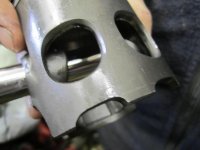
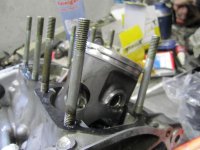
Then it was time for a test fitment,how everything lined up,ports, quish were spot on.interesting because these pistons are LC Prox pistons, only a tang on the piston was removed.so no wild porting measures ( for now 8) ) just port matching.
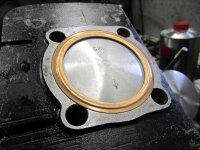
I will use the stock bottom gasket with the copper ring as a top gasket. should I anneal the gasket before usage?
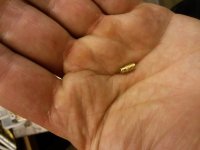
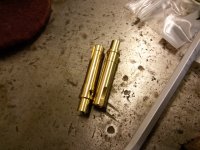
As for the studs, we tried to remove the 400 studs which are longer (longer stroke than the 350 and 250) and bring them to the right length but failed, then we tried the 250 studs without stock washers and it seems to hold up fine!

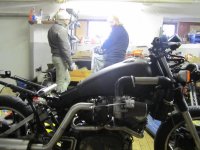
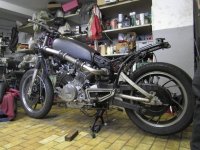
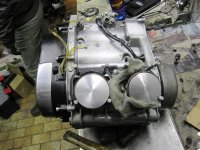
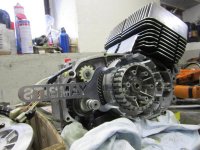
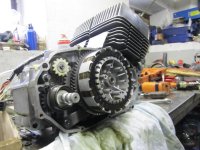
My friend was so kind a blasted the cylinders and heads after test fitment, I´m currently painting and restoring them, next weekend I will reassemble!

Next will :

-test fitting the DG chambers
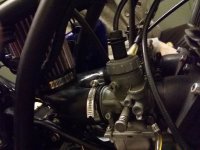
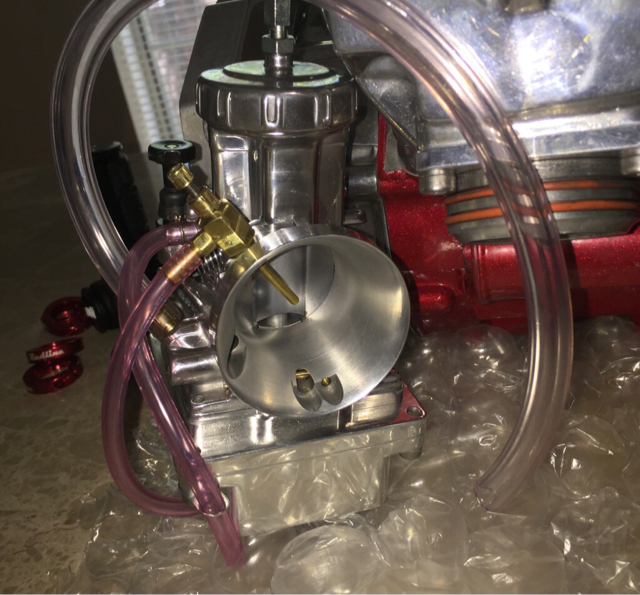
-carb jetting-->Any ideas in which direction i should go?140 mains 25 idles are stock 350,i guess start crazy rich and work my way down...
-first start up with premix :D :D

sorry for being pic heavy!!!
thanks you guys for helping!
 

Attachments

  • IMG_7428.JPG
    IMG_7428.JPG
    78.4 KB · Views: 287
  • IMG_7429.JPG
    IMG_7429.JPG
    85.9 KB · Views: 302
  • IMG_7430.JPG
    IMG_7430.JPG
    63.8 KB · Views: 296
  • IMG_7431.JPG
    IMG_7431.JPG
    86.7 KB · Views: 295
  • IMG_7432.JPG
    IMG_7432.JPG
    50.3 KB · Views: 314
  • IMG_7439.JPG
    IMG_7439.JPG
    85.1 KB · Views: 291
  • IMG_7440.JPG
    IMG_7440.JPG
    74.6 KB · Views: 291
  • IMG_7427.JPG
    IMG_7427.JPG
    67.3 KB · Views: 300
  • IMG_7425.JPG
    IMG_7425.JPG
    78.2 KB · Views: 290
  • IMG_7423.JPG
    IMG_7423.JPG
    64.2 KB · Views: 287
  • IMG_7421.JPG
    IMG_7421.JPG
    85 KB · Views: 300
  • IMG_7416.JPG
    IMG_7416.JPG
    85.9 KB · Views: 287
  • IMG_7412.JPG
    IMG_7412.JPG
    74.2 KB · Views: 290
  • IMG_7410.JPG
    IMG_7410.JPG
    81.6 KB · Views: 284
  • IMG_7405.JPG
    IMG_7405.JPG
    80.6 KB · Views: 285
  • IMG_7401.JPG
    IMG_7401.JPG
    62.9 KB · Views: 290
  • IMG_7441.JPG
    IMG_7441.JPG
    67 KB · Views: 266
Re: Yam RD "Blue Dream"- Ride,Maintain,Tune

I will definitely no run my RD on premix,i had really good experience with my stock 250 pump,never let me down.
There was quite a bit of discussion on my Aircooled RD forum whether the uprated 250 pump will be sufficient (i switched the stock 250 plastic gear wheel with a 400 gear wheel).
I have a spare 400 pump,which i never used,but i hope i can stick to the 250 pump.
I though about starting at 170 main and leaving the idle at 25 and then working my down 165,160,155.... or should i start richer?
Mods so for: 350 conversion,k/n filter,dale f mod,dg chambers,sqish reduced...

Thanks man!
 
Back
Top Bottom