Follow along with the video below to see how to install our site as a web app on your home screen.
Note: This feature currently requires accessing the site using the built-in Safari browser.
We noticed you are blocking ads. DO THE TON only works with community supporters. Most are active members of the site with small businesses. Please consider disabling your ad blocking tool and checking out the businesses that help keep our site up and free.
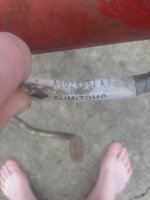
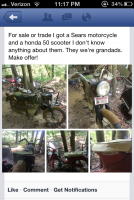
So I found this bike on Facebook along with a Sears? bike back in my home town. I immediately went and picked it up once finding out the guy still had it. The engine was locked and the kick start spindle was broke off flush, but the C102's are electric start! ;D
So the starter was my first project and once I cleaned it up it worked like a top! Put it back on and then tried to unravel the mystery of the wires. I'm horrible with anything electrical, which has brought me here. I don't know how to test the coil or the stator. I got a 6v battery to replace the old one and found a key and had it cut. So I can now get it to turn over(I had to strip down the cylinder and piston for cleaning first. But I've arrived at the problem of not getting any spark and not knowing what to do. The stator is putting off power, but I have nothing to go off of to know if it's working properly. Any help would be greatly appreciated!
Just so you all can live along with this love story as it goes! Definitely love at first site!
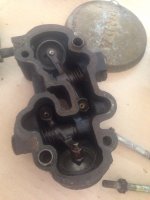
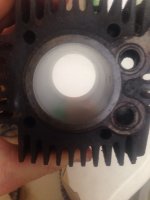
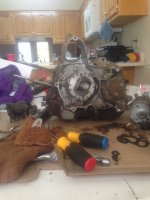
Seat is one of the roughest parts, lights were all good until moving it from my aunts house yesterday to my home. My makeshift strap failed, and once I pulled off from a red light the bike rolled back and busted the taillight. I have been devastated and quite torn. I beat myself up about it, don't worry. As of right now the engine is on my dining room table being cleaned in all the areas I know how to. I cleaned up the head, cylinder, stator, and outside of the engine so far and it's coming along well.
Opening it back up to clean everything again because it sat for a while since the last time. Crazy how new these little tanks look so new on the inside, because that's what's important, right?
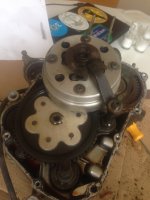
Well, I finally got one of the side casings off to look at the inside. Everything looks great on the clutch side. Pretty excited! I'm just cleaning and replacing gaskets as I go
I know how you feel about the tail light, I did the same thing with a glass headlight for my Chaparral minibikes. Very rare parts, and I was trying to open the bucket, smashed the glass. I was so frustrated I just packed it all up.
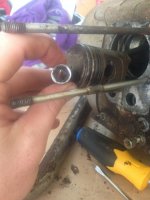
Update. Since I've gotten the bike unseized my problem has been not getting a spark. Well due to my limited knowledge of anything electrical, everything has been slow. However, I think I have found the problem. The points were not connecting at all at any time in rotation. Which has been the only problem I have been able to verify because the ohms on the coil "seem" to check out. Now my problem lies with resetting the points to the right distance apart. I have no idea how far apart these points need to be and I'm assuming I need a special gauge to ensure I do it right?
Bazooka, it will ruin your day won't it? I immediately realized what had happened and was hoping that the plate mount hit first and saved the light. It did not.. But slow progress has helped me recover from the tail light's depression
Update. Since I've gotten the bike unseized my problem has been not getting a spark. Well due to my limited knowledge of anything electrical, everything has been slow. However, I think I have found the problem. The points were not connecting at all at any time in rotation. Which has been the only problem I have been able to verify because the ohms on the coil "seem" to check out. Now my problem lies with resetting the points to the right distance apart. I have no idea how far apart these points need to be and I'm assuming I need a special gauge to ensure I do it right?
Okay, so today I put everything back on and hooked all the wires back. Late last night I fixed the points and they're getting a good connection now. The coil is getting the right reading of ohms when I test it(I THINK). So everything should be peachy, right? Wrong. The solenoid wouldn't work. So I unhooked it and it would work when I bypassed the wires. And hooked it to the battery. The starter switch seemed to be grounding fine and the hot wire was getting current. Well I bypassed the wires to try and turn the engine over and that only worked for a few moments before the battery died.
So my question is this, can the low battery cause the solenoid to not work when being hooked to the wire harness? When it worked straight to the battery?
If I were you, I'd check all my connections-make sure they're clean-and fix that kick-start...sites like CMSNL and David Silver Spares have many parts for these little Hondas. My eternal money pit is a 64 Honda ca200 90cc...I use CMSNL to get they part numbers then enter them into a google or e-bay search...it's always possible that the starter needs a rebuild. Do not give up, my ca200 was a non-running basket case when I got her...
Thanks Drew! I needed the extra encouragement after today for sure! I have definitely been looking around for a kick start, but I I have also ran into trouble opening that side of the case. I might end up drilling a screw out, which I really didn't want to do. But I'm just taking it one step at a time at the moment! All in good time!!
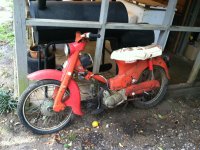
That sure is a Nice little Honda,those small 50cc engines were designed to run forever w/ minimal preventive maintenance subscribed.
Did you also purchase the Sears?
OK, now I know what you have. 8)
Pushrod motor will bend pushrods when over revved but it doesn't seem to do any other damage, I've straightened them with a couple of house bricks in 'emergencies'
The points inside flywheel magneto will need a 0.014" bronze feeler gauge to set them, a steel feeler gets 'sucked' away by the magnets and makes life real difficult.
As far as I remember the timing can only be set by points gap so you must have points in good condition to be able to get 0,012"~0.016" gap. If it's too wide, the dwell is too short for coil to charge (and too small usually means it doesn't fire at all
This site uses cookies to help personalise content, tailor your experience and to keep you logged in if you register.
By continuing to use this site, you are consenting to our use of cookies.

") subscribed.
subscribed.

