Follow along with the video below to see how to install our site as a web app on your home screen.
Note: This feature currently requires accessing the site using the built-in Safari browser.
We noticed you are blocking ads. DO THE TON only works with community supporters. Most are active members of the site with small businesses. Please consider disabling your ad blocking tool and checking out the businesses that help keep our site up and free.
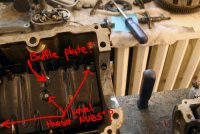
You may want to consider making the baffle plate removable. In stock form, it's bolted and peened to the bottom case half making it difficult to clean out the debris at the bottom of the oil sump. I did this to mine. Level the small nubs then drill and tap the holes for M6 bolts.
Not really necessary though. Assuming any large solids are removed, what's the worst that could happen? Imagine the condition of the bottom of some of the cases of daily riders.
You may want to consider making the baffle plate removable. In stock form, it's bolted and peened to the bottom case half making it difficult to clean out the debris at the bottom of the oil sump. I did this to mine. Level the small nubs then drill and tap the holes for M6 bolts.
You may want to consider making the baffle plate removable. In stock form, it's bolted and peened to the bottom case half making it difficult to clean out the debris at the bottom of the oil sump. I did this to mine. Level the small nubs then drill and tap the holes for M6 bolts.
that is what i did with mine , i thing i put in 10-24 screws ,it is just a simple detail project that costs nothing and ,makes for feel good,starting out with a spotless interior
I figure I would have to level those nubs to get that out! I'm going to try and avoid that and let it soak over night. The engine is actually pretty clean at the bottom so I'm confident I can get it clean under there. If I can't I may take your advice Dr J.. thanks again guys.
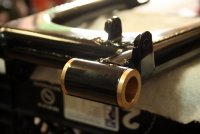
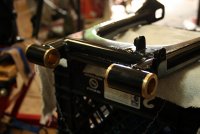
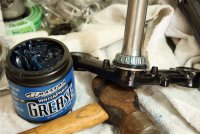
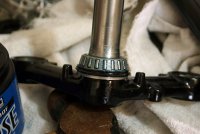
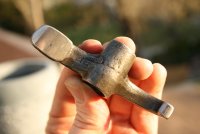
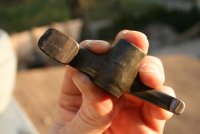
I am going to install my new bronze bushings and collars into the swing arm this Saturday and was wondering about the proper greasing procedure. I've got a plan for squeezing them with an all thread, some washers and nuts and just wondered if you pre-grease the collars and bushings OR pack the grease once fitted OR once fitted, use a grease gun to fill the inside?
I am going to install my new bronze bushings and collars into the swing arm this Saturday and was wondering about the proper greasing procedure. I've got a plan for squeezing them with an all thread, some washers and nuts and just wondered if you pre-grease the collars and bushings OR pack the grease once fitted OR once fitted, use a grease gun to fill the inside?
you dont really need to worry too much about greasing untill final assembly,a light layer of grease when pressing in is a good thing as is lite greasing on assembly the grease fittings are fine for greasing after assembly
if you go to the likker store that sells dry ice for a few dollers you can get them cold enough to go in by hand
Used a punch and a hammer. They're a real bitch to get out and you'll need to replace them if you use that method. However a clever fellow on a different forum came up with a pretty nice way to remove them. Check out post's #9 & #10 in this thread for instructions and save your fingers!
Yeah before you press them in, leave em in the freezer for a day and it'll just be that much easier. The all-threads is probably the best method for that sort of press fitting.
you dont really need to worry too much about greasing untill final assembly,a light layer of grease when pressing in is a good thing as is lite greasing on assembly the grease fittings are fine for greasing after assembly
if you go to the likker store that sells dry ice for a few dollers you can get them cold enough to go in by hand
A lot going on and wanted to write an update as to what’s been happening. My laptop died on me! So I am without editing software to finish the next video installment at the moment.
I am still waiting for my top end to come back from Bore Tech.. getting really antsy to start putting that motor back together! Mostly because I don’t want to forget where everything goes! haha I stupidly stripped a screw holding the starter motor in place on the upper crankcase so I will need to tap that and get that out somehow before I send these cases to get vapor blasted. I’m not exactly sure if the starting motor can safely withstand the blasting process or not, maybe someone can advise? I ordered a JIS screw driver but it’s been a damn month and still not shown up! Invest in a JIS screw driver if you want to take this bike apart!! Can’t stress that enough. Don’t be an impatient douche like me!
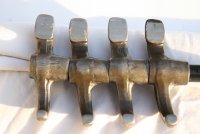
I also realized that since I am getting a hard faced cam it would make sense to hard face my rocker arms also as they were looking a little beat up. I mailed those off to Megacycle Cams about 4 weeks weeks ago and am hoping to get those back this week.
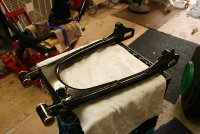
I installed the All Balls tapered steering bearings into the frame and steering stem and will share with you my struggles with that in another post, once I get the video done. I also installed my new bronze bushings into my swing arm using an all thread, some bolts and washers and it worked beautifully. I came to the realization that I needed new dust seals for the swing arm axle bolt, so I am also waiting for those to arrive before I attach everything to the frame. Also on a recommendation from Apex, I would like to upgrade the zerk grease fittings on the swing arm axle bolt before I put all that together, so that’s high on my list.
I also sealed my aluminum engine cases using a product called Shineseal. The whole process took about 3 hrs to do and about 12 hrs drying time. I will also go more into detail about that in a future post.
My new Race Tech springs and fresh fork tubes from Forking by Frank showed up last week! So I will soon rebuild the forks. I am also waiting for my upper triple top to come in from Cognito Moto before I can start putting the front end together, but it’s getting there!
High on my agenda is painting the wheel hubs. I ran into a major wall working on those. My plan was to clear coat them but I realized right before I went to take them that there are rubber bushings in the rear hub! They won’t do well in the baking process that the clear coat requires. My options were to remove them and replace them or leave them in and use a clear coat from a spray can.. I decided on taking the can route! I looked up how to remove them and started the process but I knew it would be a huge pain in the butt and I would damage them significantly. I tried looking up replacements online before I went ahead with that and they were pretty hard to find. I did eventually find them for about $17 US a piece (4 in total). PLUS shipping & import charges which I am finding out recently are quite significant! Also the little pieces behind the bushing that seal the inner hub are literally not findable.. I scoured the interwebs!! But to no avail. I called my friend Rob for some advice and he said to look for a spray clear coat for Mag Wheels. Sure enough I found this stuff, did some research on the results and was very satisfied. So I bought a few cans and I will spray these hubs soon, install the new bearings and brakes and get these darn wheels built! I am very excited to see the Buchanan rims and spokes come together on these hubs!
Lots going on and will post that video as soon as I get my laptop fixed. Back to work!
I finally got my laptop all sorted and finished the video from the last post. Here it is if you are interested:
https://youtu.be/qFTEU2vr2mg
Heading to the workshop tomorrow to do some more work on the bike. Planning on clear coating my hubs and installing the bearings in them. I also received a sweet little package from Bore-Tech and all my engine parts looks INCREDIBLE! I am really excited to get this engine back together!
I was planning on using Hondabond HT to seal the cases. Can anyone advise if this is the correct stuff? Thanks!
Just a quick update. After an 8 week wait, I have received a big ass goody box from the fine folks at Bore Tech. I will update with pics and video later. I clear coated the hubs last week with "Dupli-Color Clear Coat for Wheels" and was NOT very impressed with the results at all. It said in the instructions to leave it for 7 days to cure, so tomorrow I'll go back to the workshop to check it out. I am hoping that the paint will have settled and become shiny over time.. if not I am afraid to say that I will be buffing these parts out again! Probably.. we'll see. If I know myself that is probably what is going to happen. If they look good I plan on installing the bearings and lacing up the wheels.
I have also been spending a lot of time cleaning up the engine cases! They look fantastic (pics to come). I was debating on getting them media blasted but then after I soaked them in Pine-Sol and really pissed everyone off I live with, they looked really really good! So after I purchased a few more items I will be ready to get this engine back together!
To add to Captb's amazing and very handy 'Lower End Assembly Checklist' that's sticky'd in the engine section, I am planing on creating a video/photo check list for people to easily follow when putting this engine back together as I really think it will help a lot of people out. Thanks again Captb for posting that and I will be using it as a guide for my rebuild.
I hope everyone is enjoying the summer! I’ve been (semi) busy with the build and also taking a bit of a step back from everything to enjoy my other motorcycle and the weather here in Canada. I did however recently get some work done in the shop and was able to make a little video from it. I finished up the process of clear coating my hubs and hit a few walls after that. The bearing install on the rear hub went well but not so much for the front hub. It seems I knocked the bearing too far into the hub after placing the spacer inside and I’ve seized the bearings. This is not good at all and means there is too much of a load on the inner race of the bearing. I was pretty annoyed at myself for doing that but after talking to a few friends about it and hearing their stories of stuff they screwed up while wrenching I began to realize this is all part of the process. So, if you ever find yourself screwing up, just remember that it happens to everyone! Learn from your mistake and try again. Don’t give up! (mostly) Everything can be fixed. So I am taking the front hub to a mechanic to get the bearings removed and new ones installed. I found a really reasonably priced set of bearings from Sirius Consolidated and they have a distribution center close by! Bonus not getting it in the ass from the border patrol.
I did not get any pictures of this wrench session due to the fact that I am basically brain dead… When I returned home after my day in the shop I went to remove my memory card from the camera and realized that I had left it in the USB transfer plug beside the computer at home! Basically I was shooting pictures with no memory card all day! lol .. Not my best day in the garage. The screen on my camera is broken so of course I had no idea. Anyway, nothing super exciting in this one, just a clear coat on the hubs and a few odd jobs around the garage for the bike (cleaning bolts, etc) and a bearing install.
Here’s the video if you care to watch:
https://www.youtube.com/watch?v=w3flCA4jej4
Engine Update:
I am in the process of shooting a video of the reassembly process but I ran into a few walls with the engine. I measured my crankshaft with a dial gauge (thanks Dad!) and found that it was out of round in a few places! I am getting different specs from different manuals but basically it’s out of round by about 3 to 4 thousands of an inch. Vets of the site can you please advise??
I talked to one builder about it and he started by asking why I even took the damn thing apart in the first place. I realize that a lot of vets seemed to be annoyed by rookies or ‘home builders’ doing this but to them I say this… “Remember a time when you hadn’t seen the inside of an engine how curious you were to learn and figure it out for yourself?”. That usually wins them over. I am the type of person who needs to take things apart with my own hands, look at how they work and figure it out. I am a visual leaner and for me it was a no brainer to take this engine apart. I know this bike now. I know what every little part does and how it works. It makes me feel good that I know that and I think its important. I will sleep better at night knowing that if anything goes wrong with my bike I will know exactly what it is. That’s owners pride and I’m sure every single person reading this right now can level with me on that.
So.. My question to you is this:
What would you do if you found this on your crankshaft? The same builder who asked why I took it apart suggested that I leave it. His point was that if I’m not racing with this engine, if I’m not taking this engine to the max on a regular basis that I should leave it alone. I can’t say that I don’t agree with him. I don’t plan on winning AHRMA Championship or anything. Can these crankshafts be repaired? Do I find a replacement? Or do I just leave it and seal up the cases?
Thanks in advance for your comments. I am heading on vacation in Europe so it'll be some time before I get to the next post. Take care everyone and enjoy the summer!
"out of round" tells us nothing,there is a very specific procedure for checking the crank berarings for radial clearance and also for concentricity of the crank unit as it is a built up crank
how did you fionmd what you found ?
all that said how did it run did it shake ?
This site uses cookies to help personalise content, tailor your experience and to keep you logged in if you register.
By continuing to use this site, you are consenting to our use of cookies.

")