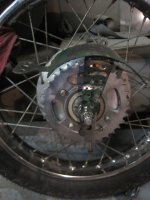
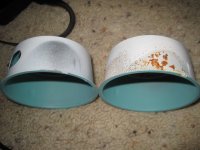
CB360 Cafe Project

frogman said:
While you are in there, check the drum right under the spring for grease on it. They are supposed to be CLEAN but after sitting for years the grease they stuck up higher will fall down and get stuck on the drum which will stick in between it and the little shield thing that sorta covers it. Clean it off and it will rise and fall as it should, not slow or not at all.

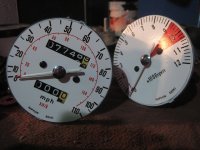
That is the main cause of sticky gauges, when I did the faces on mine I cleaned the shit out of them before I put them back together.

I was wondering why the needle was slow or if that was just normal. Those guages look sweet, I was thinking about doing my needles red but I think I am just painting the tips red. How did you get the tripometer reset thing off the speedo guage? thanks for the help.
 
I got lucky, the screw on the end of mine was not rusted or glued in, it came right out and the knob comes right off. Use the correct sized screw driver and it won't strip it out.
 
frogman said:
I got lucky, the screw on the end of mine was not rusted or glued in, it came right out and the knob comes right off. Use the correct sized screw driver and it won't strip it out.

Ohh I guess 74 are different than a 76, my doesnt have a screw on the end. I have no idea what todo :-\ . Hopefully its easier than a striped loctite screw.
 
Mocked up my chopped fender and attempted to weld it on, but failed miserably. I should have it on sooner or later. I was about to drill two holes and bolt it on. And on the happy side, got a pint of British Racing Green yesterday :) .
 

Attachments

  • fender mockup.jpg
    fender mockup.jpg
    210.9 KB · Views: 318
  • BRG PINT.jpg
    BRG PINT.jpg
    153.4 KB · Views: 323
I have seen this a lot, and think its pretty cool. So I copied it and made it alittle bit of my own. I plan on putting this on the top of my carbs (were the chrome is pitted). I'm thinking about painting the background black and the Ace Cafe green.
 

Attachments

  • ACECAFE.jpg
    ACECAFE.jpg
    129.4 KB · Views: 326
Scanned some of my pictures that are from a week after I got my bike, and the a picture of my seat when I was in the process of building my Cafe seat.
 

Attachments

  • beforebike2.jpg
    beforebike2.jpg
    301.7 KB · Views: 324
  • Cafeseat.jpg
    Cafeseat.jpg
    166.3 KB · Views: 325
Yesterday I striped the paint off of my guages, I am attemping on making them shine like aluminum, but don't know how that will work out. I also remade my cafe bum stop. I used Great Stuff and then shaped it to my likings. Then I used fiberglass and sanded it smooth.
 

Attachments

  • SHapedseat.jpg
    SHapedseat.jpg
    182.9 KB · Views: 309
  • GREATSTUFF.jpg
    GREATSTUFF.jpg
    185.7 KB · Views: 322
  • guagesstriped.jpg
    guagesstriped.jpg
    166.5 KB · Views: 313
  • Guagesbefore.jpg
    Guagesbefore.jpg
    164.1 KB · Views: 299
A lot of pics
 

Attachments

  • FIBERCLOTHSEAT.jpg
    FIBERCLOTHSEAT.jpg
    207.4 KB · Views: 302
  • FIBERSEATSANDED.jpg
    FIBERSEATSANDED.jpg
    160.4 KB · Views: 311
  • Fiberseatdry.jpg
    Fiberseatdry.jpg
    169.1 KB · Views: 328
  • FIBERseat.jpg
    FIBERseat.jpg
    176.2 KB · Views: 314
And more Pics, when using the fiber cloth and the mat I stapled the fiber down using a staple gun, was very helpful.
 

Attachments

  • FIBERCLOTHSEAT2.jpg
    FIBERCLOTHSEAT2.jpg
    211.3 KB · Views: 310
  • FIBERCLOTHSEATWET.jpg
    FIBERCLOTHSEATWET.jpg
    134 KB · Views: 337
Got my battery in the other day and just got around to taking pictures. Its a 2.9 ah 12v battery that weighs 2.2 pounds and as you can see pretty small. It was under $30 too, hopefully it works for what I need it for.
 

Attachments

  • Taillight.jpg
    Taillight.jpg
    194.4 KB · Views: 307
  • Battery.jpg
    Battery.jpg
    131.2 KB · Views: 293
My gauge faces (overlay decals) came in today, and I put them on tonight and look great, or so I think. :D
I am also polishing my gauges (even though they are steel). In the picture I am not done polishing them.
 

Attachments

  • gaugeshalfpolished.jpg
    gaugeshalfpolished.jpg
    157.9 KB · Views: 301
  • Restoredtachspeedo.jpg
    Restoredtachspeedo.jpg
    170.5 KB · Views: 293
Your build is looking really good so far. Keep up the good work and attention to detail. It will really pay off.


Ride safe
 
AH yes, nothing brightens the look up like new faces and polished housings. Make sure you paint the insides of that green part white, it makes for a difference when the lights are on and its dark outside.
 
frogman said:
AH yes, nothing brightens the look up like new faces and polished housings. Make sure you paint the insides of that green part white, it makes for a difference when the lights are on and its dark outside.

Thanks, its good to know this stuff before I put it back together, will do thanks!
 
MILLENNIUM FALCON said:
Your bike is really coming along. Those gauges are going to be sweet. Have you decided on a seat color yet? ;)
Thanks, I was thinking tan for the seat because I am painting it British racing green, but I always liked the tan exhaust wrap and I think I will do my seat black to keep the balance. But I might just suck it up and just get the black exhaust wrap.
 
Today I cut and cleaned up my kickstand, I intended on keeping the rubber piece on the kickstand but when I was taking it off it ripped. I also finish/redone my license plate/tailight bracket, were it hugs the lines of the hub and chain and sproket. My light housings for my guages got painted white, from advice a couple days ago.
 

Attachments

  • Kickstand before.jpg
    Kickstand before.jpg
    169.8 KB · Views: 306
  • kickstandcut.jpg
    kickstandcut.jpg
    180.6 KB · Views: 310
  • Licenseplatebracket.jpg
    Licenseplatebracket.jpg
    142 KB · Views: 288
  • Lighthousingbefore.jpg
    Lighthousingbefore.jpg
    136 KB · Views: 314
Back
Top Bottom