CBX550-Brat/urban scrambler on a budget

Thanks for all the feedback and advice everyone, I feel a final strip down of the m/c to check n clean it again is on the cards before going ahead with a repro m/c from a trusted supplier,David Silver in the UK, as I can get a complete repro m/c for £30 whereas a repro repair kit is £25....hope the repro m/c works out?

Thank you XB33...I'm doing my best on my jack jones, save for a very helpful neighbour.
 
Righto....in lieu of the new m/c arriving early next week, I'm onto the carbs/throttle.

We all know what a dirty set of carbs looks like, but I'l still leave these with you for comparative purposes later on.


Although a job I wasn't particularly looking forward to I got on with it and they soon came away, once a subtle prising eased the intakes off the rubber housings.

I have a complete spare set which I'm using as a reference and donor if needed.

More of the progress when I can.
 
NoRiders said:
Righto....in lieu of the new m/c arriving early next week, I'm onto the carbs/throttle.

We all know what a dirty set of carbs looks like, but I'l still leave these with you for comparative purposes later on.


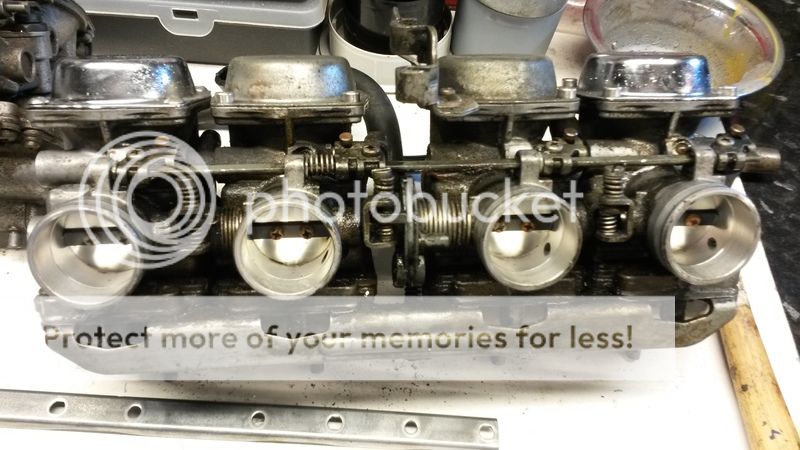
I managed to find time this arvo to set about the carbs, laboriously working my way through each carb (remembering to mark them) having undone the link bars and choke mechanism, finally separating them by the fuel/vacuum pipes and disengaging the throttle levers.


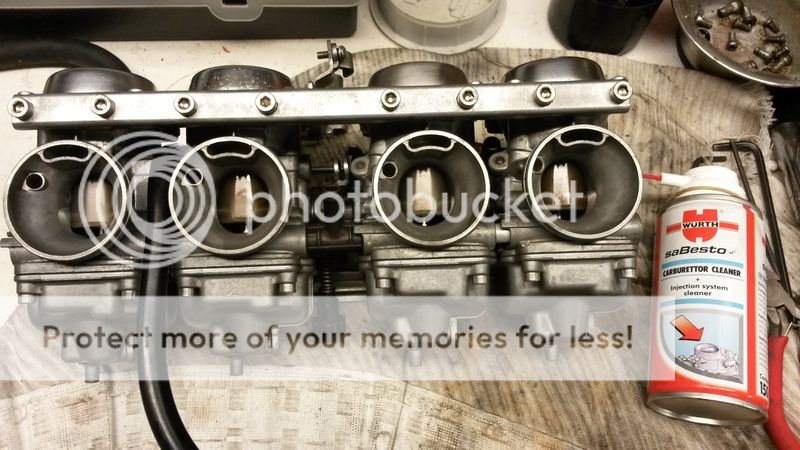
Stage 1: Degreasing outside with h/d de-greaser which is excellent, brisk scrub using her hair dye applicator brush, nice and stiff but flat and ideal for getting into nooks and crannies.

Stage 2: On the bench, a quick wipe and then strip down choke plunger, polish ready to go back. Remove diaphragm cap to clean inside and replace with cleaned up caps. Replaced one diaphragm as the seal had mishapen on the old one making the piston slower to rise than the others. Remove float bowl, bit of crud low down but nothing too onerous (given the time it's sat), quick Wurth carb cleaner get it very clean, very quickly, awesome stuff.

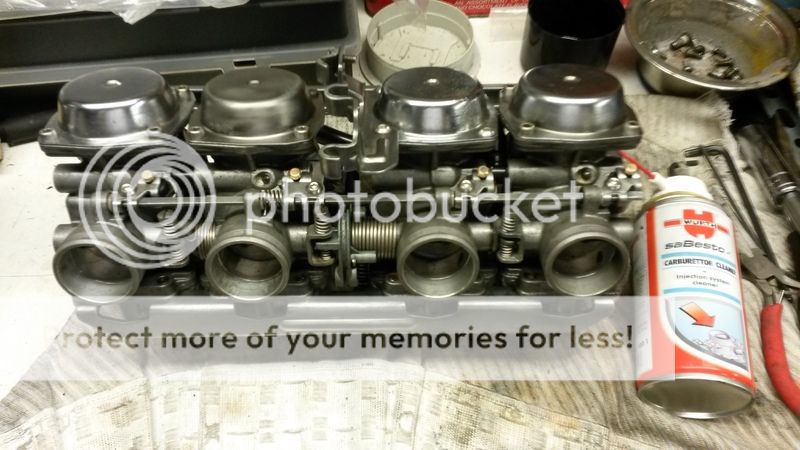
Stage 3: Rebuild each carb (did this as I went, one at a time) replacing some screws with allen/button screws instead. Replaced the fuel link pipe O rings. Wire-wheeled small brackets and fixing bars which came out OK I think.
NB: I would've struggled if I didn't have the spare set to use as a guide, priceless!

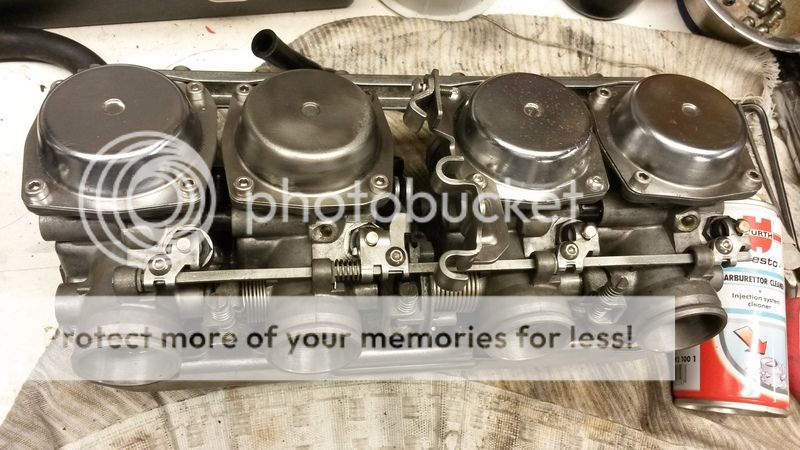
I hope the float bowl seals don't leak as I reused the old one's (gulp), all in all I'm very pleased with the way they look, not too flashy, just purposefully clean and smart :D

Thanks for checking in everyone. Colin
 
CarbsAndCylinders said:
They look very nice!

Cheers Crabs&Clymidia.......I reused parts so they're not 100% perfect looking, but good enough for me ;) Hope they work OK? They always did so I'm not too concerned tbh.
 
NoRiders said:
Cheers Crabs&Clymidia.......I reused parts so they're not 100% perfect looking, but good enough for me ;) Hope they work OK? They always did so I'm not too concerned tbh.

The crabs feed off of the clams, by the way.
 
NR they look great to me.. you should be fine if those bowl gaskets were not completely shot.. if you do get a leak replace them .. resist the urge to go monkey boy on the bowl screws.

Sent from my SM-G903W using Tapatalk
 
Psycrow said:
.. resist the urge to go monkey boy on the bowl screws...

Thank you.

I nipped then pinched them up with an allen key.

I could try a cheeky pre-fitment petrol fill up of the bowls I suppose...hmmm?
 
Cracking on today with fiddly, but important detailing of clutch lever spindle lube, choke & throttle cable (x2 pull/pull system) lube and clean up of mechanisms prior to fitting the carbs back on. Cleaned the 4x inlet clamps and minor fittings to get as much cleaned so they don't let the other stuff down.

I have to say, the bench wirewheel is worth it's salt and I do love a good session on it. The quality of the Honda screws and fittings is impressive, 1982 bike and they come up like new.

Polished the choke lever for shit n giggles and to match the m/c cover on the other side.


Carbs slid on with no problems (with a smear of silicon grease), cables were a bit fiddly, mainly due to me having not done them before, all sorted and working as they should which is good progress.


Spotted the starter solenoid looking sorry for itself, so 10 minutes later after a degrease and wirewheel and it's looking much nicer.

Before.


After.


Ordered some breather and fuel pipe as well as proper clips....don't like using jubilee clips on small bore rubber pipe, they look shite and don't do up round so I don't trust them.

Half way through mounting the ignition switch under the seat by the air filter box....more anon.
 
xb33bsa said:
jew-bullyclips ? :eek: :-X

Haha...over here they're called Jubilee and look like this:


OK in larger format for water hose etc, but in the small form-factor they suck.

I prefer these as they close up on pipe rather nicely and they look good as well, far less cumbersome and clunky IMO.


Thanks for popping by...
 
its too bad nobody has adopted the clampless hose deals like aeroquip has for gasoline/fuel
the the fitting end what pushes into the hose requires no clamps and is good for 250 psi

see the hose has got braided reiforceement to limit stretch the fittings have perfectly sized and shaped barbs
once you puish a fitting in hose and give it a few twist to let the undercut barbs to cut in the only way to seperate it ,is cutting the hose off its bitchen

http://aeroquipperformance.com/lookup.html?supercat=12
 
xb33bsa said:
its too bad nobody has adopted the clampless hose deals like aeroquip has for gasoline/fuel
the the fitting end what pushes into the hose requires no clamps and is good for 250 psi

see the hose has got braided reiforceement to limit stretch the fittings have perfectly sized and shaped barbs
once you puish a fitting in hose and give it a few twist to let the undercut barbs to cut in the only way to seperate it ,is cutting the hose off its bitchen

http://aeroquipperformance.com/lookup.html?supercat=12

Aeroquip does look like some top gear, confusing array of options though, so one would need to know what type to use.

What project/bike have you used this on XB33? Be good to see it in real life situation.

I think for my humble project good quality R6 fuel line will do fine.
Ethynol in fuel today is perishing old fuel lines as well as plastic fittings such as fuel gauge floats etc.
 
NoRiders said:
Aeroquip does look like some top gear, confusing array of options though, so one would need to know what type to use.

What project/bike have you used this on XB33? Be good to see it in real life situation.

I think for my humble project good quality R6 fuel line will do fine.
Ethynol in fuel today is perishing old fuel lines as well as plastic fittings such as fuel gauge floats etc.
i havent used it as fuel line was just sayin the concept was neat
the hydraulics repair and service shop i worked in had a complete hardware store of all kinds of shit and aeroquip was a majpr supplier so i was exposed to it there
 
I have been thinking about some form of bash plate to continue the scrambler look and had a few ideas sprialling around my mind....so, I should mock the zorst just to see how it looks, here's the result of my cheeky mock up.


Not sure a bash plate could be made to work as the down pipes are so far from the engine it'd look a bit weird I reckon.

And yes, the downpipes are different colours.....platinum outside and black inside as I had thought the lighter outer wraps and darker inners would give it the looks of a twin....didn't come out as I have imagined tbh.

I'm toying with shortening the centre section which will pull the silencer back towards the engine/undercarriage which could look cool......but it involves cutting n shutting it....maybe in phase2?

For now, I'm pleased with how it looks.
 
Finally....I have front brakes that work...hurrah.

The new m/c unit worked out of the box, bled through first time and I now have firm feel on the lever. I'll leave it for a day or so and bleed them again.
 
Wiring...that is all!


Now you see them....


...and, now you don't :)


Made very good progress today, working alongside my son who made sense of the wiring and the mods I needed to make as I've relocated the ignition switch from dash to under the seat...entailed cutting into the main loom and branching off the ignition wiring with a few mods along the way. Sticky sticky mess but it's getting there....I'm very pleased, thank you Matthew :)
 
A job I'd had in mind for sometime now was how to mount the front mudguard. I really liked the hooped frame style like the old skool trials bikes.......you see the theme I'm following right?

So, what materials to use? I had bought a double hoop frame mount but it was to tight and chromed, so my son has it now.

I sourced a friend who could roll/bend 8mm thickwall mild steel tube which was well worth the drink he wanted.

I chopped the original Honda mudguard bracket as all I wanted was the end mount hole section. This would provide the perfect mounting plate to which I weld the steel hoops to. These were cut to size and slotted to fit the plate ready for a drop of weld.

Here's how phase one turned out:


Since this image I've cleaned the plates up and ground down the rough edges ready for paint.

Here's a shot of the hoops in place. You can just see the hoops slid over the plate.


I'll weld a tab so I can bolt the guard to the frame.


I plan to paint them gloss black I reckon. Welding tomorrow.
 
in my opinion that fender bracket is outstandingly perfect actually ,..... you designed it yourself ,it perfoms the function perfectly with a very pleasing aesthetic,you like it and it looks the business
you might consider using some kind of p clamp (adel clamp)to join the fender to the tubing in say 4 locations no more welding needed either
you can get very trick looking ones ,stainless steel with for example white teflon or blue silicone rubber lined
https://www.google.com/search?q=silicone+lined+p+clamp&rlz=1C1FLDB_enUS562US569&espv=2&biw=1371&bih=765&source=lnms&tbm=isch&sa=X&ved=0ahUKEwiw6fjetufNAhVC7GMKHYMWBQoQ_AUIBygC#tbm=isch&q=silicone+lined+p+clamp+aircraft+adel+
 
Back
Top Bottom