1971 CB350K Rebuild/Restore/Mild Cafe

Tifun

Indy
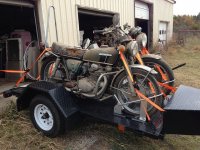
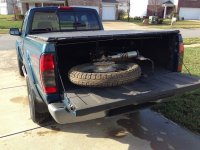
About 9 months ago my buddy tells me "Hey my grandpa says he has some bikes we can have if we just go pick them up." What! I'm game....long story short his grandpa lives in Oklahoma, us.... Indiana. 13 hours each way and we picked up 2 bikes, a CB350 and a CB750. We decided after many hours of driving the we would do the 350 for him and I'd keep the 750.

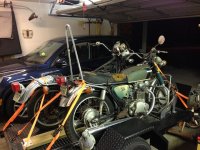
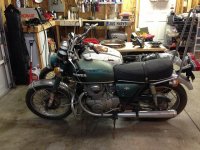
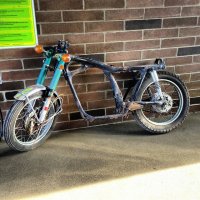
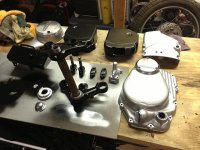
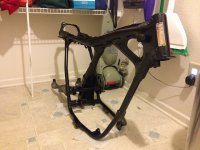
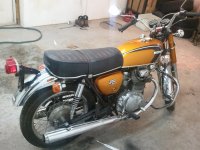
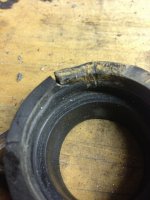
The 350 for the most part was a very complete bike and sat in a pole barn since 1993. It has the usual rot for a Honda, pipes rotted out from the bottom and the cheap chrome had it's fair share of buildup. Paint on the frame in some spots were down to the metal and there appears to have been a few guests that decided to make a small home in the air boxes(thank god the throttle bodies were closed!).

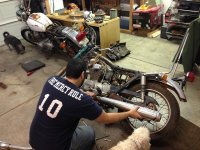
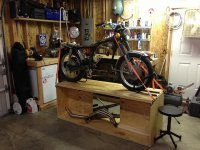
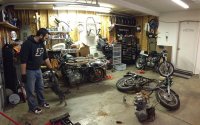
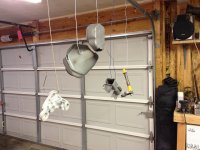
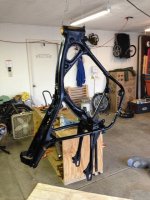
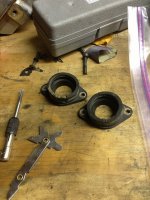
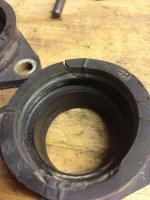
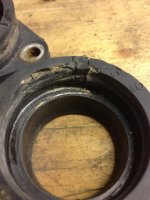
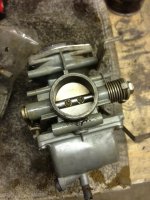
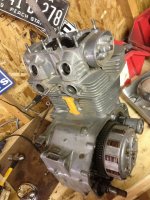
After a mostly uneventful trip back to Indiana we began tearing the bike down and planning what the finished product would be. It' been determined that it will be a full tear down with mostly restoration work and some standard cafe style cues. I could go on with what we want to do but I don't want to disappoint anyone when things change(which they do on the fly each day we wrench on it).

Well, that's the main story... on to the pictures :)

-Keith
 
Loaded up on Mothgils trailer (awesome guy to know and glad I met him through another avenue).

We began the tear down which went really smooth, only a few screws got in the way that we were able to remove with a few taps on the impact driver.
 

Attachments

  • image.jpg
    image.jpg
    166.1 KB · Views: 790
  • image.jpg
    image.jpg
    155.3 KB · Views: 798
  • image.jpg
    image.jpg
    156.1 KB · Views: 757
  • image.jpg
    image.jpg
    159.6 KB · Views: 913
More progress...
 

Attachments

  • image.jpg
    image.jpg
    233.1 KB · Views: 918
  • image.jpg
    image.jpg
    146 KB · Views: 907
  • image.jpg
    image.jpg
    144.2 KB · Views: 910
  • image.jpg
    image.jpg
    136.5 KB · Views: 896
More progress...
 

Attachments

  • image.jpg
    image.jpg
    135.7 KB · Views: 951
  • image.jpg
    image.jpg
    127.4 KB · Views: 1,003
  • image.jpg
    image.jpg
    132 KB · Views: 1,025
  • image.jpg
    image.jpg
    131 KB · Views: 974
We are a little more than a month into this project and really only have one day a week that we work on it for about 4 hours at a time. Today I finished some prep work and sprayed some minor bits in preparations to reassemble. The engine is currently on the bench getting cleaned and prepped for paint. I also began some polishing of a few items as well.

From what I can tell the bike was put to rest due to a bad magneto which I suspect they couldn't figure out was the issue. From what we can tell, the internals look great with minor build up of carbon. They really did try to take care of it up until it was parked. Needless to say we are excited that the bike is getting closer to reassembly.

-Keith
 
I'm doing a similar project right now. 1971 CB350K3. Stock or mostly stock. What did you paint the engine cases with? I'm trying to decide wether to polish stuff or go totally stock and just repaint the engine case. Dont let the pics fool you. It was nice from far but far from nice. I paid $800 for mine too (not running).
 

Attachments

  • 2012-12-11 16.43.30.jpg
    2012-12-11 16.43.30.jpg
    450.5 KB · Views: 226
We are using VHT cast aluminum high temp paint and curing it. It's been pretty tough so far. The engine hasn't been painted yet, only the large covers have been painted so far. The 2 removable service covers are getting polished along with the dip stick. Along with that is the new Allen bolt hardware kit which is a must IMO. The engine is getting the 2-tone treatment, black jugs and silver case. The paint is a little darker than stock but the light metallic is a nice touch.

The only other bits getting polished are the valve caps which are about 75% complete. Need to get another stick of polish and a fresh wheel. Gotta love the Harbor Freight polisher haha, worth every penny.
 
When we pulled the trees out the headset ball bearings disappeared as they all fell out on the floor lol. Basically, what are folks doing with that? I'd love to find a sealed bearing and cup set if it exists. Any suggestions?????
 
Thanks Andrew!

I found them on their site. $44,not terrible considering it includes new cups!

http://www.allballsracing.com/22-1011.html

-Keith
 
Tifun said:
We are using VHT cast aluminum high temp paint and curing it. It's been pretty tough so far. The engine hasn't been painted yet, only the large covers have been painted so far. The 2 removable service covers are getting polished along with the dip stick. Along with that is the new Allen bolt hardware kit which is a must IMO. The engine is getting the 2-tone treatment, black jugs and silver case. The paint is a little darker than stock but the light metallic is a nice touch.

The only other bits getting polished are the valve caps which are about 75% complete. Need to get another stick of polish and a fresh wheel. Gotta love the Harbor Freight polisher haha, worth every penny.
I bought high temp engine paint. I think it may be VHT. I also go the clear so I can put a bunch of coats so the paint doesn't wear trhough and look crappy again in no time. How are you "curing" it? I have mine right beside my wood stove. Maybe I should set them on top? I was temped to polish a bunch or stuff, replace the philips bolts with allen etc. but I got to stick with my origonal plan to go stock on this one. Once I get a stock mint CB350 I'll maybe build a cafe one.
 
I didn't do the clear. I'm still not comfortable enough with the process to feel secure that it wont yellow even after curing. I'd love to have the added gloss and extra protection but it's really not a huge deal for this build. As for curing, I use a kerosene heater and hang the freshly painted parts over the heat for about 2 hours. I have one of those keychain heat lasers and after checking the parts an hour in they were about 10 degrees hotter than what the can recommended, so considering that it may not be the most accurate gauge, I feel good enough that the curing/baking is adequate. One of the parts fell off the bench 4 foot or so and landed pretty hard on the concrete and had no blemishes. It's pretty strong stuff IMO, I'm a believer haha. Basically as long as you do it like the can states it should hold up pretty good. You can also use your oven but my wife would prolly kill me so I'm not even going to attempt that one haha. Or use the wood stove. We cure screenprint at work and found it's makes a considerable difference with durability when cured.

-Keith
 
Tifun said:
I didn't do the clear. I'm still not comfortable enough with the process to feel secure that it wont yellow even after curing. I'd love to have the added gloss and extra protection but it's really not a huge deal for this build. As for curing, I use a kerosene heater and hang the freshly painted parts over the heat for about 2 hours. I have one of those keychain heat lasers and after checking the parts an hour in they were about 10 degrees hotter than what the can recommended, so considering that it may not be the most accurate gauge, I feel good enough that the curing/baking is adequate. One of the parts fell off the bench 4 foot or so and landed pretty hard on the concrete and had no blemishes. It's pretty strong stuff IMO, I'm a believer haha. Basically as long as you do it like the can states it should hold up pretty good. You can also use your oven but my wife would prolly kill me so I'm not even going to attempt that one haha. Or use the wood stove. We cure screenprint at work and found it's makes a considerable difference with durability when cured.

-Keith

Mine isnt VHT but same idea it is 500degree engine paint. I set my pieces on top of the woodstove last night. That is about 500 degrees so that should cure it pretty good. I havent put on the clear coat yet gonna try that today then in a couple days dump some gas on the pieces and see what happens.
 
Wyld Bill said:
Mine isnt VHT but same idea it is 500degree engine paint. I set my pieces on top of the woodstove last night. That is about 500 degrees so that should cure it pretty good. I havent put on the clear coat yet gonna try that today then in a couple days dump some gas on the pieces and see what happens.

Do you have a build thread yet Bill? I'd like to follow it along :)

-Keith
 
Kewl build.............scribed.

I'm looking to do these very same things with my 350.

I'm going for the complete original restore, or at least as close to original as possible.

Very little budget...........closer to none.
 
Tifun said:
Do you have a build thread yet Bill? I'd like to follow it along :)

-Keith
Not on here yet but on Hondatwins ::) http://www.hondatwins.net/forum/viewtopic.php?f=5&t=20072
 
I finally got the carb boots off the head after about 20 minutes of tapping with an impact driver. With that I think we need to replace them. I fear it's too much risk for an air leak. Thoughts???
 

Attachments

  • image.jpg
    image.jpg
    152.7 KB · Views: 385
  • image.jpg
    image.jpg
    119.4 KB · Views: 419
  • image.jpg
    image.jpg
    119.1 KB · Views: 384
  • image.jpg
    image.jpg
    118.4 KB · Views: 372
I've been cleaning this engine for few days now to get it ready for paint. Oklahoma dirt is tough as nails! Mixed with 40 years of hardened grease isn't making it any easier haha.

Also, the carbs are stuck. I can't get the butterfly to move on one carb :( Looks like we will be tearing the carbs all the way down to a shell verses the standard rebuild. I have it sitting in a large ziplock with penetrant oil. I'm off to get a haircut then I'll check back in hopes that it at least starts to move.

-Keith
 

Attachments

  • image.jpg
    image.jpg
    115.1 KB · Views: 384
  • image.jpg
    image.jpg
    161.2 KB · Views: 378
I'd go ahead and get those replace. I had the same thing going on with mine and definitely was not getting a good seal.
 
Back
Top Bottom