We noticed you are blocking ads. DO THE TON only works with community supporters. Most are active members of the site with small businesses. Please consider disabling your ad blocking tool and checking out the businesses that help keep our site up and free.
You are using an out of date browser. It may not display this or other websites correctly.
You should upgrade or use an alternative browser.
You should upgrade or use an alternative browser.
Project "walrus" Yam XS 750
- Thread starter 2_DONE_THE_TON
- Start date
Re: Project "walrus" Yam XS 750
Thanks tim!
Did you guys rebuild youre brakes...how the hell did you get that d**** clip on the rubber dust cap...there just a tiny ridge for it...is there a trick to it?


Gesendet von meinem SM-A310F mit Tapatalk
Thanks tim!
Did you guys rebuild youre brakes...how the hell did you get that d**** clip on the rubber dust cap...there just a tiny ridge for it...is there a trick to it?
Gesendet von meinem SM-A310F mit Tapatalk
XS750AU
Coast to Coast
Ryan
Confession time. I had never serviced the front calipers as they were working fine. I did put on braided hoses, but all I did was bleed the caliper. I had some kits, so with your question I thought it was time!!!!!
Pulled the caliper off and there was no dust cover or seals - bugger!!
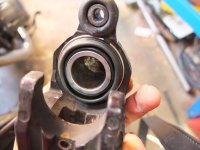
So the photos below are the fitting of the rubber seal and dust boots. Note one kit had a rubber washer and one kit did not- no idea why? The schematic in the repair manual does show the washer, but it was oversize compared to the piston and appears to just sit on top of the caliper boss. So one side has the washer and one side does not.
The photos are the sequence of assembly - the wire clip goes on the outside of the boot to clamp the boot to the caliper boss.
Cheers
Tim
Confession time. I had never serviced the front calipers as they were working fine. I did put on braided hoses, but all I did was bleed the caliper. I had some kits, so with your question I thought it was time!!!!!
Pulled the caliper off and there was no dust cover or seals - bugger!!
So the photos below are the fitting of the rubber seal and dust boots. Note one kit had a rubber washer and one kit did not- no idea why? The schematic in the repair manual does show the washer, but it was oversize compared to the piston and appears to just sit on top of the caliper boss. So one side has the washer and one side does not.
The photos are the sequence of assembly - the wire clip goes on the outside of the boot to clamp the boot to the caliper boss.
Cheers
Tim
Attachments

XS750AU
Coast to Coast
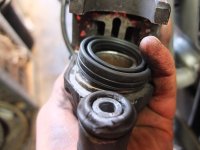
Found the second rubber washer, so now they both have them fitted.
To get the metal clip on.
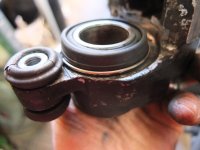
Have the boot fully seated down on the caliper boss.
With the clip on the boot, push one free end of the clip down into position and then work you way around to the other end. I used a blade screw driver to push it down.
Cheers
Tim
To get the metal clip on.
Have the boot fully seated down on the caliper boss.
With the clip on the boot, push one free end of the clip down into position and then work you way around to the other end. I used a blade screw driver to push it down.
Cheers
Tim
Thanks tim!
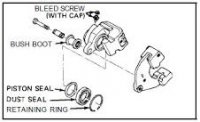
Interesting there are just 4 parts on my brakes:
1.)the brake piston (chromed)
2.)the rubber boot
3.)a circlip the pin the boot dowm
4.)the seal that sits in the notch where the piston slides up and down.
The rubber seal (4.) that you show in your first pic above belongs into the notch IN the brake assembly...or am I missing something") ?
?
Gesendet von meinem SM-A310F mit Tapatalk
Interesting there are just 4 parts on my brakes:
1.)the brake piston (chromed)
2.)the rubber boot
3.)a circlip the pin the boot dowm
4.)the seal that sits in the notch where the piston slides up and down.
The rubber seal (4.) that you show in your first pic above belongs into the notch IN the brake assembly...or am I missing something
?Gesendet von meinem SM-A310F mit Tapatalk
XS750AU
Coast to Coast
Re: Project "walrus" Yam XS 750
Hi Ryan
Yes that makes sense. The trouble with the kits I had was that the rubber washer/seal was oversize. As you coul see in the photo it was the same OD as caliper boss. Do you you have a photo? Does it go on the piston? Or does it fit into the caliper body?
Thanks
Tim
Sent from my GT-I9506 using Tapatalk
Re: Project "walrus" Yam XS 750
I will send you a pic tomorrow my friend!
Cheers
Gesendet von meinem SM-A310F mit Tapatalk
I will send you a pic tomorrow my friend!
Cheers
Gesendet von meinem SM-A310F mit Tapatalk
Re: Project "walrus" Yam XS 750
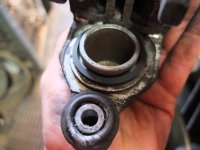
Today I dissaasembled another brake (rear).
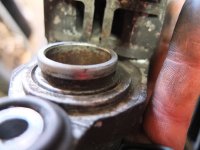
Rubber washer sits in piston,reakly important to clean all the dirt thats behind seal.I use a dremel with a rubber polishing device,works nicely.
The rubber boot sits in a notch on the piston and getd pinned down with clip.
Think I found out why it was impossible to put the rubber boot back,I used petroleum on the other brakes in order to clean.....BIG mistake...seems to mess with the rubber.
They get new kits anyways...
Would you recommend buying stainless steel pistons,my stock ones look brilliant after I cleaned them...


Gesendet von meinem SM-A310F mit Tapatalk
Agree.XS750AU said:Agree Dave
They have got to fit into the caliper body - not on the piston.
The seals in my calipers are not leaking so I will take the spares out for when needed.
Thanks
Tim
Today I dissaasembled another brake (rear).
Rubber washer sits in piston,reakly important to clean all the dirt thats behind seal.I use a dremel with a rubber polishing device,works nicely.
The rubber boot sits in a notch on the piston and getd pinned down with clip.
Think I found out why it was impossible to put the rubber boot back,I used petroleum on the other brakes in order to clean.....BIG mistake...seems to mess with the rubber.
They get new kits anyways...
Would you recommend buying stainless steel pistons,my stock ones look brilliant after I cleaned them...
Gesendet von meinem SM-A310F mit Tapatalk
Re: Project "walrus" Yam XS 750
Gesendet von meinem SM-A310F mit Tapatalk
I heard that they do tend seize easier than the stainless ones...but I guess this only happens when you leave then unused for a long time.semmins said:If there's no pitting on the outside of your stock pistons, no need to replace them.
Gesendet von meinem SM-A310F mit Tapatalk
Brake fluid (most types) are quite hygroscopic which means it attracts and absorbs moisture. That's why the pistons corrode if you don't swap out the fluid once in a while. Stainless helps a lot to stop this (stainless still rusts under this sort of situation) but the fluid performance can go terribly wrong if allowed to accumulate enough water so you still need to change fluid at regular intervals. I wouldn't use any sort of power tool on any interior brake part unless I was honing a bore which is these days pretty much a last resort. I also don't let any sort of chemical near any brake components except brake fluid (anti-squeal vibration dampening goo and grease for sliding pins and housings being the exception), and commonly have a little bowl to dunk parts in as they get assembled.
Thanks Mobius for chiming in!
I´ve been busy with minor things (life), the last days but i´ve collected a variety of new parts.
Just ordered new seal kits for the brakes,forks et cetera.
How do you guys decide if a fork needs servicing or not?
My fork seals seem to be good in shape (no oil or dirt whatsoever),the chrome on the fork legs is good, no pitting or scratches.
Would you guys just drain the fork oil and let it be?the forks seem to be a bit saggy, but that could also be because of the weight of the bike...there are some kind of adjusters on top, maybe i can just readjust them.
thanks in advance!
XS750AU
Coast to Coast
Re: Project "walrus" Yam XS 750
Hi Ryan
Don't let forks scare you, 1970s forks are very simple. As a minimum drain the oil and replace with new. After 40 years with a heavy bike resting on them the springs will have sagged. So a new set would make a difference. They are easy to get out. You may need to spray some penetrating oil around the end plug to free it up. You push the end plug down 1 or 2 mm and with a small blade screw driver lever out the retaining clip. The spring can then be removed. Once you have removed the spring you can wash the fork out and flush out any rubbish. New oil and springs at the correct length will make a difference.
Cheers
Tim.
Sent from my GT-I9506 using Tapatalk
Re: Project "walrus" Yam XS 750
Thanks Tim!
Then I guess I will do the forks too.What do you think about Progressive Springs for the XS?generally new springs are darn expensive (100 euros here in austria)...
XS750AU said:Hi Ryan
Don't let forks scare you, 1970s forks are very simple. As a minimum drain the oil and replace with new. After 40 years with a heavy bike resting on them the springs will have sagged. So a new set would make a difference. They are easy to get out. You may need to spray some penetrating oil around the end plug to free it up. You push the end plug down 1 or 2 mm and with a small blade screw driver lever out the retaining clip. The spring can then be removed. Once you have removed the spring you can wash the fork out and flush out any rubbish. New oil and springs at the correct length will make a difference.
Cheers
Tim.
Sent from my GT-I9506 using Tapatalk
Thanks Tim!
Then I guess I will do the forks too.What do you think about Progressive Springs for the XS?generally new springs are darn expensive (100 euros here in austria)...
XS750AU
Coast to Coast
Hi Ryan
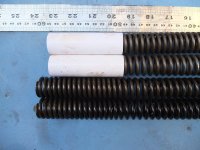
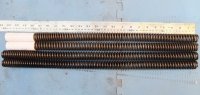
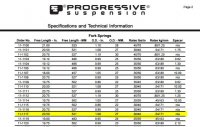
Originally they did not have progressive springs. I fitted Progressive Suspension part number 11-1117 to the 750 when serviced my forks. The XS factory spec states the free length was 503mm as you can see in the photo the original springs measure closer to 493mm. Not much sag but still have sag. The Progressive Suspension 11-1117 free length is 521mm with a progressive rate. That meant a 18mm preload - they do bottom out (and thats not on the Paris to Dakar either!). I weigh 90Kg so you can judge from there how they would suit you.
Unfortunately there is not a lot of choice on spring rates that I have found. I believe Hagon sell fork springs but I have not got the data on them. Progressive do make a higher rated spring (11-1107) but it is only 457mm long, so would need a 50mm spacer, which is doable.
The longer springs you can see in the photos are from the XS750SE which is the basis for the 896 which I am building up. Their specified free length is 606mm and they are measuring 600mm. I am going to have a play with the 2D springs which are currently measuring 493mm to see if I can reset them to 500+mm. Involves stretching and heat - just got to confirm the heat process. I believe it is just low temperature stuff though!! Anyone out there that has reset their springs???
Cheers
Tim