Follow along with the video below to see how to install our site as a web app on your home screen.
Note: This feature currently requires accessing the site using the built-in Safari browser.
We noticed you are blocking ads. DO THE TON only works with community supporters. Most are active members of the site with small businesses. Please consider disabling your ad blocking tool and checking out the businesses that help keep our site up and free.
About time I did a build thread. A lot of it will be a bit retroactive since I started the project back in October of 2012. But don't worry -- it is not done yet !
Why the name "Cafe Interruptus"? Well, we moved in May 2013 and I lost my garage workshop for a few months. But I did manage to get the bike running just before I lost the shop which was no small feat as you'll see from the photos describing the engine teardown.
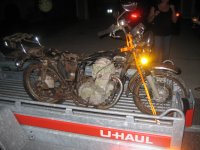
To kick things off I'll show some pics of the bike as I acquired it in March 2012 (it sat for a while as I finished my 1963 CB77 restoration.) The last pic in this post is a teaser of what it looks like today. Next milestone is to get all fabrication done and ride it around a bit to shake the bugs out. Then it will be completely disassembled for polishing and painting.
I learned a great lesson about buying used bikes with this one. If I had it to do over I would have passed this one by. I certainly would've looking into the intake and exhaust ports which at first glance would've told anyone this bike was too far gone.
But I got carried away with wanting a new project and I had just installed a trailer hitch on my car. So when the CL ad appeared I talked to the guy looked at the pictures and decided it was worth the 1+ hour trip to go see it. So I rented a motorcycle trailer from u-haul and set out.
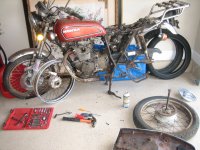
Anyway, first order of business was to get it apart which was complicated by the fact that nothing moved. I had to cut the chain off with an angle grinder and cut the tires off with a reciprocating saw.
It took a lot of work to get the engine out of the frame because the starter was in the way. Getting the starter off resulted in the first of many broken bolts.
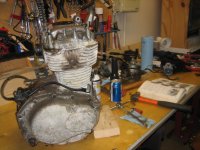
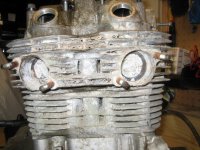
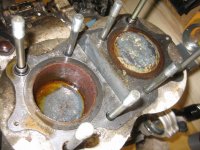
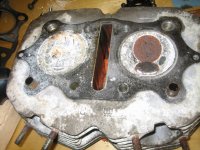
First pic engine out, second and third: uh-oh. Both pistons were completely frozen and the cylinder head was full of what appeared and acted like concrete. You could not even see the left cylinder's valves.
It took a lot of work to get the pistons freed up. Heat, penetrating oil; I even drilled holes in the top of the pistons hoping they would collapse inward.
Ultimately they finally started to move once I bought a bigger (4lb) hammer.
Cases are finally split. Hopefully bottom end is still OK after all that pounding.
I bought a 40lb sandblaster from HF and modified it for soda blasting using a kit from Eastwood. HF now sells the same Soda conversion kit (for a lot less.) Soda blasting cleaned the cases up nicely (and killed the grass in my side yard putting me in the dog house with the wife.) Soda is easily cleaned with warm water vs. sand which you can never be sure of getting completely out of every nook and cranny of the engine.
Cylinder heads was missing aluminum around the valve seats. It was like hard water loaded with lime-scale and calcium had literally eaten away some of the aluminum. Cylinder walls were so rusted and pitted they they seemed unusable so I bought a used cylinder and head off eBay.
I found some 3rd over pistons and rings via CL and took them downtown to the machine shop and had the cylinders bored and honed to match the pistons for $40 a hole. Pic also show various other parts being accumulated for the build.
Used Duplicolor high heat primer on the engine parts after they were thoroughly cleaned.
Then painted them Duplicolor black and aluminum.
And baked them in the oven for an hour at about 250-degrees (while the wife was out, of course.)
Engine went back together rather uneventfully except for the usual head-scratching and double-checking related to the cam-chain tensioner.
Just about buttoned up. Even the advancer was seized and had to be completely disassembled, cleaned, lubed, and reassembled using new springs.
I later bought a allen-bolt kit from Alloyz Boltz (via Dime City) Wish I had done that up front vs. going back and replacing all the bolts later.
you picked the right bike to cafe, it pains me to see a good condition bike turned into a cafe when there are so many that are in similar if not better condition than yours that could be cafe'd. ill post a pic of my "restoration" in a few.
Long about March 2013 we were getting ready to move and I was in a race against time to try and get the bike put somewhat together so it'd be easier to move. I also wanted to hear the newly rebuilt engine at least fire-up.
So I sandblasted the frame (with a second HF 40lb sandblaster) and sprayed it with rattle-can etching primer so it would not rust (again) while sitting in a storage unit for who knows how many months.
And installed the engine and enough other parts to get a rolling chassis.
Carbs were in rough, seized shape as well. I broke several parts of one of them getting it apart. eBay to the rescue once again as I bought another carb. So using parts from three different carbs I built two good ones. The diaphragms were junk, of course, so I bought new ones from http://jbmindustries.com/
Using an auxiliary tank from I was able to fire it up. I used an iPad to film the momentous occasion and posted it to youtube:
https://www.youtube.com/watch?v=H6d8TA44oq4
It's always so damn cool to hear an engine you've built with your own two hands fire up for the first time.
you picked the right bike to cafe, it pains me to see a good condition bike turned into a cafe when there are so many that are in similar if not better condition than yours that could be cafe'd. ill post a pic of my "restoration" in a few.
I'm raising this thread from the dead. After I got the engine running we moved and the bike as in storage for several months. We now pretend that it is June 2013 when I was finally settled enough in the new garage to begin work again.
First thing I tackled was pulling dents out of the tank. I strapped the tank down to the frame and used a dent puller add-on for my Eastwood Mig 175 and it worked with limited success. The pins would sometimes not have been welded well enough and would pop up when I used the slide hammer. Other times the pin would rip off and leave a hole in the tank.
So there was lots of extra welding to seal up those holes. BTW, the tank had been been sitting empty so long that I knew it was safe enough to weld on it.
I also decided (I can't recall why) to replace the Honda filler neck/cap and replace it with a weld-in filler neck and cap from TC Bros:
After a little body-filler:
As sketchy as this tanks looks I later sealed it with Caswell and am happy to report that it never leaked.
In July, 2013 it was time to tackle the frame. Since this will be a cafe racer there must be an open-triangle (it's the law, you know and a rear-hoop. So I chopped off the rear of the frame and a few other bits:
Obligatory shot of the chopped-off bits:
A neighbor threw out an rusty old hand-trunk and I saw an opportunity for metal tubing with bends already in it:
By October, 2013 I was playing around with an electronics tray and battery box. I decided I was not interested in spending $100+ for a tiny battery and would instead use a $30 AGM 12v-12ah unit. This composite photo shows the tray and the battery box as well as some brackets I welded on for the seat.
Thanks!
In November, 2013 I started working on the rear-sets. I had bought a universal kit (via Dime City, I believe) and had to figure out where and how to mount them to the frame. For some reason I did not want to use the passenger peg mounts for this.
So I started playing around with some 1/4-inch plywood templates of what would eventually be aluminum. My plan was to weld steel brackets to the frame, bolt an aluminum bracket to the steel bracket, and finally bolt the rear-sets to the aluminum piece.
Here's the steel bracket:
And here's the aluminum pieces made from the plywood template:
I had to build the engine-side shift linkage and decided to use the cannibalize the shift-level:
I did something similar for the brake side. I cut down the brake pedal leaving just enough to engage with the spring and then I cut a piece of 16ga that I welded on. I made my own clevis as well from a u-bent piece of steel and a threaded-rod coupler:
I found that I needed to move the rear brake switch to make it all work smoothly:
Big gap from December 2013 to April 2014 at which point I found myself working on a way-too-fancy license plate bracket made from two pieces of 22ga. Here's the "back" part:
And here's both parts and all the tools I was using:
Here's I am checking the fit-up of the two parts before welding:
And here it sits on the bike. The wires are for an 6-segment LED that will be glued up in the top to shine light on the plate. The wires run down through the inside of the bracket. The black wire grounds to the 6mm bracket bolt and the red wire connects to an 18ga wire that runs though the swingarm and comes out near the engine and heads up to the electric tray and finally ends up connected to a brown wire from the original harness so the license plate is lit whenever the taillight is on.
Still in April 2014 I made up a new chain guard from a piece of aluminum and welded a bracket to the swingarm for a "hugger" rear fender made from a left-over part of the front fender off of my CB450 brat-style project:
By late April 2014 I was working on two-into-one exhaust system. I bought a set TC Bros pre-bent exhaust tubing via DCC and proceeded to measure, stare, cut, and tack parts together. I used the first 8-inch arc of the original headers as they came out of the engine:
I even read up on how to make a collector and gave it a shot:
I used various methods to try and hold things in place while I tacked parts together:
Oops! I seem to be missing a piece. I figured it would be good to go up a bit in size as the two 1.5 inch pipes came together so I bought another pre-bent piece of 1.75-inch tubing from Summit Racing.
My muffler is a 17-inch unit by EMGO sourced from DCC. Here I am using pipe insulation foam to try and visualize the angles I needed:
Here in July 2014 is the fully welded (please don't mock my welds too badly-- it is a learning experience) exhaust complete with a bracket that hangs on the lower rear engine mounting bolt:
Also in this shot you can see how I moved the side-stand several inches forward so it will not interfere with the exhaust or the rear-sets.
I painted the exhaust with VHT hi-heat flat black:
This site uses cookies to help personalise content, tailor your experience and to keep you logged in if you register.
By continuing to use this site, you are consenting to our use of cookies.


") and a rear-hoop. So I chopped off the rear of the frame and a few other bits:
and a rear-hoop. So I chopped off the rear of the frame and a few other bits:


