Applications - Top End Repair and Health
Well, I was going to continue with my semi-logical order of performance upgrades, but I've had an interesting couple of weeks and I figure I'll diverge a little bit in order to share what's been going on in my shop.
A couple of weeks ago, on the way to work, my daily driver (1996 Geo Metro, 1.0L) started missing on one of the cylinders at idle. Once I revved it up to 3,000 RPM or so, the cylinder would kick back in. The car got me to work, but on the way back home, the engine started overheating as well.
I suspected a blown head gasket. A loss of compression will cause the misfire and leaking coolant system will cause the overheating. Both of these things occur when the head gasket fails on a liquid cooled engine.
Turns out, I was correct. This is the oil I drained from the engine and when it's in this condition it is known as "milkshake". If drained from a recently run engine, it will be very frothy, hence the name. I was expecting about three quarts of oil, and ended up with a gallon of this stuff; another sure sign something is not right.
Funnily enough, I've never really taken apart a car engine before, but having some experience with bikes I figured I'd give it a shot. $100 in parts sure beats $1000 for the parts and labor, I figure.
So a few hours later, I'm at this point (this pic was taken after cleaning up the sealing surface on the top of the block).

Right away, we can see that cylinder one was the problem. The coolant, leaking into the cylinder during operation, has steam cleaned the piston and combustion chamber, resulting in the shiny surface you see here.
While everything was disassembled, it's also a great time for a general health check of the top end. I recommend this to anyone looking to restore a vintage bike. I'm pretty sure I mentioned it earlier, but it bears repeating: An engine is only as good as its weakest link. You can have trick components, a hot cam, and high compression pistons, but if your valves are leaking then it's wasted effort. A stock engine in good health will almost always outperform a built engine that's limping along on one or more questionable parts.
The Acetone Test
Now that I had the engine apart, it was time to start checking things over. The first test I usually perform on the head is what many folks call the acetone test. The idea is fairly simple. You pour some acetone into each of the ports, one at a time. Sit the head up on its edge and add a couple of table spoons into the first port. Let it sit for a few minutes and inspect the combustion chamber for leakage. Any acetone that makes it through indicates a failure of the valve to seal and this must be corrected. Here's a pic of a failed acetone test on GS450. The liquid leaking past is clearly visible.
It's important to note that other fluids may be used, but you're looking for something with very little surface tension. Paint thinner, denatured alcohol, and gasoline are all viable fluids for this test.
Like the picture above, my Metro failed on all six valves. Time for some work.
Inspecting the Valves
Now that we know that valve sealing is an issue with our engine, we can pull the valves and inspect what may be wrong. Even if nothing is wrong and you pass the acetone test, it may still be a good idea to pull the valves. This will let you check the valve stem diameters, stem-to-guide clearances, and also lets you replace the valve stem seals. These next sets of pics are the intake valves, and the exhaust valves, respectively. All six valves were cleaned using a combination of Simple Green and a soft wire brush, prior to taking these photos.


As you may have guess from the photos, the exhaust valves are all shot. Each valve is clearly pitted along the sealing surface. The intake valves are showing a little discoloration, but are in otherwise decent condition. I reused them.
OK. So we know that new exhaust valves were needed. Time to inspect the valve seats within the head.
Again, the intake valve seats look to be in good condition (nice shiny surface, no pitting), but the exhaust valve seats have seen better days. Though not immediately apparent in this pic, there was very little pitting, but they still weren't as good as I would like and carbon build up was a clear sign that we aren't getting as much metal-to-metal contact as is required.
Now... Sometimes compromises need to be struck. In a perfect world, every job should be done perfectly, but this is not a perfect world. We are limited by our time, our resources, and our own skill levels. An argument can be made for not doing a job to perfection, but there is no excuse to not maximize the use of the time, resources, and skills we do have. In this scenario, I was limited very much by resources ($$$), and so I chose not to have a machinist clean up these valves seats. The price for a valve job usually runs about $20-$25 per valve, so I was expecting a bill of around $150 to have the valve seats cleaned up and that's something I could not afford at the moment. A car that is running at a sub-optimal level is more useful to me than a car that is not running at all and so I decided to proceed without the valve job. I do want to make it clear that is something that should have been done, but was not. If this were to enter a mechanic's shop, they probably wouldn't guarantee the work without having the valve seats recut by a machinist. The overall health of my engine was affected by this decision, and I will get into that later. But basically, know this: Before you make a decision to stray from the beaten path, you should ask yourself one single question. "What will happen if I do it this way, instead?" If you can't answer that question, don't do it. Decisions should be made from a base of knowledge rather than necessity. In this case, I know that my approach may not fix the problem, but it wasn't likely to make it any worse, either, and so I choose to proceed. Also, had this been on my motorcycle engine I would have done the job properly and not taken any chances, even if I had to wait a few months to get the money together. My bike and my car serve different purposes in my life and so they get different treatments.
Clean up
Now that we know some work is needed, the next step in the process is to get everything cleaned up. Even if no work is needed, it's still advised to undertake this step. The only reason I list the acetone test first is that it helps to give you an idea of what problems may exist and it saves you at least one set of (dis)assembly routines.
Aside from pain involved in working with greasy and dirty components, sometimes it's just plain impossible to make the measurements needed with bits of leftover gasket, chunks of carbon, and blobs of grease all over everything, so it's time to make this thing shine.
Chances are, your head is made from aluminum and so you're going to want to follow some important procedures when cleaning. First, don't expose the head to any heat levels that would be exceed normal operating temperatures. No blow torches or crap like that. For my own cleaning, hot water is about as hot as I get. Second, try to avoid media blasting, if you can. Soda is OK, but stuff like glass and shells can plug things up and coarser media like sand will usually cause damage.
The first step to cleaning is a soak in a citrus cleaner like Zep, Simple Green, or even Pine Sol. For really caked on grease, you can use a plastic brush to work the cleaner into those areas. The second step is a good scrubbing with soap and hot water. I use a combination of another plastic brush, and occasionally a 3M scratch pad. Any carbon deposits left after this stage can be cleaned with a carbon dissolver such as Zep Morado, but don't leave it in contact too long. This stuff can hurt aluminum over time and it shouldn't be used on areas without carbon build up. A wire brush may be necessary to fully remove the carbon deposits. To remove any gaskets, use a razor blade, but scrape against the angle of the blade instead of into it. This will avoid gouging the head and causing any scratches. If there is coked oil at any point, kerosene or diesel can help get these off. Finally, any left over gasket bits can be removed with some 400 grit paper and WD40. Be very careful when sanding, however, as sealing surfaces are very intolerant of low spots. Most specs allow for only .003" height differences across the entire sealing surface. You may need to have the head resurfaced if you get too heavy handed at this point. A final wash in soap and hot water followed by air drying should get you ready for the next steps. 3M Roloc pads in a die grinder can also be used for gasket removal, but use them sparingly. Power tools get through aluminum in a hurry and what may save you time now, may cost you both time and money later.
The Valve Job
As I just mentioned, I chose not to pursue a valve job at this time, but I'm going to include the information here for future reference to those seeking to "do it right".
Many people, at this point, would hand the head over to a machinist for the necessary work, and that's OK. I did the same with my own 360 build. I'm going to cover how to do your own valve job, however. You will need some special tools and this does take time, but it's also quite rewarding. The pics for this section have been "borrowed" from around the 'net, so these represent what I would have done, rather than what actually happened.
First up, the tool set. You will definitely need a valve cutter. Neway is a company that makes these for a reasonable cost and no special power tools are needed for it's operation. They usually cost between $250 and $400 for one of these things, so it's probably only worth buying if you plan to do your own valves at least half a dozen times (many vintage bikes will not have a three angle grind from the factory, so this tool can be used for performance and not just repair). Make sure to buy the kit with the cutting heads of the appropriate size. These kits are not one-size-fits-all, but they are one-size-fits most. They look like this when they're new:

The first step in the cutting process is to insert the pilot. This acts as a guide for the cutter to ensure the cut is precise. If you are planning to replace the valve stem guides, you'll definitely want to do that before doing any valve cutting.

Next, slip the 45° cutter in place over the pilot.

And finally, the cutting handle.

After a few turns (only a little pressure is needed, better to cut too little than too much), some of the valve seat should be cut.
Repeat this process for the inside (60°) and then the outside (30°) angle and you should now have a nice, shiny, valve seat.

At this point, you'll want to cover your nice work with some layout dye (aka machinist's dye aka Prussian Blue).

And then repeat your 45° cut.

The thickness of the metal strip that is exposed should be around .040" for the intake valves and .060" for the exhaust valves. This 45° cut serves two purposes. First, this is the sealing surface. When your cut is finished, all of the blue dye should be removed. Any spots of dye that are left after the cut usually indicate pitting in the valve seat. You're going to need to cut again, but slightly deeper. The second purpose is that the thickness of the valve seat has to do with heat transfer. Because fresh intake mixture is coming over the intake valves every time they open, they are cooled by this mixture. On the flip side, it's all hot exhaust gases passing by the exhaust valves and so the seats need to be thicker to allow the heat to transfer from the (relatively) hotter exhaust valves to the cooler head. If this seat is too thin, then you burn up your valves in short order.
Your 60° cut (the one further up the intake port) should be roughly twice the width of the 45° cut and the 30° should be about 75% of the width of your 45° cut. If you've made your 45° cut too wide, if can be narrowed by recutting with the 30° cutter in order to make that width wider. There are only so many cuts you can do in a head, though. Cutting extra means the total lifespan of your head is reduced as most heads do not have replaceable seats. Some guys are clever enough to be able to add more metal to this area, but don't count on simply finding someone who is capable of this type of work. That said, it'll usually be cheaper just to get a new head, anyway.
At this point, you can reassemble things and place the valves, springs, retainers, etc, back into the head. Repeat the acetone test and hopefully you will see zero leakage after around five minutes of waiting.
If leakage still occurs, it is important to know why. Were you a bit haphazard in your approach? Did all the measurements check out? Did the 45° cut fully remove the dye from the valve seat? If you're happy with the way things went during the cutting process, it may be necessary to lap the valves.
Valve Lapping
Many machinists will advise you to lap the valves as a matter of course. For me, this seems unnecessary and I think this recommendation is one of those things that just gets handed down out of tradition rather than real need. As a side note, if you're running with titanium valves, you don't want to lap them. If the acetone test fails, then you need to recut the seats. Titanium valves almost always include special coatings and lapping will remove them.
Lapping is a lot like precision sanding. Lapping compounds are usually some sort of lubricant with different levels of grit mixed into it. The idea is the rub the valves back and forth across the seats until both the valves and the seats are nice and smooth. This is accomplished by adding a bit of lapping compound onto the valve head and pressing it into the seat (by hand). A valve lapping tool is then used to spin the valve in place and the compound cuts into the valve and the valve seat. A lapping tool is essentially a wooden stick with a suction cup on each end. Don't buy a cheap one of these off of eBay as you want a good suction cup for this not to end up being a huge headache. Auto parts stores usually stock the good ones. Lapping should not be done by attaching things to the valve stem and spinning (such as I've seen suggest with power drills and such). Also, lapping should be done prior to the replacement of the valve stem seals. It's OK to lap with the old seals in place or removed, but not OK to use the new seals during this process.
For the lapping process, itself, just do what this video is showing.
Repeat this process until the "sound" of the grit starts getting quieter. Switch to the next finest grit until it gets quieter and so one and so forth. Grits commonly used for valve lapping are 120 grit, followed by 220 grit, followed by 400 grit. Some people even go out to 800 grit, but I think this is overkill. Also, you may not need to start at 120 grit unless you skipped the cutting process, like I did.
As another side note, lapping compound is useful to have around the shop to clean up sealing surfaces on heads and jugs prior to assembly. Spread a liberal amount over a sheet of plate glass and work your part in a figure eight pattern for ten minutes, rotate it 90°, and go for another ten. This clears up microscratches and the like and is also a good way to correct any scratches you may have introduced to sealing surfaces during the removal of old gaskets. A bit of diesel or kerosene can be added to the lapping compound to thin it out a bit. Thinned out compound is called "slurry" and is available for purchase directly, but I just prefer to keep the compound around and thin it myself, if needed.
When you have finished the lapping process, the shiny valves and valve seats will have developed a satin gray stripe along the middle. Lapped valve on the left, new valve on the right.

After running the valves in your engine for a few hundred miles, this gray satin finish will eventually be worn into the shiny finish like you see in the valve on the right. The lapping process helps provide an initial seal, but like cross hatching on cylinder walls, it eventually wears away and creates an even better seal after doing so. You should not count on the engine to do all the work in this process, though, the idea behind a good lapping job is to minimize the time this wearing-in process takes and doing it poorly can result in a poor final seal as well.
After this lapping process, you should have a seal good enough to pass the acetone test. If not, you need to make a decision. What the problem with the cutting or was it with the lapping? More Prussian Blue can tell the tale. Paint it around the valve seal and place the valve into position without twisting it. Pulling the valve back out should result in a coating of dye all the way around the valve. Any missed spots indicate a failure in the cutting process and you'll likely want to repeat it. If you get dye all the way around the valve, you can try lapping it again. A failure after another round of lapping will mean you'll want to recut, though. Make sure your seat widths are within spec, as well. Too narrow and you could have sealing problems. Other things to check are bent valve stems or damaged valve guides.
Back to my Decision
As I mentioned earlier, we'd revisit my decision not to cut the valve seats. After getting the new head gasket into place and reassembling the engine, I decided to run a compression check. The spec on a fresh engine for the 1.0L Geo Metro is 195 PSI with the lower rebuild limit coming in at 165 PSI. My first test netted me values of around 130 PSI. After discovering some cam timing issues and retorquing the head (this should be done after covering a few miles so as to compress the gasket a bit further) I'm up to 150, but still below spec. There are a couple of things which could be working against me. First up, I mentioned that I was doing this work under tight financial constraints and so I choose not to have the valve work done. One thing I hadn't yet mentioned is that I also skipped out on the head surfacing (which was probably needed as well, but would have been another $100). Here's a pic of the sealing surface on the head and the pitting here is quite clear.

So... how does that affect my compression? Well, it is not uncommon for head gasket kits (especially those in the auto industry) to come with slightly thicker-than-stock head gaskets. It is assumed that resurfacing the head after 200,000 miles is something that will just be done and so the head gaskets come slightly thicker than they would, otherwise. I don't know that this is for certain in my case as I did not measure either the new or the old head gasket. This is simply a possibility.
Assuming the head gaskets had no difference in thickness, then I suspect the lapping I did on the valves either helped only a little, or not at all. The car's power output does seem a bit low, but that could also be from me being used to riding on two wheels these past few months. I have no data to which I can compare and I know only that it could be better than what it is right now. With any luck, the valves will continue to seat in and my compression will slowly rise over the coming miles. But having to choose between a car that doesn't run and one that doesn't run as well as it could, the choice was pretty clear.
Conclusion
OK... so your head is screwed up and you're not sure where to begin. Start with some simple tests and some cleaning and go from there. Remember guys, you're working with technology that has been around for a while now. This isn't rocket science and it's not as hard as you'd think. Take your time, make your measurements, implement your solutions. An engine that runs always puts out more horsepower than an engine that doesn't, and so making sure you're up to spec should be job number one. The reliability and performance of your engine will depend a lot on the time you take in diagnosing and correcting any problems you encounter. Also, be aware, that when it comes to engines, new parts aren't always enough. Some parts (even new ones) may need machining in order to fit, but not all machining needs to be done by a machinist. There are a lot of hand tools available that will get the job done and you can learn a lot of new things along the way.
Well, I was going to continue with my semi-logical order of performance upgrades, but I've had an interesting couple of weeks and I figure I'll diverge a little bit in order to share what's been going on in my shop.
A couple of weeks ago, on the way to work, my daily driver (1996 Geo Metro, 1.0L) started missing on one of the cylinders at idle. Once I revved it up to 3,000 RPM or so, the cylinder would kick back in. The car got me to work, but on the way back home, the engine started overheating as well.
I suspected a blown head gasket. A loss of compression will cause the misfire and leaking coolant system will cause the overheating. Both of these things occur when the head gasket fails on a liquid cooled engine.
Turns out, I was correct. This is the oil I drained from the engine and when it's in this condition it is known as "milkshake". If drained from a recently run engine, it will be very frothy, hence the name. I was expecting about three quarts of oil, and ended up with a gallon of this stuff; another sure sign something is not right.
Funnily enough, I've never really taken apart a car engine before, but having some experience with bikes I figured I'd give it a shot. $100 in parts sure beats $1000 for the parts and labor, I figure.
So a few hours later, I'm at this point (this pic was taken after cleaning up the sealing surface on the top of the block).
Right away, we can see that cylinder one was the problem. The coolant, leaking into the cylinder during operation, has steam cleaned the piston and combustion chamber, resulting in the shiny surface you see here.
While everything was disassembled, it's also a great time for a general health check of the top end. I recommend this to anyone looking to restore a vintage bike. I'm pretty sure I mentioned it earlier, but it bears repeating: An engine is only as good as its weakest link. You can have trick components, a hot cam, and high compression pistons, but if your valves are leaking then it's wasted effort. A stock engine in good health will almost always outperform a built engine that's limping along on one or more questionable parts.
The Acetone Test
Now that I had the engine apart, it was time to start checking things over. The first test I usually perform on the head is what many folks call the acetone test. The idea is fairly simple. You pour some acetone into each of the ports, one at a time. Sit the head up on its edge and add a couple of table spoons into the first port. Let it sit for a few minutes and inspect the combustion chamber for leakage. Any acetone that makes it through indicates a failure of the valve to seal and this must be corrected. Here's a pic of a failed acetone test on GS450. The liquid leaking past is clearly visible.
It's important to note that other fluids may be used, but you're looking for something with very little surface tension. Paint thinner, denatured alcohol, and gasoline are all viable fluids for this test.
Like the picture above, my Metro failed on all six valves. Time for some work.
Inspecting the Valves
Now that we know that valve sealing is an issue with our engine, we can pull the valves and inspect what may be wrong. Even if nothing is wrong and you pass the acetone test, it may still be a good idea to pull the valves. This will let you check the valve stem diameters, stem-to-guide clearances, and also lets you replace the valve stem seals. These next sets of pics are the intake valves, and the exhaust valves, respectively. All six valves were cleaned using a combination of Simple Green and a soft wire brush, prior to taking these photos.
As you may have guess from the photos, the exhaust valves are all shot. Each valve is clearly pitted along the sealing surface. The intake valves are showing a little discoloration, but are in otherwise decent condition. I reused them.
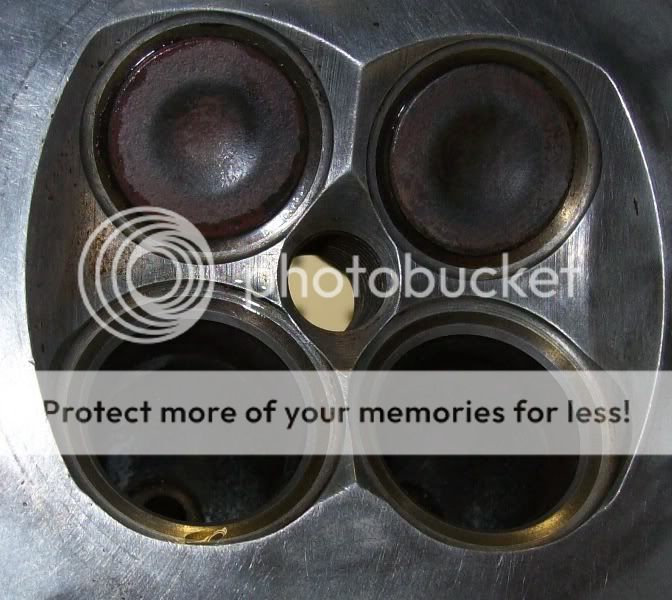
OK. So we know that new exhaust valves were needed. Time to inspect the valve seats within the head.
Again, the intake valve seats look to be in good condition (nice shiny surface, no pitting), but the exhaust valve seats have seen better days. Though not immediately apparent in this pic, there was very little pitting, but they still weren't as good as I would like and carbon build up was a clear sign that we aren't getting as much metal-to-metal contact as is required.
Now... Sometimes compromises need to be struck. In a perfect world, every job should be done perfectly, but this is not a perfect world. We are limited by our time, our resources, and our own skill levels. An argument can be made for not doing a job to perfection, but there is no excuse to not maximize the use of the time, resources, and skills we do have. In this scenario, I was limited very much by resources ($$$), and so I chose not to have a machinist clean up these valves seats. The price for a valve job usually runs about $20-$25 per valve, so I was expecting a bill of around $150 to have the valve seats cleaned up and that's something I could not afford at the moment. A car that is running at a sub-optimal level is more useful to me than a car that is not running at all and so I decided to proceed without the valve job. I do want to make it clear that is something that should have been done, but was not. If this were to enter a mechanic's shop, they probably wouldn't guarantee the work without having the valve seats recut by a machinist. The overall health of my engine was affected by this decision, and I will get into that later. But basically, know this: Before you make a decision to stray from the beaten path, you should ask yourself one single question. "What will happen if I do it this way, instead?" If you can't answer that question, don't do it. Decisions should be made from a base of knowledge rather than necessity. In this case, I know that my approach may not fix the problem, but it wasn't likely to make it any worse, either, and so I choose to proceed. Also, had this been on my motorcycle engine I would have done the job properly and not taken any chances, even if I had to wait a few months to get the money together. My bike and my car serve different purposes in my life and so they get different treatments.
Clean up
Now that we know some work is needed, the next step in the process is to get everything cleaned up. Even if no work is needed, it's still advised to undertake this step. The only reason I list the acetone test first is that it helps to give you an idea of what problems may exist and it saves you at least one set of (dis)assembly routines.
Aside from pain involved in working with greasy and dirty components, sometimes it's just plain impossible to make the measurements needed with bits of leftover gasket, chunks of carbon, and blobs of grease all over everything, so it's time to make this thing shine.
Chances are, your head is made from aluminum and so you're going to want to follow some important procedures when cleaning. First, don't expose the head to any heat levels that would be exceed normal operating temperatures. No blow torches or crap like that. For my own cleaning, hot water is about as hot as I get. Second, try to avoid media blasting, if you can. Soda is OK, but stuff like glass and shells can plug things up and coarser media like sand will usually cause damage.
The first step to cleaning is a soak in a citrus cleaner like Zep, Simple Green, or even Pine Sol. For really caked on grease, you can use a plastic brush to work the cleaner into those areas. The second step is a good scrubbing with soap and hot water. I use a combination of another plastic brush, and occasionally a 3M scratch pad. Any carbon deposits left after this stage can be cleaned with a carbon dissolver such as Zep Morado, but don't leave it in contact too long. This stuff can hurt aluminum over time and it shouldn't be used on areas without carbon build up. A wire brush may be necessary to fully remove the carbon deposits. To remove any gaskets, use a razor blade, but scrape against the angle of the blade instead of into it. This will avoid gouging the head and causing any scratches. If there is coked oil at any point, kerosene or diesel can help get these off. Finally, any left over gasket bits can be removed with some 400 grit paper and WD40. Be very careful when sanding, however, as sealing surfaces are very intolerant of low spots. Most specs allow for only .003" height differences across the entire sealing surface. You may need to have the head resurfaced if you get too heavy handed at this point. A final wash in soap and hot water followed by air drying should get you ready for the next steps. 3M Roloc pads in a die grinder can also be used for gasket removal, but use them sparingly. Power tools get through aluminum in a hurry and what may save you time now, may cost you both time and money later.
The Valve Job
As I just mentioned, I chose not to pursue a valve job at this time, but I'm going to include the information here for future reference to those seeking to "do it right".
Many people, at this point, would hand the head over to a machinist for the necessary work, and that's OK. I did the same with my own 360 build. I'm going to cover how to do your own valve job, however. You will need some special tools and this does take time, but it's also quite rewarding. The pics for this section have been "borrowed" from around the 'net, so these represent what I would have done, rather than what actually happened.
First up, the tool set. You will definitely need a valve cutter. Neway is a company that makes these for a reasonable cost and no special power tools are needed for it's operation. They usually cost between $250 and $400 for one of these things, so it's probably only worth buying if you plan to do your own valves at least half a dozen times (many vintage bikes will not have a three angle grind from the factory, so this tool can be used for performance and not just repair). Make sure to buy the kit with the cutting heads of the appropriate size. These kits are not one-size-fits-all, but they are one-size-fits most. They look like this when they're new:
The first step in the cutting process is to insert the pilot. This acts as a guide for the cutter to ensure the cut is precise. If you are planning to replace the valve stem guides, you'll definitely want to do that before doing any valve cutting.
Next, slip the 45° cutter in place over the pilot.
And finally, the cutting handle.
After a few turns (only a little pressure is needed, better to cut too little than too much), some of the valve seat should be cut.
Repeat this process for the inside (60°) and then the outside (30°) angle and you should now have a nice, shiny, valve seat.
At this point, you'll want to cover your nice work with some layout dye (aka machinist's dye aka Prussian Blue).
And then repeat your 45° cut.
The thickness of the metal strip that is exposed should be around .040" for the intake valves and .060" for the exhaust valves. This 45° cut serves two purposes. First, this is the sealing surface. When your cut is finished, all of the blue dye should be removed. Any spots of dye that are left after the cut usually indicate pitting in the valve seat. You're going to need to cut again, but slightly deeper. The second purpose is that the thickness of the valve seat has to do with heat transfer. Because fresh intake mixture is coming over the intake valves every time they open, they are cooled by this mixture. On the flip side, it's all hot exhaust gases passing by the exhaust valves and so the seats need to be thicker to allow the heat to transfer from the (relatively) hotter exhaust valves to the cooler head. If this seat is too thin, then you burn up your valves in short order.
Your 60° cut (the one further up the intake port) should be roughly twice the width of the 45° cut and the 30° should be about 75% of the width of your 45° cut. If you've made your 45° cut too wide, if can be narrowed by recutting with the 30° cutter in order to make that width wider. There are only so many cuts you can do in a head, though. Cutting extra means the total lifespan of your head is reduced as most heads do not have replaceable seats. Some guys are clever enough to be able to add more metal to this area, but don't count on simply finding someone who is capable of this type of work. That said, it'll usually be cheaper just to get a new head, anyway.
At this point, you can reassemble things and place the valves, springs, retainers, etc, back into the head. Repeat the acetone test and hopefully you will see zero leakage after around five minutes of waiting.
If leakage still occurs, it is important to know why. Were you a bit haphazard in your approach? Did all the measurements check out? Did the 45° cut fully remove the dye from the valve seat? If you're happy with the way things went during the cutting process, it may be necessary to lap the valves.
Valve Lapping
Many machinists will advise you to lap the valves as a matter of course. For me, this seems unnecessary and I think this recommendation is one of those things that just gets handed down out of tradition rather than real need. As a side note, if you're running with titanium valves, you don't want to lap them. If the acetone test fails, then you need to recut the seats. Titanium valves almost always include special coatings and lapping will remove them.
Lapping is a lot like precision sanding. Lapping compounds are usually some sort of lubricant with different levels of grit mixed into it. The idea is the rub the valves back and forth across the seats until both the valves and the seats are nice and smooth. This is accomplished by adding a bit of lapping compound onto the valve head and pressing it into the seat (by hand). A valve lapping tool is then used to spin the valve in place and the compound cuts into the valve and the valve seat. A lapping tool is essentially a wooden stick with a suction cup on each end. Don't buy a cheap one of these off of eBay as you want a good suction cup for this not to end up being a huge headache. Auto parts stores usually stock the good ones. Lapping should not be done by attaching things to the valve stem and spinning (such as I've seen suggest with power drills and such). Also, lapping should be done prior to the replacement of the valve stem seals. It's OK to lap with the old seals in place or removed, but not OK to use the new seals during this process.
For the lapping process, itself, just do what this video is showing.
http://www.youtube.com/watch?v=fhXsH12Rg6s
Repeat this process until the "sound" of the grit starts getting quieter. Switch to the next finest grit until it gets quieter and so one and so forth. Grits commonly used for valve lapping are 120 grit, followed by 220 grit, followed by 400 grit. Some people even go out to 800 grit, but I think this is overkill. Also, you may not need to start at 120 grit unless you skipped the cutting process, like I did.
As another side note, lapping compound is useful to have around the shop to clean up sealing surfaces on heads and jugs prior to assembly. Spread a liberal amount over a sheet of plate glass and work your part in a figure eight pattern for ten minutes, rotate it 90°, and go for another ten. This clears up microscratches and the like and is also a good way to correct any scratches you may have introduced to sealing surfaces during the removal of old gaskets. A bit of diesel or kerosene can be added to the lapping compound to thin it out a bit. Thinned out compound is called "slurry" and is available for purchase directly, but I just prefer to keep the compound around and thin it myself, if needed.
When you have finished the lapping process, the shiny valves and valve seats will have developed a satin gray stripe along the middle. Lapped valve on the left, new valve on the right.
After running the valves in your engine for a few hundred miles, this gray satin finish will eventually be worn into the shiny finish like you see in the valve on the right. The lapping process helps provide an initial seal, but like cross hatching on cylinder walls, it eventually wears away and creates an even better seal after doing so. You should not count on the engine to do all the work in this process, though, the idea behind a good lapping job is to minimize the time this wearing-in process takes and doing it poorly can result in a poor final seal as well.
After this lapping process, you should have a seal good enough to pass the acetone test. If not, you need to make a decision. What the problem with the cutting or was it with the lapping? More Prussian Blue can tell the tale. Paint it around the valve seal and place the valve into position without twisting it. Pulling the valve back out should result in a coating of dye all the way around the valve. Any missed spots indicate a failure in the cutting process and you'll likely want to repeat it. If you get dye all the way around the valve, you can try lapping it again. A failure after another round of lapping will mean you'll want to recut, though. Make sure your seat widths are within spec, as well. Too narrow and you could have sealing problems. Other things to check are bent valve stems or damaged valve guides.
Back to my Decision
As I mentioned earlier, we'd revisit my decision not to cut the valve seats. After getting the new head gasket into place and reassembling the engine, I decided to run a compression check. The spec on a fresh engine for the 1.0L Geo Metro is 195 PSI with the lower rebuild limit coming in at 165 PSI. My first test netted me values of around 130 PSI. After discovering some cam timing issues and retorquing the head (this should be done after covering a few miles so as to compress the gasket a bit further) I'm up to 150, but still below spec. There are a couple of things which could be working against me. First up, I mentioned that I was doing this work under tight financial constraints and so I choose not to have the valve work done. One thing I hadn't yet mentioned is that I also skipped out on the head surfacing (which was probably needed as well, but would have been another $100). Here's a pic of the sealing surface on the head and the pitting here is quite clear.
So... how does that affect my compression? Well, it is not uncommon for head gasket kits (especially those in the auto industry) to come with slightly thicker-than-stock head gaskets. It is assumed that resurfacing the head after 200,000 miles is something that will just be done and so the head gaskets come slightly thicker than they would, otherwise. I don't know that this is for certain in my case as I did not measure either the new or the old head gasket. This is simply a possibility.
Assuming the head gaskets had no difference in thickness, then I suspect the lapping I did on the valves either helped only a little, or not at all. The car's power output does seem a bit low, but that could also be from me being used to riding on two wheels these past few months. I have no data to which I can compare and I know only that it could be better than what it is right now. With any luck, the valves will continue to seat in and my compression will slowly rise over the coming miles. But having to choose between a car that doesn't run and one that doesn't run as well as it could, the choice was pretty clear.
Conclusion
OK... so your head is screwed up and you're not sure where to begin. Start with some simple tests and some cleaning and go from there. Remember guys, you're working with technology that has been around for a while now. This isn't rocket science and it's not as hard as you'd think. Take your time, make your measurements, implement your solutions. An engine that runs always puts out more horsepower than an engine that doesn't, and so making sure you're up to spec should be job number one. The reliability and performance of your engine will depend a lot on the time you take in diagnosing and correcting any problems you encounter. Also, be aware, that when it comes to engines, new parts aren't always enough. Some parts (even new ones) may need machining in order to fit, but not all machining needs to be done by a machinist. There are a lot of hand tools available that will get the job done and you can learn a lot of new things along the way.