Follow along with the video below to see how to install our site as a web app on your home screen.
Note: This feature currently requires accessing the site using the built-in Safari browser.
We noticed you are blocking ads. DO THE TON only works with community supporters. Most are active members of the site with small businesses. Please consider disabling your ad blocking tool and checking out the businesses that help keep our site up and free.
How's it look? Some edges aren't stuck together I can mix up more resin later on and stick em together I'm also going to get the rubber that goes around the edge.
I was going to add a brake light on the back and a license plate holder but I think it will be a pain in the ass for an upholstery person to deal with so I might come up with something else some ideas would help.
I put four layers down is that thick enough?
And I forgot the 9v battery and fuse!! So checking the regulator is going to have to wait.
Does anyone know an upholstery place in nj lol this dude won't get back to me
ill have to add some material to it, is there a thickness that I should be aiming for? I was thinking of doing one more sheet. I can check the thickness later on tonight.
ill probably just do another layer to be safe I originally put 4 layers criss-crossing to clean it up a bit, It will just have to wait until I can find somewhere besides my basement to do it...stunk up the whole house pretty bad!
yep you done great job its looks awesome but needs some structural
like cardboard coat hanger tubes a few layed crossways then glased over a few layups this gets a 3d dimensinal strenth from the structures shape not the cardboard they use large diameter cardbord tubes for underneath of runabout boat decks as an example
you cannot just lay more resin and glass on top now it won't stick (unless you used laminating resin and no finish coat)
you will have to GENTLY grind away the very top layer of the resin TO PREP IT FOR ANOTHER LAY
did you use laminatimng resin or did you make it in one wet session ?
this is why you use laminating resin you can continue design it will be sticky but a day or 2 later you can do more lays easily
Throw the pan on the bike, put your palm in the middle of it and push down with as much of your weight as you think it can handle. My guess is that your feet come off the ground before it deforms or cracks and in that case it is already more than strong enough.
yep you done great job its looks awesome but needs some structural
like cardboard coat hanger tubes a few layed crossways then glased over a few layups this gets a 3d dimensinal strenth from the structures shape not the cardboard they use large diameter cardbord tubes for underneath of runabout boat decks as an example
you cannot just lay more resin and glass on top now it won't stick (unless you used laminating resin and no finish coat)
you will have to GENTLY grind away the very top layer of the resin TO PREP IT FOR ANOTHER LAY
did you use laminatimng resin or did you make it in one wet session ?
this is why you use laminating resin you can continue design it will be sticky but a day or 2 later you can do more lays easily
I used the stuff with wax in it, I did the pan that I have so far in two sessions, did a diagnol and a straight layer then I let it dry and sanded the top wax off and impregnated the two mounting screws and laid two more sheets one diagnol the other way and one straight again. I will be welding in a flat bar across the frame rails where the carriage bolts will be mounting the seat to the frame. I know the hanger cardboard pieces your talking about but I haven't gotten any hangers with them lately!!! :-\
im going to have a flat bar accrossed the area where the carriage bolts will mount to I was planning on putting a couple strips of Velcro around the rest but I might have to do a support somewhere in the back or middle.
I will try out that test, if it breaks itll be easy to fix... I know exactly what you mean about the tool thing...still haven't gotten around to getting the fuse or battery
im going to have a flat bar accrossed the area where the carriage bolts will mount to I was planning on putting a couple strips of Velcro around the rest but I might have to do a support somewhere in the back or middle.
But I meant that you weld some braces, other than the one that is going to receive the carriage bolts for seatpan securing, in the areas where you butt will be. They could also serve purpose as a flat surface for sticking the velcro as you said before, and at the same time adding some support.
If you go by what Dohcbikes said, and the pan passes through the test, then I'd think it I'll be strong enough and not in need of those flat bars across.
yeah that's what I meant when I was talking about the support I just wasn't clear what I was supporting or where, my old pan had a tab at the rear maybe ill do that because I need to mount a plate holder and tail light still too
Hey thanks for checkin out my seat pan, I gotta get some dremel cut off wheels and clean it up a bit more and figure out if im going to make some kind of rear mount for a LED strip and a license plate. I am still undecided on whether or not I want to try and put the foam on my self or if I shud just have an eupholstery shop do it.
That's a lobster roll from a place in point pleasant NJ that my girlfriend wants to go to, probably this weekend. its just chunks of lobster and butter exactly what shud be on a lobster roll!
If your coming down to hit up Shore Fresh (I assume), there's a Harbor Freight about 10 mins away in Brick. Kill 2 birds with one stone. Also, Jamis Upholstery in Point Pleasant is a very good, old school shop. We've used them at work for a number of vehicles on numerous occasions.
This site uses cookies to help personalise content, tailor your experience and to keep you logged in if you register.
By continuing to use this site, you are consenting to our use of cookies.


 image.jpeg597.9 KB · Views: 275
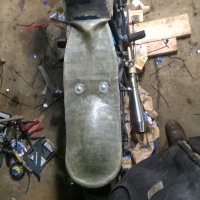 image.jpeg763 KB · Views: 265
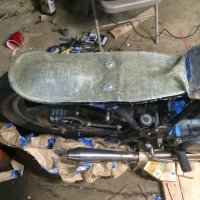 image.jpeg890 KB · Views: 282
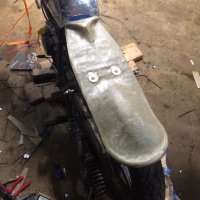 image.jpeg802.3 KB · Views: 266
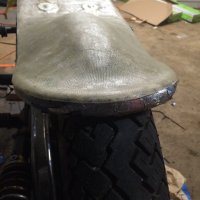 image.jpeg597.6 KB · Views: 274
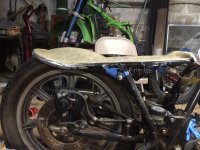 image.jpeg1.2 MB · Views: 286
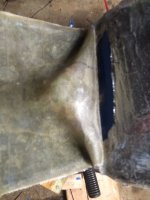 image.jpeg830 KB · Views: 264
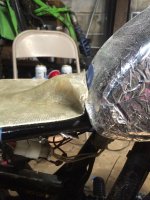 image.jpeg1.1 MB · Views: 291
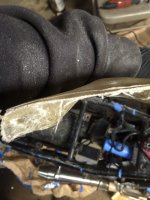 image.jpeg953.1 KB · Views: 280
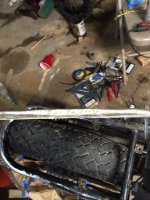 image.jpeg952.6 KB · Views: 281
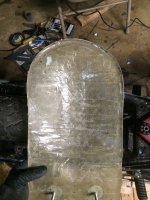 image.jpeg1 MB · Views: 262
 image.jpeg179.8 KB · Views: 285

