1955 BSA A10 engine build

goldy

Coast to Coast
DTT BOTM WINNER
Over the years, I have built and rebuilt dozens of A50 and A65 BSA engines. I have also had the honour of rebuilding several of the M, B and C series singles.

Although I have worked on the A10 model before, I have never been tasked with building one up from a truckload of rusty, crusty parts. If there is any interest in this, I will document the work here. If anybody wants to see it, let me know, if not the thread dies here.

Cheers,
Goldy
 
I'd like to see it personally. But honestly, there doesn't seem to be a whole lot of interest in Brit bikes on here, which is quite ironic. I think there is like maybe 10 people following my build thread for my Enfield.
 
I must be one of those ten....nice bit of work! :D You're right, the younger crowd doesn't really seem to be interested in the classic British scene. Anyhow, I'll give it a few more days and see what happens.
 
LOL and Thanks! :D It would be cool to see your build. I plan on building a performance motor for the Enfield hopefully next winter, and I may be picking a B50 motor sometime this spring. Plus I like learning anything new. ;)
 
Go ahead and write it up, Engine threads are always cool, its neat to see the internals and how things work.

High On Octane said:
I'd like to see it personally. But honestly, there doesn't seem to be a whole lot of interest in Brit bikes on here, which is quite ironic. I think there is like maybe 10 people following my build thread for my Enfield.

There's plenty of people here that like Brit bikes. There's just not much for projects going right now, because they are usually outside of peoples budgets. Swans Goldstar had all kinds of participation.
 
frogman said:
.....There's plenty of people here that like Brit bikes. There's just not much for projects going right now, because they are usually outside of peoples budgets. Swans Goldstar had all kinds of participation.

Sure wasn't much action on my build thread. Maybe because I wasn't constantly asking for help? ??? Or maybe people just don't like me because I refuse to rock a rattle can. ;D 8)
 
Just for fun, I went thru the "Cafe Racer" build threads. There are two, TWO vintage British bikes in TEN PAGES of build threads!!! Now, I'm a bit of a history buff, and I happen to know that if it wasn't for British motorcycles in the 50's and 60's, cafe racers wouldn't even exist. But yet, hardly anyone at all stays true to the vintage roots. There are just so many people "building" a "cafe racer" out of 2 wheel machines with an engine it blows my mind. Apparently all you need is a wrench set, a can of spray paint and a wallet to build a cafe racer these days.
 
Lets see if this can spark some interest, if I can hook a couple more lurkers, I'll get it under way. I'll apologize for the less than perfect picture quality.

All that glitters is not gold, and not everything that looks like a piece of garbage is all that bad...In the beginning God made rust...
 

Attachments

  • 001.JPG
    001.JPG
    871 KB · Views: 325
  • 005.JPG
    005.JPG
    394.6 KB · Views: 319
I really didn't expect to get too many people interested in this, but I guess there is enough to get it under way.

This project came to me in the form of five plastic milk crates and three cardboard boxes full of bits and pieces from several different engines...some look good, some, not so good. Some parts from the older iron head engines, some from the later aluminum head machines. This engine will be going in a '56 Golden Flash and so one will use the aluminum head (I hope).
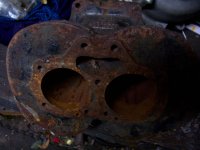
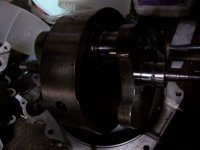
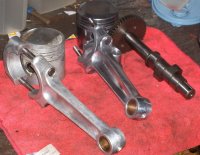
To start with, I decided to have a look at the best looking crankshaft and crankcase. There was is a good bit of rust on the crankcase fasteners, but all things considered, it didn't look too ugly. The crank was lightly rusted, but the clean out plugs came out very easily to reveal a clean oil passage. After spending a few hours cleaning it up, the crankshaft looked almost as good as new...there was no indication of any sort of wear on the journals or the main bearing and timing side bushing. In fact, when I measured everything up, they all came to a perfect 0.30 under regrind. I began to think that someone may have been in the process of getting it ready for re assembly.
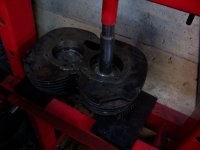
The cylinders I took out of the shed first, appeared to be in pretty nice condition, but both pistons were stuck in the bores...No problem says I, but when I got this fused together mess in the shop I was not too delighted to see that the cylinder walls, in spite of being relatively clean, were very badly pitted. The pistons are marked as 0.060" over and would not budge even with the help of the hydraulic press...I'll get them out eventually and I may consider getting them rebored to 0.080" for some other project, but for now they are 'soaking'.
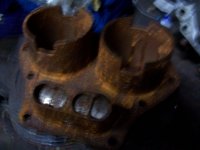
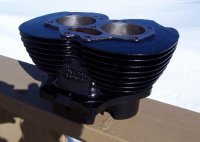
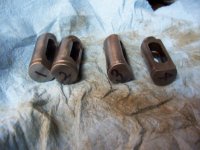
Enter the rusty jugs in the previous posting. As I was digging through the boxes, I discovered a brand new set of pistons among the other offerings and began to wonder...why did he buy new pistons? I looked at the horridly rusty cylinders sitting in the 'unservicable' pile and slipped the top of one of the pistons into the bores. I have seen rebored cylinders left to rust before, but I have never seen anything so horrid looking as this set. Just for curiousity, I thought I would try cleaning them up. It took a whole day of scrubbing, honing and sanding, but they are almost as good as new...I even managed to get the tappets out of their bores and they cleaned up perfectly. I still don't understand why someone would take a freshly rebored cylinder and let it sit on the floor of a basement that regularly floods, without even bothering to grease it up. I got a history lesson the other day on these particular bits and pieces, but this is getting a little long winded, so I'll save that story for another post. Here's what I've got so far:

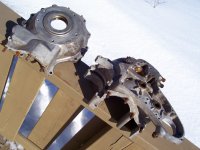
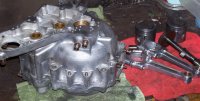
Crankcase halves, crankshaft, seized pistons/ cylinders (cleaned up), cleaned up tappets:
 

Attachments

  • 003 (2).JPG
    003 (2).JPG
    732.2 KB · Views: 302
  • 003.JPG
    003.JPG
    931.8 KB · Views: 292
  • 010.JPG
    010.JPG
    797.8 KB · Views: 290
  • 001 (2).JPG
    001 (2).JPG
    566.7 KB · Views: 285
  • 009.JPG
    009.JPG
    706.8 KB · Views: 301
People do strange things to good parts, when I tore my 450 engine down it was stuck solid and looked to be very a very fresh .50 over rebuild, everything looked new except for a cylinder that someone left the carb off of and allowed it to get full of water multiple times.
 
Just finished shoveling another mess of 'effing' snow out of the driveway...been out there chopping and digging ice and snow every bloody day for the past month. I'm waiting for the shop to heat up, so I'll continue my tale...
The history lesson I got...well it turns out that the cases and cylinders I have been working with came from an engine that was in the process of being rebuilt by one of the local BSA fanatics about fifteen or twenty years ago. The poor fellow kicked the bucket before he could get it finished and one of the AVMS members had somehow gotten hold of it with the intention of finishing the work. I think this may be where the rust came from...he used to live in an old farmhouse with a cistern in the basement. Anyhow, he has since moved into a nice new home and took his massive collection of rusty cars, motorcycles and parts with him. The guy I am doing this work for happens to be one of my best friends and bought this 'stuff' from this huge accumulation of odds and ends. I thought the drive side bearing appeared to be in perfect condition and the clearance on the timing side bushing is exactly where I would have put it at 0.0015". I almost always change these bearing/ bushings, but with the knowledge that they have never seen use, I have decided that it in this case it should be safe to just keep the existing bearing and bushing combination. I have been tasked with refurbishing an old Honda Benley Cylinder head, but that shouldn't take too long, then I'll get to work cleaning up those A10 crankcases.
 
It's the camera, no rust, just some staining. I've had to rebuild engines with worse water damage and after years of service they are still running perfectly with no negative results.
 
It's always fun to know the stories, I'd love to know where both of my toys have been. Both have well over 25k original miles on them so someone had a decent amount of fun and then parked them both. Only things I know about them is one was in a storage container in a military town and one was bought at a church auction before I received/purchased them.

Shame the old feller kicked the bucket before he could finish it.
 
Here I am again warming up from shoveling yet another batch of snow...getting mighty tired of this, ready for spring.
Anyhow, yes it is great to find out the stories behind your machines. I got a very detailed history lesson on my Commando about three years ago from one of the former owners. He filled in a lot of blanks for me, and about a year later when a BSA B25 showed up for restoration that I knew a good deal of the background of, it prompted me to start a vintage motorcycle data base in the hope that future owners might know the story behind their machines.
Anyhow, the shop is warming up and it's time to get to work.
 
Put in a good days work today. After the GD driveway was cleared, I started cleaning up the best looking of three camshafts. Then gave the connecting rods a bit of polishing, nothing spectacular, but they look better than the they did (as rough as Briggs and Straton lawnmower rods). Then cleaned up the pistons.
After that I still had time to remove the fasteners and clean up the crankcase halves, oil fittings and relief valve were removed and thoroughly cleaned as well.
And to top it all off, the sun came out and the temperature shot up to almost eight degrees Celcus...AND the guys at British Cycle Supply had all the little bits I need to start putting this back together, should be here before the weekend!

Pic one shows before and after of the con rods, pic two the day's accomplishments.
 

Attachments

  • 001.JPG
    001.JPG
    494 KB · Views: 317
  • 002.JPG
    002.JPG
    513.9 KB · Views: 294
Back
Top Bottom