74 RD350 - Anything more than 2 strokes is a waste

Re: 74 RD250 - Anything more than 2 strokes is a waste

OK guys - it's been a little while and figure I owe you (and me) an update. I made it over to the Bull City Rumble in Durham, NC this past weekend to check things out and get the creativity going again.

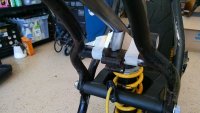
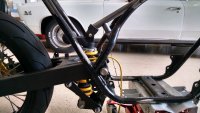
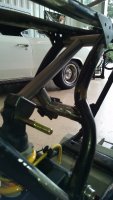
I needed to spread the lower linkage pull rods out a bit to clear the shock spring as the rear susp articulates. I grabbed some M12 washers and welded them to the pull rods. Problem solved, and I get to melt things together with the TIG. As I mentioned in my intro thread, the purpose of this project is to build my fab/welding skills and learn a bunch of cool shit.

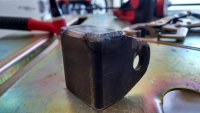
I also had all of my engine cases/covers and carbs vapor blasted by MotoBlasting in Charlotte, NC. I'm pretty happy with the way they turned out. The pics below show the surface finish following the vapor blasting - I'd call it around wet sanding with 1000 grit...just without the sanding marks. My plan is to add some grain via scotchbrite to the entire engine and leave it with a satin finish.

To give the grain/satin finish, I picked up some 3M Cross Buff pads that go on the die grinder. It's basically maroon scotch brite turning 18,000RPM. These things are sweet. The oil pump cover below in the 2nd pic has the top half done with the cross buff and the bottom half with the vapor blast finish. I also did the top engine case half.
 

Attachments

  • IMG_20140903_183330672_HDR[1].jpg
    IMG_20140903_183330672_HDR[1].jpg
    2.7 MB · Views: 338
  • IMG_20140903_194220578[1].jpg
    IMG_20140903_194220578[1].jpg
    3.1 MB · Views: 363
  • IMG_20140903_201940480_HDR[1].jpg
    IMG_20140903_201940480_HDR[1].jpg
    2.9 MB · Views: 340
Re: 74 RD250 - Anything more than 2 strokes is a waste

Unfortunately, it was pretty dark when I took the shots of the engine cases. They came out looking pretty good and should have that subtle shine in the natural light.
 

Attachments

  • IMG_20140903_200037504[1].jpg
    IMG_20140903_200037504[1].jpg
    3.4 MB · Views: 332
  • IMG_20140903_200031843_HDR[1].jpg
    IMG_20140903_200031843_HDR[1].jpg
    1.2 MB · Views: 316
  • IMG_20140903_193518536[1].jpg
    IMG_20140903_193518536[1].jpg
    3 MB · Views: 381
Re: 74 RD250 - Anything more than 2 strokes is a waste

I sent the woman to the beach for the weekend so I could put some serious time into the bike. I haven’t been able to work on it much lately and it’s been bugging the shit out of me. On tap for the weekend was to finalize the geometry and fab the rear suspension. I had a few different ideas I had drawn up in MS Paint, but still wasn’t 100% sure on what I’d do. I wanted to do something different than copy the RZ style rear shock mount.

First things first, I got the bike off the frame table and onto the floor. I used my transmission jack to dial in the ride height. I mimicked the Ninja 250 rear geometry to get started and settled on a position that would allow for 23-27 degrees of front end rake depending on how deep I buried the forks in the clamps. This puts me at 80-100mm of trail depending on where the forks are set. I figured this was enough adjustment range to get started when it comes time to set up a bike. I can also always have rear dogbones cut on a waterjet in different lengths if needed.

Once the rear shock position was set, I started by making a shock mount/clevis to go over the top of the upper shock mount. From there, I started trying to figure out an “intricate” connection from the shock mount to the frame. I quickly realized that my shadetree mechanic tube notching capabilities were very limited. I called it a day Saturday and went and had a beer.

I got smarter overnight and figured out a ghetto-ass way to notch tubing. I pulled out my drafting kit from high school, drill press vise, and hacksaw. I could clamp the vise to my workbench at a 60deg angle, then eye-ball the cut with the hacksaw. Spin the vise on the workbench and reclamp to make the other cut. It wasn’t perfect, but it got me pretty damn close. I had to do some touch up with the bench grinder and die grinder, but surprised myself nonetheless.

So I got the rear shock mount fabbed and fitted. Unfortunatley, I didn’t feel warm and fuzzy inside about the design and how loads were carried. Rather than tack it all together, I decided to head home, think it over, and do some engineering work.
 

Attachments

  • IMG_20140906_164906872_HDR.jpg
    IMG_20140906_164906872_HDR.jpg
    2.6 MB · Views: 320
  • IMG_20140907_082113362.jpg
    IMG_20140907_082113362.jpg
    3.6 MB · Views: 323
  • IMG_20140906_090509366_HDR.jpg
    IMG_20140906_090509366_HDR.jpg
    3 MB · Views: 377
  • IMG_20140906_182212818_HDR.jpg
    IMG_20140906_182212818_HDR.jpg
    3.3 MB · Views: 344
Re: 74 RD250 - Anything more than 2 strokes is a waste

Below is the mock up of the rear shock mount that I fabbed earlier today. As mentioned, I didn’t like how the loading was looking, so I decided to slow down and do some math. I took some measurements of the shock mount geometry and shock spring to use as inputs.

Conditions
Spring Rate – 0.72kg/mm
Spring Free Length – 203mm
Spring Installed Length – 190mm
Shock Travel – 74mm
Total Spring Force at Full Travel – 1381 lbf
1010 Steel - 41,300 psi yield strength
1" OD, .083" wall tube

From there, it was engineering statics and mechanics to determine loading, stresses, and deflection. I’d be happy to share the calcs with whoever wants to geek out.

Results:
At upper frame crossbar
Reaction Load (Shear Like) - 235 lbf
Compressive Load (Longitudinal) – 843 lbf

At lower frame connection closest to shock
Axial load in member – 1293 lbf
Stress in longitudal tube (bending) 31,302 psi (76% of yield)
Bending moment – 132 lbf-ft
Max Axial stress in member – 5408 psi (13% yield)

At shock mount
Max Deflection – 0.008”

Shock/Spring Load required to yield highest stressed point – 1821 lbf

So given the results of calculations, I’m feeling much better about pursuing the rear shock mount as it sits. I’m also planning to add some gussets to the short upright in order to add some lateral stiffness to the connection.
 

Attachments

  • IMG_20140907_123235195.jpg
    IMG_20140907_123235195.jpg
    2.9 MB · Views: 323
  • IMG_20140907_100913868_HDR.jpg
    IMG_20140907_100913868_HDR.jpg
    1 MB · Views: 309
  • IMG_20140907_100439001.jpg
    IMG_20140907_100439001.jpg
    2.4 MB · Views: 315
Re: 74 RD250 - Anything more than 2 strokes is a waste

Just note that if you plan on running the Y-Boot, the air filter that is used with it will not fit with that shock mount set up. The RZ style set up would be tough to work with the reservoir hanging off the back of that shock, I know because I looked into it. I'm digging the calculations on the metal, it's way cooler than seeing someone just through stuff together because they saw it on a biker website and assume that it must work.
 
Re: 74 RD250 - Anything more than 2 strokes is a waste

Damn, forgot about the Y-boot and air filter...
Plan A was to Vee the connection to the frame but that is well above my pay grade. I really don't like the look of that shock mount as it sits. It just doesn't flow with the rest of the lines on the bike. Back to the drawing board.
 
Re: 74 RD250 - Anything more than 2 strokes is a waste

Took some time away from the RD to race local moto and supercross. Now that I race the "Vet" classes, I find that my body needs 1-2 of recovery following a good day of racing.

Although the math worked out for my other shock mount, I didn't like the way it looked. I also wanted to run the Y-boot. So it was back to the drawing board. I would have like to do something more elegant, but went the route of the RZ shock mount and fabricated a center piece that spans the engine mount cross bar to another piece of 1" tubing that I coped to fit in the frame. It's not the sexiest shock mount out there, but it's functional and safe. I took the spring off the shock and ran the linkage through the motions. I end up with about 1/4"ish between the shock reservoir and the rear cross bar when it's on the bump stop. I'm cool with that. The bike can hold itself up now.
 

Attachments

  • IMG_20140928_102729644_HDR[1].jpg
    IMG_20140928_102729644_HDR[1].jpg
    2.8 MB · Views: 320
Re: 74 RD250 - Anything more than 2 strokes is a waste

Since I won't be running the stock seat, I needed a way to hold down the back end of the tank. I wanted something to incorporate the rubber isolators of the stock RD setup, was secure, and could be easily removed. I ended up cutting up the stock rear tank mount and tacking it to the frame. On the tank side, I cut down a 3/8" clevis pin, welded a 3/8" washer to the head, then welded the washer to the underside of the gas tank. The tank was full of water when I did the welding to minimize any chances of trouble, although this thing hasn't seen petrol for 30 years.
I picked up some rubber grommets and a hairpin to lock things down while riding.
 

Attachments

  • IMG_20141005_093146440[1].jpg
    IMG_20141005_093146440[1].jpg
    3.9 MB · Views: 359
  • IMG_20141005_181003116[1].jpg
    IMG_20141005_181003116[1].jpg
    2 MB · Views: 317
  • IMG_20141005_095440065[1].jpg
    IMG_20141005_095440065[1].jpg
    2.8 MB · Views: 318
Re: 74 RD250 - Anything more than 2 strokes is a waste

I wanted a circular pattern to the satin finish of my mag cover. So I got it. I'll be doing the same with the clutch side.
In other news, this awesome guy I work with had a set of RD350 cylinders and heads kicking around his shop that he gave to me in exchange for my RD250 cyls and heads. This project has found momentum again.
 

Attachments

  • IMG_20141021_185541531_HDR[1].jpg
    IMG_20141021_185541531_HDR[1].jpg
    2.9 MB · Views: 314
  • IMG_20141021_185531664_HDR[1].jpg
    IMG_20141021_185531664_HDR[1].jpg
    3.3 MB · Views: 313
Re: 74 RD250...is now a 350 - Anything more than 2 strokes is a waste

While not as sexy, version two of the upper shock mount is way better. It should be way stiffer and lighter too.
 
Re: 74 RD250...is now a 350 - Anything more than 2 strokes is a waste

Well, it's been a frustrating few weeks with the bike. I can't seem to make any progress.
I was able to get the bottom end of the engine/trans together without any issues. The new crank from Vito's and the seal kit from Economy Cycle fit perfect. The trouble came with the old clutch basket/gear. When I rolled the engine over by hand, I found a sticky spot, where the crank/clutch didn't want to roll smooth. I was able to narrow it down to a single gear tooth on the clutch primary gear. I'm not sure how this may have happened, but one tooth has a slight wave to it. You can see in the pic below the left tooth with the orange paint dot has the slightest wave. I considered trying to file it flat, but first I have to find a file with a hardness higher than the gear tooth.

As I mentioned in a previous post, a guy I work with was kind enough to swap me a set of RD350 cylinders/heads for my RD250 cylinders/heads. Aside from some surface rust and 20 years of dirt/dust on the fins, the bores were in good shape and at 65.00mm. Lots of life left. I tried to hit the cylinders with my hone to see if they'd clean up. Not the case. There were a few vertical scores that just didn't want to clean up. Since I have nothing to lose, I might try honing them out again to see how large the bore ends up, but I'm thinking I'm going to have to bore the cyls to 65.25mm and run the next size up Banshee piston.
Sidenote - Aluminum brightener from Napa worked pretty good to clean these cylinder fins. I then worked them over with a thin wire brush. It's coming out looking pretty good, but I still can't get the gunk out from between them. I'm thinking pressure washer next.

One last fail to report - I was trying to weld steering stops to my lower triple clamp, but for the life of me last night, I couldn't get the cast AL of the lower triple to puddle at all.
 

Attachments

  • IMG_20141101_121252260[1].jpg
    IMG_20141101_121252260[1].jpg
    2.4 MB · Views: 306
  • IMG_20141104_192233254_HDR[1].jpg
    IMG_20141104_192233254_HDR[1].jpg
    3.2 MB · Views: 350
  • IMG_20141104_192249064_HDR[1].jpg
    IMG_20141104_192249064_HDR[1].jpg
    3.1 MB · Views: 355
Re: 74 RD250...is now a 350 - Anything more than 2 strokes is a waste

Wow, that waved tooth is weird, that would have been hard to find I bet. I wonder if you can just replace the basket? Can't be too expensive. Not sure if filing that flat won't cause you more greif down the road.
 
Re: 74 RD250...is now a 350 - Anything more than 2 strokes is a waste

I don't think that you'll be able to hone that cylinder enough and still keep it in round.
 
Re: 74 RD250...is now a 350 - Anything more than 2 strokes is a waste

clem said:
I don't think that you'll be able to hone that cylinder enough and still keep it in round.

I agree, but since I had nothing to lose, I was going to hone until the scores were removed, then measure my bores for size/taper/round to see where they were at. It's looking like banshee pistons, fresh bore/hone, and 350 primary/oil pump gears to mate with the 350 clutch basket that I was given (gracious hat-tip to the charitable co-workers)
 
Re: 74 RD250...is now a 350 - Anything more than 2 strokes is a waste

Hez jchek,

I got 350 jugs sitting around aswell.might pop them in the next season,currently fiddling with electrics,brakes et cetera of my RD.

Am i right that for the 350 conversion you ll need:

350 pistons
350 primary gear
350 oil pump gear
Rejet carbs

Thats all isnt it?

Cheers mate great build so far!!
 
Re: 74 RD250...is now a 350 - Anything more than 2 strokes is a waste

Ryan Stecken said:
Hez jchek,

I got 350 jugs sitting around aswell.might pop them in the next season,currently fiddling with electrics,brakes et cetera of my RD.

Am i right that for the 350 conversion you ll need:

350 pistons
350 primary gear
350 oil pump gear
Rejet carbs

Thats all isnt it?

Cheers mate great build so far!!

350 pistons for a Banshee, since they come in .25mm increments. You have to remove some skirt material from the base of the Banshee piston, but that's well documented with a simple search of the web.
350 primary gear with a 350 clutch basket/66 tooth clutch gear.
350 oil pump gear to mesh with the 350 primary
Carb jets.

That should do it for you.
 
Re: 74 RD250...is now a 350 - Anything more than 2 strokes is a waste

I ended up solving my clutch gear problem by acquiring a 350 clutch basket, pri gear, and oil pump gear. I'm still a bit pissed about the gnarfed clutch gear - I had good luck for the past 10 years using a penny with the sides cut off it to wedge between 2 gears to break primary gear nuts/bolts loose. I can't say for sure that that's what happened, as the engine was seized when I tore it down. Problem solved, moving on.

Last week I tried to TIG aluminum steering stops to the lower triple. I didn't have much luck welding to the cast aluminum triple and wasn't going to do any further damage trying. I ended up fabricating a bolt on steering stop plate. It came out pretty good, but I have a little more work to do to dress it up. I was also able to machine some front wheel spacers on a friends bench top lathe. I tried to make rear wheel spacers, but I ran against the limit of lathe capability when trying to bore the axle through holes.
 

Attachments

  • IMG_20141109_102450580[1].jpg
    IMG_20141109_102450580[1].jpg
    1.2 MB · Views: 311
Re: 74 RD250...is now a 350 - Anything more than 2 strokes is a waste

that bolt on steering stop looks fine
for future reference on larger castings, not puddling is simply the amount of amp and size of tungsten you ain't getting enough heat soaked into the base material
this is where pre heating is the answer, that and an 1/8 tungsten and turn up the amps
preheat on something like that with a propane torch works fine
 
Re: 74 RD250...is now a 350 - Anything more than 2 strokes is a waste

xb33bsa said:
that bolt on steering stop looks fine
for future reference on larger castings, not puddling is simply the amount of amp and size of tungsten you ain't getting enough heat soaked into the base material
this is where pre heating is the answer, that and an 1/8 tungsten and turn up the amps
preheat on something like that with a propane torch works fine

Thanks for the feedback. I was small with the tungsten electrode because the largest I had was 3/32" I tried to preheat with the propane torch, cranked the juice up to 180 amps, and still had no luck. It wouldn't puddle the cast before it started to melt away the 1/4" thick steering stop I was trying to weld to it. I'm still a novice with the TIG.
 
Re: 74 RD250...is now a 350 - Anything more than 2 strokes is a waste

that is a very tricky deal... i can see what your saying now, i hadn't thought of it as having a such little piece that just wants to meltaway....
 
Back
Top Bottom