
locOleoN
Is that the best you got? OK.. now my TURN...
Check it out...
I pulled this from:
http://www.anubiscycle.com/cb750-dual-disc-brake-install.htm
This is how Im gonna set up my front brakes for my cb750 from single disk brake to duals.. I thought I might share:
We are going to demystify the Honda CB 750 Dual Disc Brake conversion and make it possible for you to do this modification to your bike and greatly improve your stopping power. We would like to thank Ben Hiles for providing this information.
You will need the following parts:
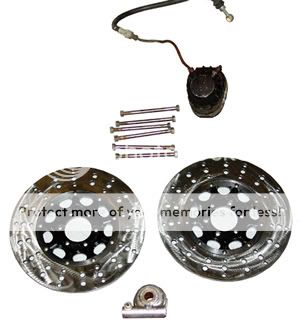
1- caliper arm (make sure you have the correct one as there are two different kinds you can have. The shorter ones are for the earlier models)
1- caliper
1- disc
6- 8mmx110mm bolts (for mounting the brake disc)
1- lower brake line (that makes two all up)
1- steel brake line to caliper (which again makes two all up)
1- Double banjo fitting (for the two lower brake lines, this can be made or you can use a dual banjo bolt from any modern sport bike with dual disc front brake - otherwise you will have to buy one and they are about $16)
1- Bigger master cylinder (Some say that you should use a Goldwing master or other modern master, the larger CB750F masters are plenty big enough to handle the job)
1- CB500/550 speedo drive plate (no modification)
2- 6mmx30mm bolts and washers
1- 8mmx35mm bolt and washer
You will also need some spare 6mm washers for shims.
1. Put the bike on the center stand, and jack the front off the ground, take the wheel off, remove the axle and the factory disc bolts.
2. Remove the speedo drive, chrome retainer plate, Speedo gearbox drive, and the rubber ‘O’ ring on the hub.
3. Now get your two discs… when you look through them back to back, they will line up, but only on a couple of spots, mark them so when you bolt them together on you hub, they will look the same… when looked though… this is just cosmetic.
4. Now that you have made sure they line up, and have marked them, get the 6 110mm long bolts and pass them through disc number one.. this disc is going onto the speedo drive side… if you put them in from the other side the nuts will hit the speedo gear box.. so bolt heads MUST be on the speedo side (fig 1)… now feed the disc over the hub, with the bolts going right through the hub, and put disc number two on, with holes that were marked lined up, and do up the nuts..sorry couldn’t find a torque setting for these bolts.
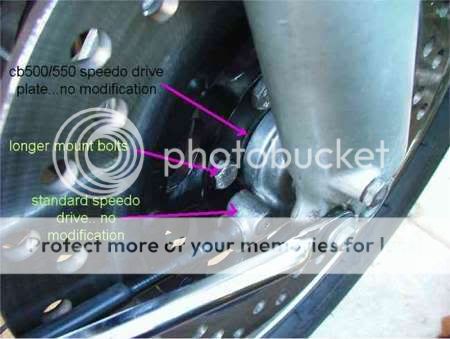
5. Now put the CB500/550 speedo drive plate in the middle of the second disc, it should be a really neat fit, but it should fit, you wont be able to use your chrome dress ring because of clearances.
6. Next put you speedo gearbox on then refit your axle..if you have forgotten which side the shaft goes into… it insets from the speedo side, once this is done, your front double disc wheel is complete… no the caliper.
Now for starters, remove your front guard.
7. Now you are going to have to refit the wheel for this… and from now on it is a lot of fitting, and removing of the caliper arm to get right.
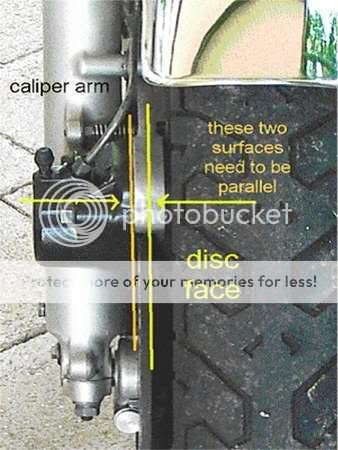
Firstly I fitted the caliper arm, and didn’t check anything…BIG mistake… what happened was, when I squeezed the front brake the caliper wasn’t parallel to the disc, and jammed the whole show up!!!, I mean major drama just to get the caliper mount bolts undone so I could just move the bike…
So what you need to do is place the 8mmx35mm bolt and washer into the lower hole on the caliper pivot arm and just nip up…. This will give a good idea of how out of shape the mounts on this fork leg are…. Mine had a gap of more than 20mm between the top mounts on the fork, to the top mount of the pivot arm.
Now this is where the patience and trial and error are coming into there own…you need to take the pivot arm off again, and file the lower mount little by little till you can mount the pivot arm parallel to the disc (fig 2), you can use a straight ruler along the side of the pivot arm to check parallel.
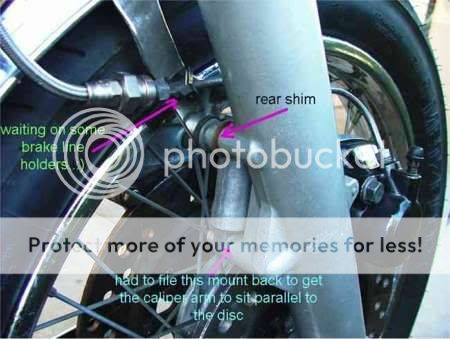
now what I did was try and file the lower mount as close as I could to the fork leg, without fowling up the pivot arm, b4 I started shimming the top of the mount (fig 3)
this took some time to get right, because you have to file the pivot mount parallel to the disc as well, otherwise the top of the pivot arm wont mount to the fork… take your time, you can always take metal off… its bloody hard to put it back on though, and also remember that there is metal filings going into the threads, blow these out b4 screwing a bolt into them… it will destroy the thread, and that’s not a good thing…
The next, when things are parallel, nip the pivot arm to the fork leg, then measure the gap left between the top mounting points of the fork and the top mounts of the pivot arm, and then filed back a pair of washers to fit in these gaps ,in (FIG3) you see the rear mount shim, and in (fig 4) you see the front mount shim.
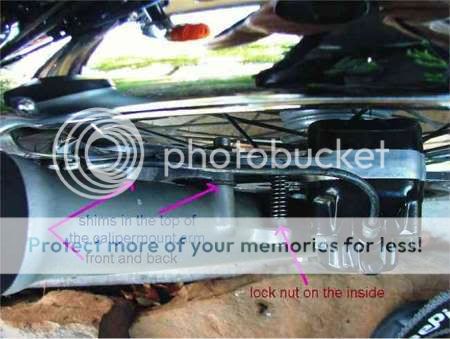
you will also notice how parallel the caliper pivot arm and the disc are, this is essential to this set up working properly.
Ok now we have the pivot arm all nice and parallel, you would have also noticed by now, that you have to try and get bolt done up when the wheel is on, don’t uses socket head caps screws as the mounting bolts like I did, you eve tried getting an allen key between a wheel to do them up!!!, stick to bolts for this application, another thing you are going to have to remove one of the calipers if you want to remove the wheel in the future.. the wheel and tire just don’t fit between the two pivot arms when they are both bolted on… there is always a downside to something.
Now while looking at the bike from the front mount the guard to the right side first using the bolts and washers that came off that side,, on the left side use your 8mmx35 bolt and washer, on the lower mount.
You will find at this point you may need to slightly bend your guard mount a little to get the pivot arm behind it (fig 4), the guard has rubber grommets in the it, take them out, now you need 6mm washers between the guard mount and the pivot arm, and then you need 6mm washers between your bolts and the other side of the guard mount( the guard mount is sandwiched between the washers), this stops the guard from moving round and makes for a more solid plate form for you to tighten the upper pivot arm bolts.
Ok now you should have the pivot arm, ad the guard fitted, and everything should still be parallel, now to fit the adjuster screw, you will notice that the adjuster screw mount on the fork is in a different spot to the other fork, hence why I put the lock nut on the inside , there just wasn’t any room on the outside, you will see this in figure 4.
Ok to the caliper, I would suggest that you rebuild them b4 you put them on the bike, nothing worse than getting some thing finished to have to pull it apart again… the caliper just mounts the same as the normal factory caliper, its just reversed, so nothing hard there, the steel brake line runs the same, though you may have to zip tie it to the guard, because there is no line holder on this side (fig 3).
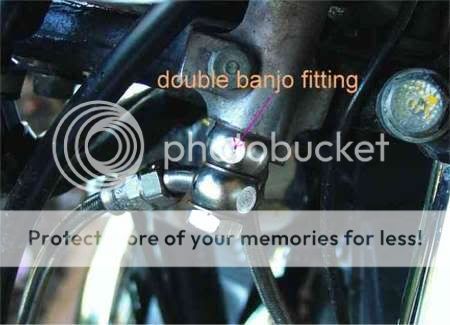
Ok now you need your new lower brake line, and the double banjo fitting, this is best explain with fig 5
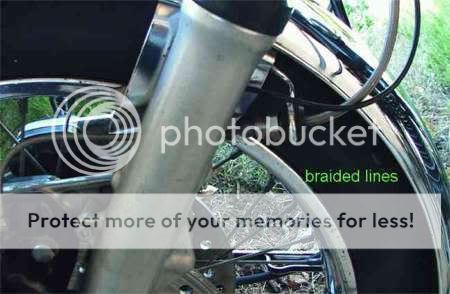
you will notice that I am using stainless braided lines… got my local hydraulics shop to make them for me, but the standard factory lines will fit also, connect you steel line(fig4) to your new lower line, and this part of the conversion is done.
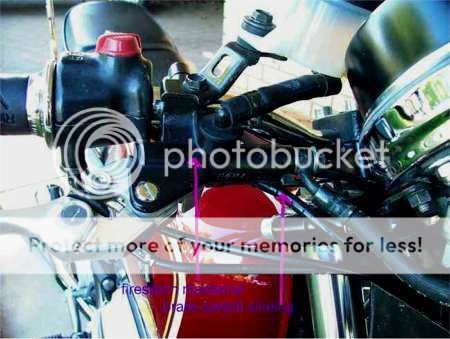
Onto the master cylinder. I have used a master cylinder of f of a VTR1000f (fig 6), and that is only because I had one laying round, but the master cylinder from any twin disc bike will do as long as it fits the handle bars, I have been told that you can use a master cylinder off a GL1500 goldwing, so that will make the system look more authentic
Now all that is left is to bleed the system, I think there is enough said about bleeding brakes to not warrant me going through it… this is a well worth while mod, and when done correctly gives huge improvement over the standard set up, I hope this has been helpful.
I pulled this from:
http://www.anubiscycle.com/cb750-dual-disc-brake-install.htm
This is how Im gonna set up my front brakes for my cb750 from single disk brake to duals.. I thought I might share:
We are going to demystify the Honda CB 750 Dual Disc Brake conversion and make it possible for you to do this modification to your bike and greatly improve your stopping power. We would like to thank Ben Hiles for providing this information.
You will need the following parts:
1- caliper arm (make sure you have the correct one as there are two different kinds you can have. The shorter ones are for the earlier models)
1- caliper
1- disc
6- 8mmx110mm bolts (for mounting the brake disc)
1- lower brake line (that makes two all up)
1- steel brake line to caliper (which again makes two all up)
1- Double banjo fitting (for the two lower brake lines, this can be made or you can use a dual banjo bolt from any modern sport bike with dual disc front brake - otherwise you will have to buy one and they are about $16)
1- Bigger master cylinder (Some say that you should use a Goldwing master or other modern master, the larger CB750F masters are plenty big enough to handle the job)
1- CB500/550 speedo drive plate (no modification)
2- 6mmx30mm bolts and washers
1- 8mmx35mm bolt and washer
You will also need some spare 6mm washers for shims.
1. Put the bike on the center stand, and jack the front off the ground, take the wheel off, remove the axle and the factory disc bolts.
2. Remove the speedo drive, chrome retainer plate, Speedo gearbox drive, and the rubber ‘O’ ring on the hub.
3. Now get your two discs… when you look through them back to back, they will line up, but only on a couple of spots, mark them so when you bolt them together on you hub, they will look the same… when looked though… this is just cosmetic.
4. Now that you have made sure they line up, and have marked them, get the 6 110mm long bolts and pass them through disc number one.. this disc is going onto the speedo drive side… if you put them in from the other side the nuts will hit the speedo gear box.. so bolt heads MUST be on the speedo side (fig 1)… now feed the disc over the hub, with the bolts going right through the hub, and put disc number two on, with holes that were marked lined up, and do up the nuts..sorry couldn’t find a torque setting for these bolts.
5. Now put the CB500/550 speedo drive plate in the middle of the second disc, it should be a really neat fit, but it should fit, you wont be able to use your chrome dress ring because of clearances.
6. Next put you speedo gearbox on then refit your axle..if you have forgotten which side the shaft goes into… it insets from the speedo side, once this is done, your front double disc wheel is complete… no the caliper.
Now for starters, remove your front guard.
7. Now you are going to have to refit the wheel for this… and from now on it is a lot of fitting, and removing of the caliper arm to get right.
Firstly I fitted the caliper arm, and didn’t check anything…BIG mistake… what happened was, when I squeezed the front brake the caliper wasn’t parallel to the disc, and jammed the whole show up!!!, I mean major drama just to get the caliper mount bolts undone so I could just move the bike…
So what you need to do is place the 8mmx35mm bolt and washer into the lower hole on the caliper pivot arm and just nip up…. This will give a good idea of how out of shape the mounts on this fork leg are…. Mine had a gap of more than 20mm between the top mounts on the fork, to the top mount of the pivot arm.
Now this is where the patience and trial and error are coming into there own…you need to take the pivot arm off again, and file the lower mount little by little till you can mount the pivot arm parallel to the disc (fig 2), you can use a straight ruler along the side of the pivot arm to check parallel.
now what I did was try and file the lower mount as close as I could to the fork leg, without fowling up the pivot arm, b4 I started shimming the top of the mount (fig 3)
this took some time to get right, because you have to file the pivot mount parallel to the disc as well, otherwise the top of the pivot arm wont mount to the fork… take your time, you can always take metal off… its bloody hard to put it back on though, and also remember that there is metal filings going into the threads, blow these out b4 screwing a bolt into them… it will destroy the thread, and that’s not a good thing…
The next, when things are parallel, nip the pivot arm to the fork leg, then measure the gap left between the top mounting points of the fork and the top mounts of the pivot arm, and then filed back a pair of washers to fit in these gaps ,in (FIG3) you see the rear mount shim, and in (fig 4) you see the front mount shim.
you will also notice how parallel the caliper pivot arm and the disc are, this is essential to this set up working properly.
Ok now we have the pivot arm all nice and parallel, you would have also noticed by now, that you have to try and get bolt done up when the wheel is on, don’t uses socket head caps screws as the mounting bolts like I did, you eve tried getting an allen key between a wheel to do them up!!!, stick to bolts for this application, another thing you are going to have to remove one of the calipers if you want to remove the wheel in the future.. the wheel and tire just don’t fit between the two pivot arms when they are both bolted on… there is always a downside to something.
Now while looking at the bike from the front mount the guard to the right side first using the bolts and washers that came off that side,, on the left side use your 8mmx35 bolt and washer, on the lower mount.
You will find at this point you may need to slightly bend your guard mount a little to get the pivot arm behind it (fig 4), the guard has rubber grommets in the it, take them out, now you need 6mm washers between the guard mount and the pivot arm, and then you need 6mm washers between your bolts and the other side of the guard mount( the guard mount is sandwiched between the washers), this stops the guard from moving round and makes for a more solid plate form for you to tighten the upper pivot arm bolts.
Ok now you should have the pivot arm, ad the guard fitted, and everything should still be parallel, now to fit the adjuster screw, you will notice that the adjuster screw mount on the fork is in a different spot to the other fork, hence why I put the lock nut on the inside , there just wasn’t any room on the outside, you will see this in figure 4.
Ok to the caliper, I would suggest that you rebuild them b4 you put them on the bike, nothing worse than getting some thing finished to have to pull it apart again… the caliper just mounts the same as the normal factory caliper, its just reversed, so nothing hard there, the steel brake line runs the same, though you may have to zip tie it to the guard, because there is no line holder on this side (fig 3).
Ok now you need your new lower brake line, and the double banjo fitting, this is best explain with fig 5
you will notice that I am using stainless braided lines… got my local hydraulics shop to make them for me, but the standard factory lines will fit also, connect you steel line(fig4) to your new lower line, and this part of the conversion is done.
Onto the master cylinder. I have used a master cylinder of f of a VTR1000f (fig 6), and that is only because I had one laying round, but the master cylinder from any twin disc bike will do as long as it fits the handle bars, I have been told that you can use a master cylinder off a GL1500 goldwing, so that will make the system look more authentic
Now all that is left is to bleed the system, I think there is enough said about bleeding brakes to not warrant me going through it… this is a well worth while mod, and when done correctly gives huge improvement over the standard set up, I hope this has been helpful.
")


