CB100 - The "Snow Day"

dmbtiger19

New Member
I brought home a 1972 CB100 today, and here it is. The bike is complete except for three things. The keys, a carb, and a title. I've already got plans for all three, so we are ready to roll. The keys I'll pick up from Tena Vintage. I'l grab and upgrade to a Mikuni carb from ebay, and the title I'll have to do some tinkering on, but Diesel has already offered his services in Maine.

As for the bike, I plan on creating a cross between a cafe and a tracker; but seeing as how even with the final motor installment I have planned this bike will never break into the ton, I decided it was a better idea to post the build here.

Either way, here are the pictures.

003.jpg


004.jpg


006.jpg


005.jpg


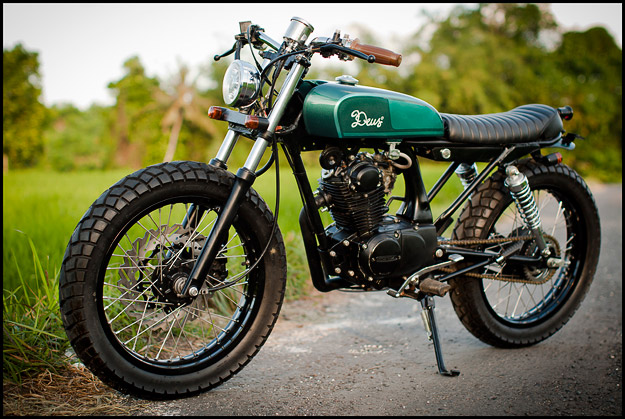
I'm going to keep my plans a secret for now, but here are some of the inspirations
CB100GF1-tm.jpg


honda-cb100.jpg


I plan on starting to tear the bike down tomorrow.
Opinions?
 
Re: CB100 - The beginning

Ok so anyone interested in a seat, tank, taillight or blinkers for a 72? Haha. Looks like I now have some to sell.
 
Re: CB100 - The beginning

So I found what I believe to be the remains of the original air filter and the tires might just be the originals. Motor turns but, I'm just wondering how the insides look.
 
Re: CB100 - The beginning

Long live the little scoot! This should be a fun project. But be careful with the title thing- would be a shame to have a sweet "camp" bike.
 
Re: CB100 - The beginning

That tank looks pretty sweet. I dig the original color schemes. Where are you located? What kind of shape is the seat in?
 
Re: CB100 - The beginning

A few updates. The tank's tunnel is pretty rusted so I'll probably just cut it part for parts. The senate is in pretty good condition, and I'll post some pictures later this week. I've already stripped the bikes lights, tank, forward controls and bars, seat, and nervous system. The goal is to get the engine out and suspension torn apart by the first of next week, but who knows with Christmas.
 
CB100 - The first major update

Okay, so I found my camera and here are all of the pictures for the last week.

002.jpg

It amazes me how many wires they seem to cram into these headlights.

003-Copy.jpg

Bottom of the seat pan looks good. If you are interested, it will be posted on ebay later this week.

004-Copy.jpg

39 years worth of southern soil, but no problems so far.

005-Copy.jpg

In case you are wondering, that is not dirt and grime in the airbox. That is what remains of the ORIGINAL air filter.

006-Copy.jpg

If you look closely you should be able to spot some of my finger prints that caused the filter to literally fall off and blow away.

009.jpg

The tank was the next thing to be ripped off the bones of the CB. It is pretty rusted inside and down the tunnel, so it will probably just be scavenged for parts a-la CCrider style.
010.jpg

011.jpg

012.jpg


013.jpg

Good thing I was planning on replacing the plug wires any way, huh?

014.jpg

Nervous system stripped and tossed.

015.jpg

Seat is just sitting on there now so I could play with my riding position. I'm 6 feet tall on a tiny ass CB, so it goes without saying that I'll have to sit farther back and figure something out for the rearsets. I like the look of the forward slanting bars, but I think they will be killer on my wrists while riding.

027.jpg

I took off the alternator cover to start prepping it. Looks pretty clean underneath. Maybe the engine won't be so bad, but there is only one way to know...

033.jpg

Rear wheel is out.

034.jpg

Shocks are gone too, but now I have to deal with this magical floating swing arm. More on that later.
The shocks are 12 inches from center to center. I want to raise the back end a little (again for my height), so does anyone have any suggestions on new shocks?

035.jpg

I couldn't manage to get the wheel bearings out of either wheel. Suggestions?

043.jpg

First attempt at laying out the holes in the case cover.

045.jpg

How it turned out. There isn't a pattern, so don't look for one. Instead I just drilled some holes (19 of them of course).

038.jpg

Just a little bit of rust. I like it looks kind of like New Jersey.
 
Re: CB100 - The beginning

Fun man! Looks just like my CL100!


I didn't fully realize JUST how small that frame is until I got my KZ400 home and compared them side by side. So funny.
 
CB100 - The first question

Okay so after looking at the swing arm for a little bit (and bashing my knuckles against the frame twice) i started to figure out why the damn thing was stuck.

Firstly, as I have already discovered, this bike was rode hard by rednecks and then stored in a building so every crack and hole is packed with SC dirt, dust and mold. So, I started by spraying the swing arm with WD-40 and then filing between the frame and swing arm with a nail file. However, this only did three things in the end... waste my time, make the swing arm more a little better, and make me feel like an idiot. This did not loosen the bolt at all.

001-Copy.jpg

003-Copy2.jpg

006-Copy2.jpg


So, the next morning I took it to the Old Man's workshop. It is mostly wood working tools and equipment, but he has a pretty nice air setup and most attachments I'll need. With that said, the swing arm is now off. Bastard!

009-Copy.jpg

008-Copy.jpg


Now I'm to the point where I'm ready to start prepping the frame for paint, but I can't figure out how to get the lower forks off. I know there has to be some easy way to get the nut off of the stem, but again I'm lost. Any help is appreciated.

013-Copy.jpg

014-Copy.jpg

015-Copy.jpg
 
Re: CB100 - The first question

Thanks a lot Rev. That means I can tap it out tomorrow and hopefully prime the frame. Let's hope for no rain. Getting to the point where I have to finalize the paint specifics. I'm still in the looks for some rear shocks that are 13 inches from eyelet to eyelet if anybody knows of any out there.

Also, funny that Rev commented cause I was checking out the build of minimus today. What did you search for to find a pipe like that on eBay? I would like to find something similar.
 
Re: CB100 - The first question

I may have a set out in the shed, that were on my 72' years ago. Not sure of the length. I'll check and get back to ya.
 
Re: CB100 - The first question

So I have good and bad news today. The bad news is that it is raining so I can't get outside and the wife isn't too keen on me prepping the paint inside the house. Might start work on the wheels soon but I'm still stuck on the wheel bearings.

Good news is that I just scored the triples for a sl70 off of eBay. Nearly identical to my triples, but they have removable risers. So now for 20 bucks, I've got a smooth top triple to work with. Delivered!
 
Re: CB100 - The first question

So the Old Man came through for my b-day. Got a new Dremel and a bunch of extra bits. I'm going to trim down this carcass tomorrow. I've got just about all I need now.

But, can anyone recommend a good paint stripper I can use on my frame that I can pick up locally? Lowes, Autozone, etc?
 
Re: CB100 - The new toy

Aircraft stripper. But get the big can of it, not the spray stuff. It's available at auto parts stores
 
Re: CB100 - The new toy

So good news and bad news right now. Good news is that I'm rolling on the wheels. Started prepping them for paint last night then notice some really bad pitting in the front rim. Probably going to have to replace it. Back rim looks great. Both of the hubs look good and I'm going to order new spokes with the next payday.

Tomorrow is a snow day down here in SC. I know, I know. Most of y'all live in the north, but down here we cancel school with even the threat of Ivey roads, so school teachers get the day off. Woo hoo. This means that I hope to get the frame ready for paint tomorrow.

All new pictures will be posted tomorrow.

Now here is the question. How do I remove the wheel bearings? Do I have too remove them if the look like they are in pretty good shape? If I don't remove them can I just tape over them for paint?
 
Can you media blast the rim and paint it? Or are you looking for chrome wheels?

If the bearings feel smooth you could just tape over them along with aanything else. But they are a real pita to remove. You can use a drift, or take it to a bike shop. Last time I had bearings pulled it was around 18 bucks a wheel
 
So I should just throw the shaft back through it and see how the spin?

I'm going to paint the wheels. There will be no chrome on this thing, cause I hate polishing. I think this chip is beyond repair but I'll make sure to get a close up of it.
 
Back
Top Bottom