
We noticed you are blocking ads. DO THE TON only works with community supporters. Most are active members of the site with small businesses. Please consider disabling your ad blocking tool and checking out the businesses that help keep our site up and free.
You are using an out of date browser. It may not display this or other websites correctly.
You should upgrade or use an alternative browser.
You should upgrade or use an alternative browser.
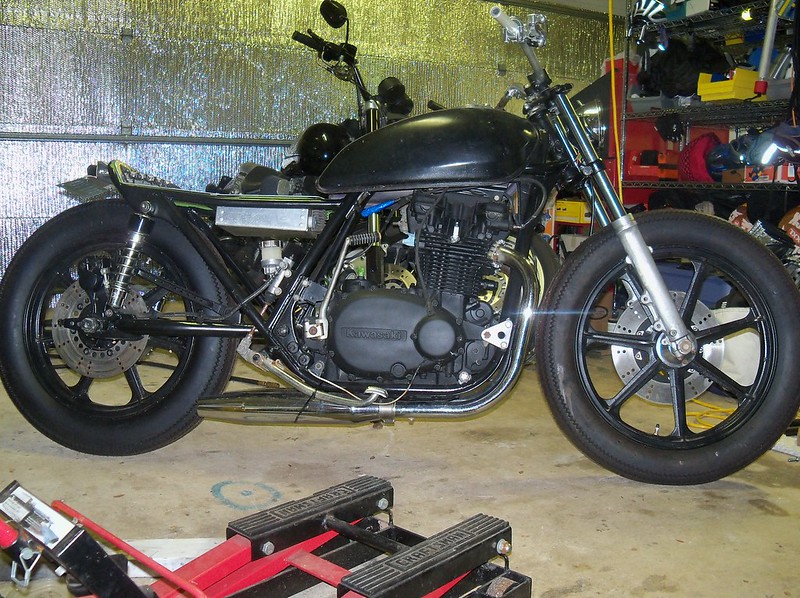
Project: "HonkyKong" 1979 KZ750 B Twin (brat-tracker-thingy)
- Thread starter hallin222
- Start date
Just search Amazon for "normally open button" or something similar. It should get you tons of hits:gk45011 said:What is the silver one off of? That is exactly what I'm looking for when I move some of my bar controls.
GK
http://www.amazon.com/Amico-Momentary-Button-Switch-Normally/dp/B008DFYEZQ/ref=sr_1_6?ie=UTF8&qid=1352237725&sr=8-6&keywords=normally+open+button
gk45011
Coast to Coast
Damn, Hallin.. Right on point for that exact momentary switch. I looked under momentary before and only got a short list of results.
http://www.amazon.com/SPST-NORMALLY-OPEN-BUTTON-SWITCH/dp/B006WS6FHG/ref=sr_1_3?ie=UTF8&qid=1352239077&sr=8-3&keywords=NORMALLY+OPEN+BUTTON
GK
http://www.amazon.com/SPST-NORMALLY-OPEN-BUTTON-SWITCH/dp/B006WS6FHG/ref=sr_1_3?ie=UTF8&qid=1352239077&sr=8-3&keywords=NORMALLY+OPEN+BUTTON
GK
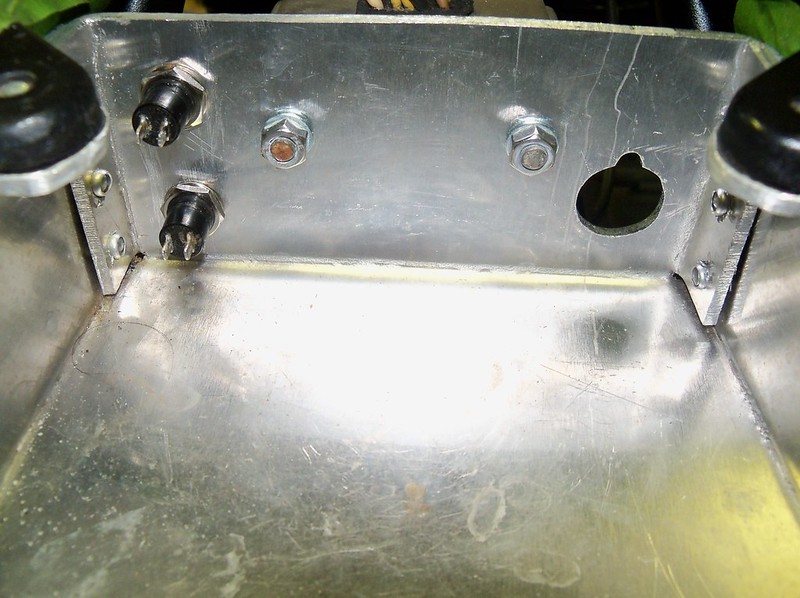
Minor updated to the electrical box. The two on the left will be starter and horn buttons, and I'll be re-using the factory ignition switch on the right. The ugly switch spacer will be replaced with something more permanent later. I've cut up the wiring harness a bunch, but it's not really back together cleanly yet, so no photos of that.
I'm happy that I've been able to keep the visible sides free of clutter. The only things being placed inside are a new Ballistic 8-cell battery, the starter relay, the fuse box, and the bundle of wires.
I'm happy that I've been able to keep the visible sides free of clutter. The only things being placed inside are a new Ballistic 8-cell battery, the starter relay, the fuse box, and the bundle of wires.
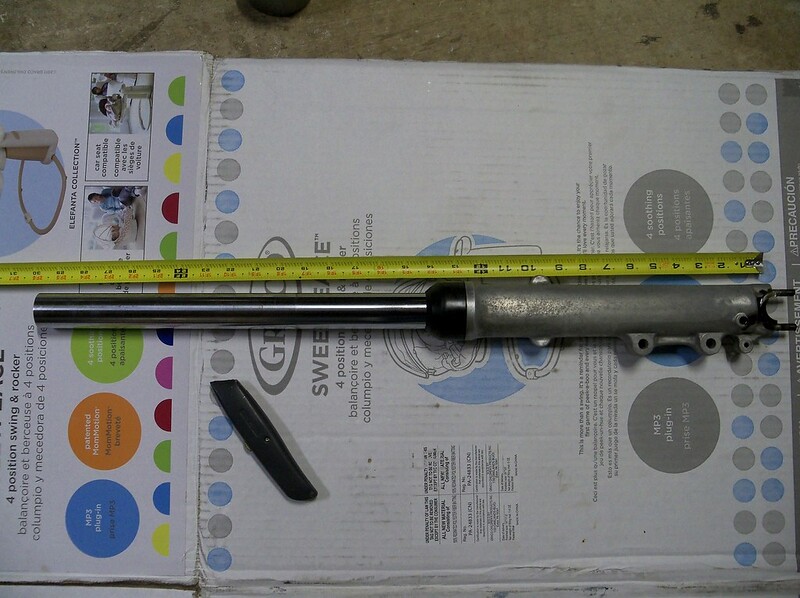
*** FORK LOWERING ***
I've yet to see another KZ750 twin dropped internally like this, and I really wanted to lower my stance to equal to or shorter than those seen in previous pages of this thread, but without the fork tubes protruding past the top triple clamp like done by so many builders (including my inspiration, Wrenchmonkees).
Starting point. I didn't document the removal of the forks from the frame, becasue if you can't do that, you shouldn't bother attempt the simple procedure below. I stole this method from the folks over at the XS650 forum.
my source of info: http://www.xs650chopper.com/2009/06/mulligan-machine-lower-your-xs650-forks-low-buck-garage-tech/
First, drain as much of the oil as possible via the tiny drain screw at the bottom. Pump the tube to squirt it out. Warning: this can make a mess if you're not careful, and it smells awful.
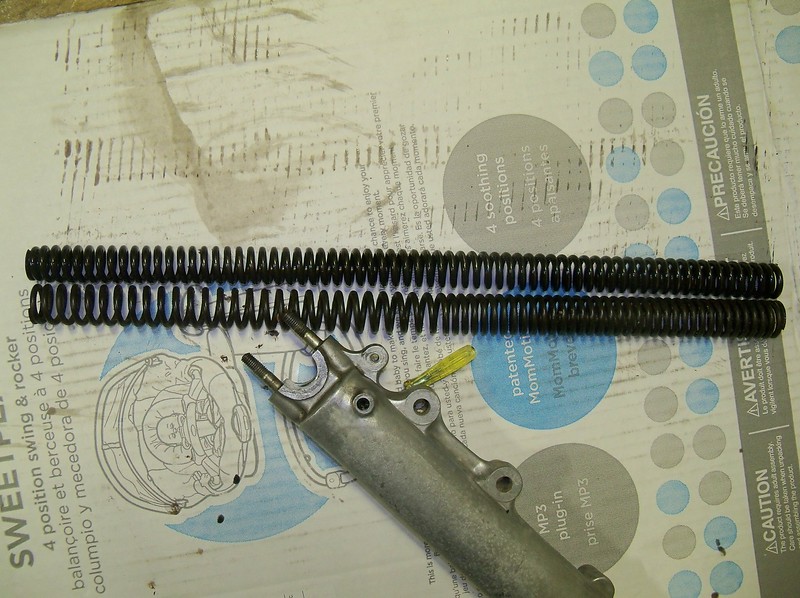
Next, unscrew the top cap via a 1/2 drive ratchet, and remove the main spring. Mine is the non-progressive one on top. The other is from a 4 cylinder KZ750 that I thought I might be able to use, but unfortunately, the OD of those coils is about .5mm too large to fit inside my fork tubes, despite the OD of both bikes' fork tubes being 36mm.
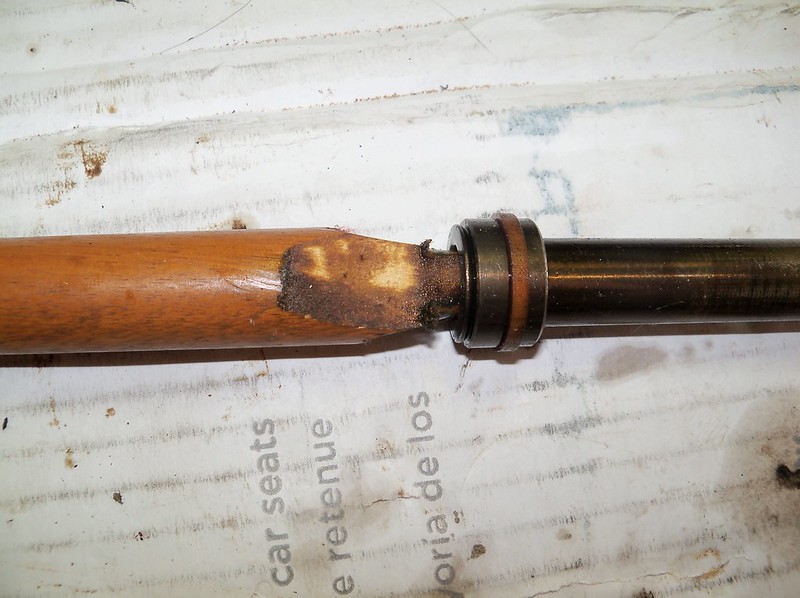
Now came the tough part. I had trouble removing the damper rod bolt from the axle side, as the damper just spun, and I didn't have the 'special tool' Kawasaki recommends to hold it still from inside the fork tube. So, per the instructions from the guys over on the KZ twin board, I cut down what is essentially a broomstick and jammed it in there, while I hit the lower bolt with an air impact to shock it loose.
This is obviously after the damper rod had been removed from the fork leg.
The contents all laid out in their approximate orientation of assembly. Not shown is the fork seal, which is still in the casting.
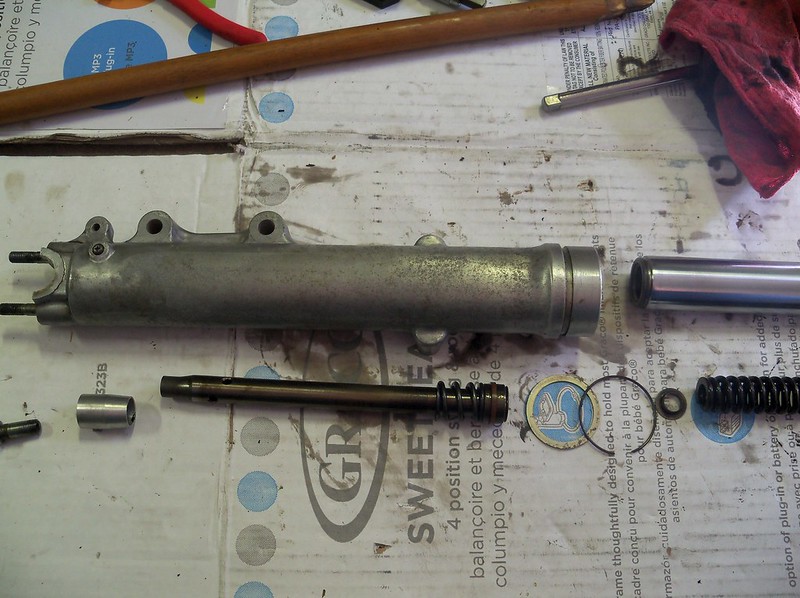
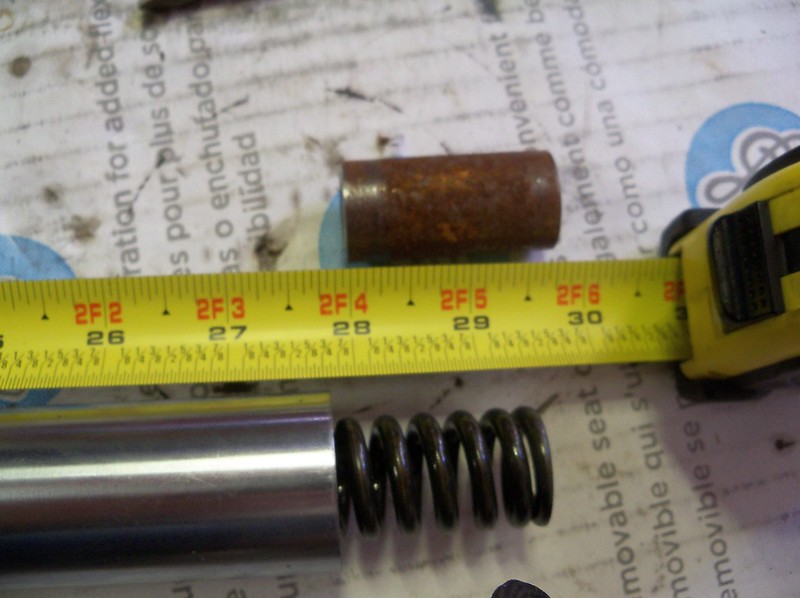
These are the spacers I cut down from some scrap steel tubing. I've heard of folks using PVC for this, but I feel better about having metal in there. I don't know why I didn't buy a pipe cutter years ago. This thing is awesome. Clean, straight cuts every time. These spacers will be de-rusted before final assembly. This was all just a dry mock-up until I can find some 15W fork oil.
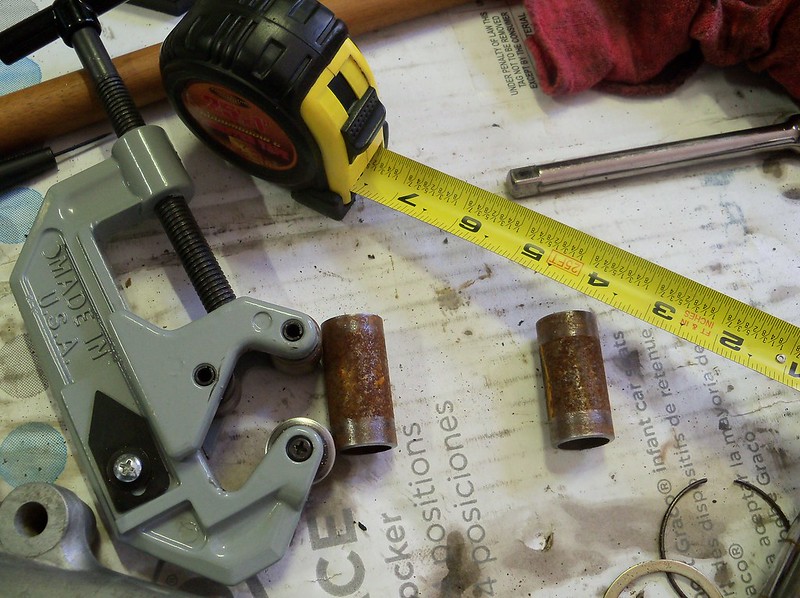
Placement of those spacers:

Re-assemble everythig in reverse order, again using the broom stick to allow proper tightening of the lower damper bolt.
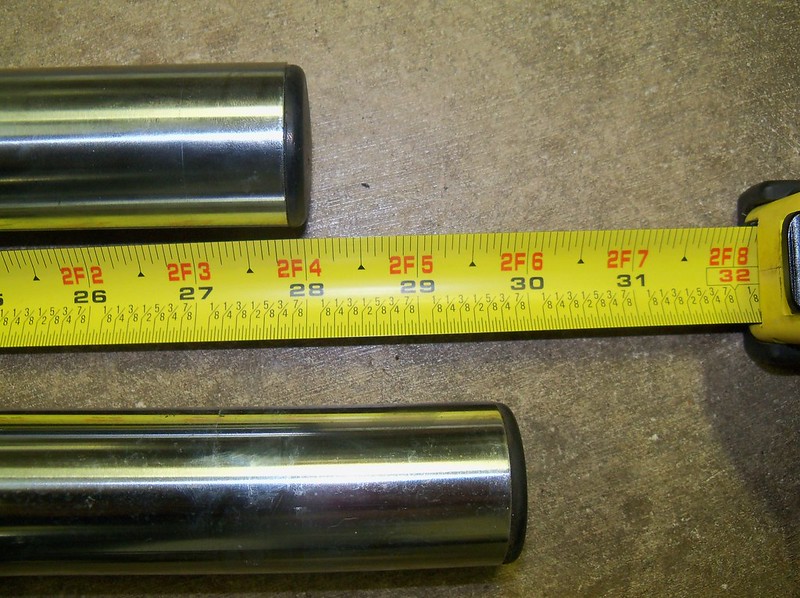
Now you're left with a main spring that is a little too long. Some of this needs to be cut. As suggested my the XS650 chopper link above, I cut slightly less away from the main spring, as the spacer was long. Spacer = 1.75". Spring reduction = 1.5". This creates a slight increase in spring preload. As a heavier rider, on what I considered to be a very soft set of forks, I thought this would help. I may add a tiny collar up top to add even more preload but that can wait.
I cut that top section of the main spring with an angle grinder, then ground it as smooth / flat as possible. The increased preload was not a major change, and I was still able to re-install the top cap with one hand. Note that I haven't added oil (don't forget that step), but I wanted to show the before & after lengths as seen below.
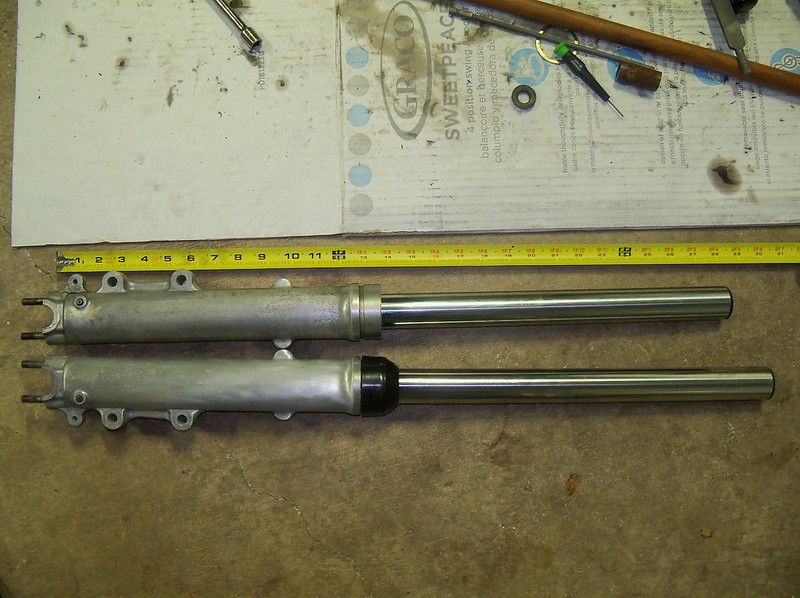
I still need to perform this on the second fork leg, so full bike photos will have to wait for another day. These cut springs with added preload feel a tad stiffer than stock, but it's hard to compare without any fork oil. I'll give my report on that issue when I have some in there.
I hope this helps some foks in the future.
I've yet to see another KZ750 twin dropped internally like this, and I really wanted to lower my stance to equal to or shorter than those seen in previous pages of this thread, but without the fork tubes protruding past the top triple clamp like done by so many builders (including my inspiration, Wrenchmonkees).
Starting point. I didn't document the removal of the forks from the frame, becasue if you can't do that, you shouldn't bother attempt the simple procedure below. I stole this method from the folks over at the XS650 forum.
my source of info: http://www.xs650chopper.com/2009/06/mulligan-machine-lower-your-xs650-forks-low-buck-garage-tech/
First, drain as much of the oil as possible via the tiny drain screw at the bottom. Pump the tube to squirt it out. Warning: this can make a mess if you're not careful, and it smells awful.
Next, unscrew the top cap via a 1/2 drive ratchet, and remove the main spring. Mine is the non-progressive one on top. The other is from a 4 cylinder KZ750 that I thought I might be able to use, but unfortunately, the OD of those coils is about .5mm too large to fit inside my fork tubes, despite the OD of both bikes' fork tubes being 36mm.
Now came the tough part. I had trouble removing the damper rod bolt from the axle side, as the damper just spun, and I didn't have the 'special tool' Kawasaki recommends to hold it still from inside the fork tube. So, per the instructions from the guys over on the KZ twin board, I cut down what is essentially a broomstick and jammed it in there, while I hit the lower bolt with an air impact to shock it loose.
This is obviously after the damper rod had been removed from the fork leg.
The contents all laid out in their approximate orientation of assembly. Not shown is the fork seal, which is still in the casting.
These are the spacers I cut down from some scrap steel tubing. I've heard of folks using PVC for this, but I feel better about having metal in there. I don't know why I didn't buy a pipe cutter years ago. This thing is awesome. Clean, straight cuts every time. These spacers will be de-rusted before final assembly. This was all just a dry mock-up until I can find some 15W fork oil.
Placement of those spacers:
Re-assemble everythig in reverse order, again using the broom stick to allow proper tightening of the lower damper bolt.
Now you're left with a main spring that is a little too long. Some of this needs to be cut. As suggested my the XS650 chopper link above, I cut slightly less away from the main spring, as the spacer was long. Spacer = 1.75". Spring reduction = 1.5". This creates a slight increase in spring preload. As a heavier rider, on what I considered to be a very soft set of forks, I thought this would help. I may add a tiny collar up top to add even more preload but that can wait.
I cut that top section of the main spring with an angle grinder, then ground it as smooth / flat as possible. The increased preload was not a major change, and I was still able to re-install the top cap with one hand. Note that I haven't added oil (don't forget that step), but I wanted to show the before & after lengths as seen below.
I still need to perform this on the second fork leg, so full bike photos will have to wait for another day. These cut springs with added preload feel a tad stiffer than stock, but it's hard to compare without any fork oil. I'll give my report on that issue when I have some in there.
I hope this helps some foks in the future.
crackerman
Been Around the Block
Nice work on that fork chop. I might have to do that on mine. I've rebuilt a couple sets of KZ forks and with out that "special tool" it's a real pain in the ass to pull them apart. I think I ended up doing something similar to what you did but it took me a while.
If your looking for jets for the BS38 carb I just finished jetting my 79kz. Took me a couple of orders to get the right ones but I found them. I'm running pods and Shorty open mufflers similar to what you got. I used a 50 pilot jet(bs30/96) and 135 main jet(n100.606 under pilot jet)Got them from Niche cycle. Def a big improvement over the stock 125, 45 pilot. I know a lot of people don't like the bs38 carbs, but there's not much to them and there easy to pull apart and clean.
If your looking for jets for the BS38 carb I just finished jetting my 79kz. Took me a couple of orders to get the right ones but I found them. I'm running pods and Shorty open mufflers similar to what you got. I used a 50 pilot jet(bs30/96) and 135 main jet(n100.606 under pilot jet)Got them from Niche cycle. Def a big improvement over the stock 125, 45 pilot. I know a lot of people don't like the bs38 carbs, but there's not much to them and there easy to pull apart and clean.
Thanks, crackerman. If I don't do the single carb swap, I'll use these as a good starting point.
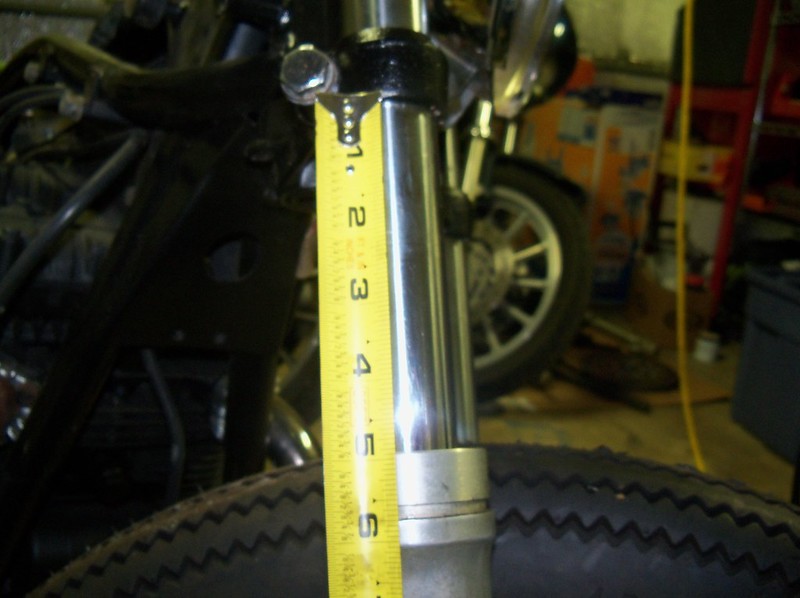
OK, so I couldn't wait. I hacked up the other leg and put it all back together dry tonight:
Resting on side stand:
Fully compressed:
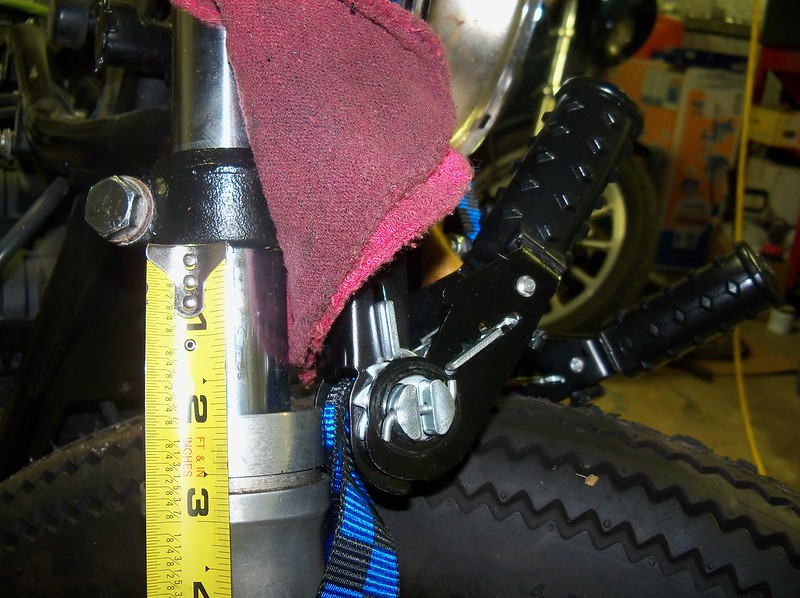
Lucky me. Coil bind (or whatever is causing internal fork 'bottoming') occurs here, and no tire-to-header contact occurs.
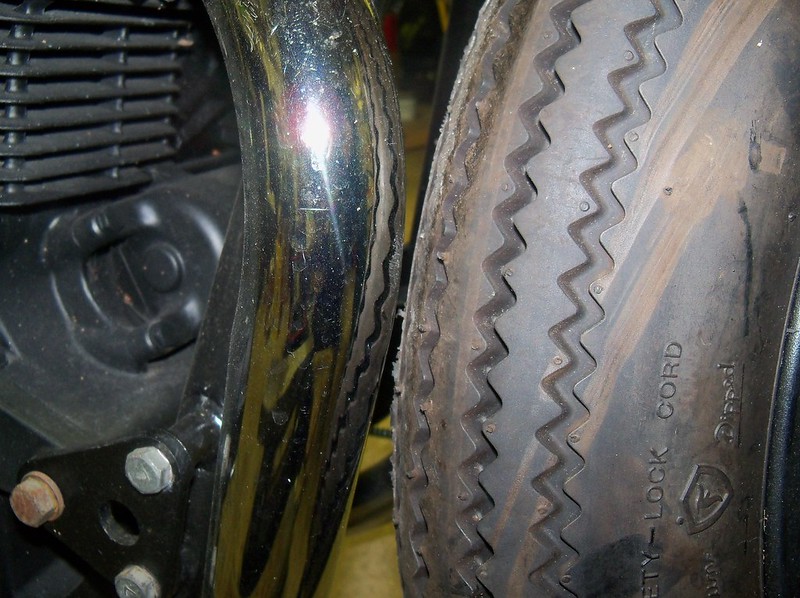
This is better:

OK, so I couldn't wait. I hacked up the other leg and put it all back together dry tonight:
Resting on side stand:
Fully compressed:
Lucky me. Coil bind (or whatever is causing internal fork 'bottoming') occurs here, and no tire-to-header contact occurs.
This is better:
sinbad85
Been Around the Block
great write up on the internal lowering mate!!!
when i had the stock front end on my bike i called three shops nearby to see if they could do this....
they said it wasnt possible.....
if i ever go back to stock front end on this ill be sure to follow your instructions......
looks really good!
when i had the stock front end on my bike i called three shops nearby to see if they could do this....
they said it wasnt possible.....
if i ever go back to stock front end on this ill be sure to follow your instructions......
looks really good!
Pablo83
Sleep, wrench, ride.
gk45011 said:How much tire expansion do you get with those tires when they are run and heat up? Looks awfully close in the picture.
There was some discussion about this on another site. I think you're supposed to add something like 3/8" for tire expansion, but more of the expansion is due to centripetal force than heat expansion. If hallon's ever in a situation where he has the wheel turned this far to the side at highway speeds with the forks fully compressed, he's got a lot more to worry about than melting some rubber to his pipe.
If you ever go back to the stock front end, I want your forks. You know, if you ever visit Texas.sinbad85 said:if i ever go back to stock front end on this ill be sure to follow your instructions......
I'm reconsidering my lack of front fender. Not for any functional reasons but just because I threw a Burgundy Sportster (or any Harley with a NarrowGlide) front fender on it and I like the shape and even the color.
Fresh_c has suggested I consider an oxblood color somewhere in my paint and although I was thinking more earthtones it could look pretty good.
Fresh_c has suggested I consider an oxblood color somewhere in my paint and although I was thinking more earthtones it could look pretty good.
gk45011
Coast to Coast
Pablo83 said:There was some discussion about this on another site. I think you're supposed to add something like 3/8" for tire expansion, but more of the expansion is due to centripetal force than heat expansion. If hallon's ever in a situation where he has the wheel turned this far to the side at highway speeds with the forks fully compressed, he's got a lot more to worry about than melting some rubber to his pipe.
LOL True, you ain't lying there. I was thinking more of tighter parking lot manuvers after a decent length ride.
Diggin the build, looking tits'
GK
This tight clearance was only with the forks ratched-strapped down to their fully bottomed out position. Parking lot manuvers allow several inches of clearance.gk45011 said:I was thinking more of tighter parking lot manuvers after a decent length ride.
Please excuse the lack of updates lately. I've got a baby boy due any day and preparations have taken priority. I'll get back to this after the new year.


