
Hopefully this afternoon I can zip over to the "New Members" section and introduce myself properly. So I'll keep this thread about the bike... I've been wanting to do a brat/cafe project for years, and over the winter I was able to get my hands on this little beauty.  ($75 sounded fair to me, I could scrap it for that)
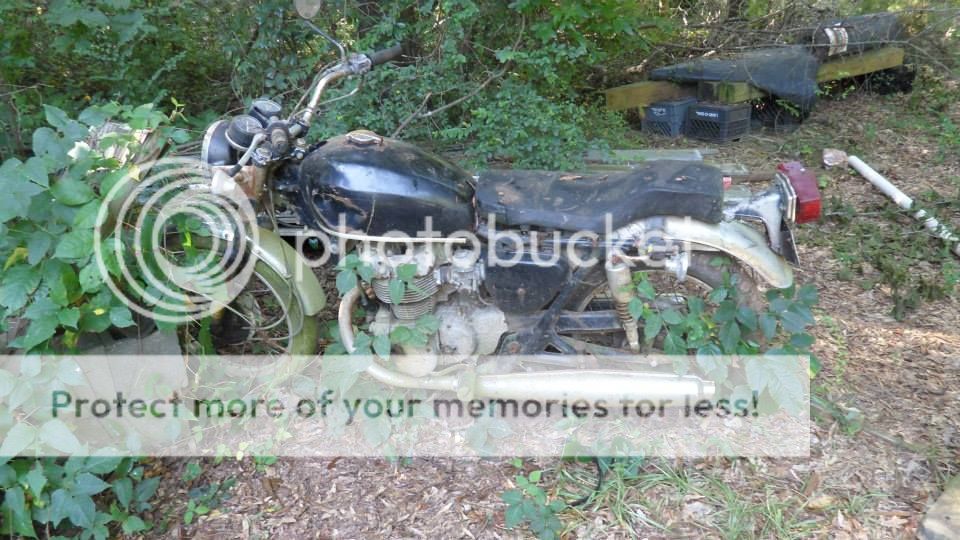

I brought it home, stuck it on my messy pad behind my shed and I (and my son) started ripping it apart (carefully, of course).


Once I had her all torn down, I found a few surprises. The engine is none other than a Honda 500T engine. BUT... It's sitting on a 1973 CB450 frame, and has what appears to be a CL350 front end (forks and wheel). Since I am not taking it back to stock, I just smiled, shrugged and moved on with the build. ;D
Once I got it all taken apart, it was time to hit that frame with a wire wheel... And this is what it looked like once I got done stripping all that old nasty paint.

After that, I detabbed that frame, and got it painted with a very dark metallic gray paint.
When I picked the bike up, one of the spark plugs was missing, so that cylinder had some water sitting in it and was QUITE frozen up! I had to take the engine completely apart, and do a full rebuild. Sadly, I didn't take any pics during the process, so here's the first engine pic I took, which was after it was mostly back together and had been cleaned and painted.

And here's a comparison pic for ya...

And then here are the finished pics (minus the carbs)


I'm just gonna toss this out there... I COULD NOT LIVE WITHOUT DIME CITY CYCLES!!! They were amazing during this process. Sometimes I may have paid a bit more for some of the products, but their service and helpfulness is worth more than money! So, suffice it to say that I bought a TON of parts from them during this build.
Y'all wanna see that engine mounted in the detabbed frame??? Yep, thought so... 8)


Now, I wanted to hear this engine run... In a BIG way! I had rebuilt it, and although I'm mechanically inclined, I just wanted to make sure... I rebuilt my carbs, and had to completely rework the ignition (see those new coils in the pics above?). So the next thing I did was work on that tank. It had a pretty serious dent in it, so I bumped it out as much as I could and then started my body/bondo work.

And then I fixed up my wheels (new bearings and insides), and put my glorious new tires on them. I rebuilt my forks and put it all together to get a rolling frame. Oh, I got the triple tree, handlebars, cables, handles, and all that good stuff from DCC.


The tank is only primered, so it will get painted by the local paint shop (going with a Honda Blue and pinstripes). Oh, I forgot to mention that I DID crank it up and it runs beautifully! Compression is great in both cylinders as well. ;D ;D ;D
I also decided to try my hand with a sewing machine and a skateboard, to make me a seat. It was my first time on a sweing machine, and all things considered, I thought the project turned out fairly well. I used car seat foam for the padding, and open cell foam to create the humps in the seat. Here's a few pictures...


I have it mounted to the bike now, but haven't got any pics of that yet. I'm hoping to finish the cable and brake work this weekend (July 4,5) as well as put the chain and exhaust on it so I can take it for a very short ride around my driveway. Definitely more pics to come!!! The overall general look that I was going for was:

If you guys have any questions, comments or even criticism (take it easy on me, I'm new), I'd love to hear it.
($75 sounded fair to me, I could scrap it for that)
I brought it home, stuck it on my messy pad behind my shed and I (and my son) started ripping it apart (carefully, of course).
Once I had her all torn down, I found a few surprises. The engine is none other than a Honda 500T engine. BUT... It's sitting on a 1973 CB450 frame, and has what appears to be a CL350 front end (forks and wheel). Since I am not taking it back to stock, I just smiled, shrugged and moved on with the build. ;D
Once I got it all taken apart, it was time to hit that frame with a wire wheel... And this is what it looked like once I got done stripping all that old nasty paint.
After that, I detabbed that frame, and got it painted with a very dark metallic gray paint.
When I picked the bike up, one of the spark plugs was missing, so that cylinder had some water sitting in it and was QUITE frozen up! I had to take the engine completely apart, and do a full rebuild. Sadly, I didn't take any pics during the process, so here's the first engine pic I took, which was after it was mostly back together and had been cleaned and painted.
And here's a comparison pic for ya...
And then here are the finished pics (minus the carbs)
I'm just gonna toss this out there... I COULD NOT LIVE WITHOUT DIME CITY CYCLES!!! They were amazing during this process. Sometimes I may have paid a bit more for some of the products, but their service and helpfulness is worth more than money! So, suffice it to say that I bought a TON of parts from them during this build.
Y'all wanna see that engine mounted in the detabbed frame??? Yep, thought so... 8)
Now, I wanted to hear this engine run... In a BIG way! I had rebuilt it, and although I'm mechanically inclined, I just wanted to make sure... I rebuilt my carbs, and had to completely rework the ignition (see those new coils in the pics above?). So the next thing I did was work on that tank. It had a pretty serious dent in it, so I bumped it out as much as I could and then started my body/bondo work.
And then I fixed up my wheels (new bearings and insides), and put my glorious new tires on them. I rebuilt my forks and put it all together to get a rolling frame. Oh, I got the triple tree, handlebars, cables, handles, and all that good stuff from DCC.
The tank is only primered, so it will get painted by the local paint shop (going with a Honda Blue and pinstripes). Oh, I forgot to mention that I DID crank it up and it runs beautifully! Compression is great in both cylinders as well. ;D ;D ;D
I also decided to try my hand with a sewing machine and a skateboard, to make me a seat. It was my first time on a sweing machine, and all things considered, I thought the project turned out fairly well. I used car seat foam for the padding, and open cell foam to create the humps in the seat. Here's a few pictures...
I have it mounted to the bike now, but haven't got any pics of that yet. I'm hoping to finish the cable and brake work this weekend (July 4,5) as well as put the chain and exhaust on it so I can take it for a very short ride around my driveway. Definitely more pics to come!!! The overall general look that I was going for was:
If you guys have any questions, comments or even criticism (take it easy on me, I'm new), I'd love to hear it.


