We noticed you are blocking ads. DO THE TON only works with community supporters. Most are active members of the site with small businesses. Please consider disabling your ad blocking tool and checking out the businesses that help keep our site up and free.
You are using an out of date browser. It may not display this or other websites correctly.
You should upgrade or use an alternative browser.
You should upgrade or use an alternative browser.
1980 XT500 BUILD
- Thread starter MCKAY34
- Start date
XS750AU
Coast to Coast
This was the closest I could find.
https://www.ebay.co.uk/itm/YAMAHA-RD125-RD200-RESTORATION-DECAL-SET/163199995641?_trkparms=aid%3D222007%26algo%3DSIM.MBE%26ao%3D2%26asc%3D20160323102634%26meid%3Db182edc7d47b4611bbe8ab2d536bf69e%26pid%3D100623%26rk%3D4%26rkt%3D6%26sd%3D132320106158%26itm%3D163199995641&_trksid=p2047675.c100623.m-1
With a bit of trimming it would be close.
XS750AU said:This was the closest I could find.
https://www.ebay.co.uk/itm/YAMAHA-RD125-RD200-RESTORATION-DECAL-SET/163199995641?_trkparms=aid%3D222007%26algo%3DSIM.MBE%26ao%3D2%26asc%3D20160323102634%26meid%3Db182edc7d47b4611bbe8ab2d536bf69e%26pid%3D100623%26rk%3D4%26rkt%3D6%26sd%3D132320106158%26itm%3D163199995641&_trksid=p2047675.c100623.m-1
With a bit of trimming it would be close.
Yes! I also found those RD decals. I think it’s as close as I’m going to get. I think they will look great
Thanks for the help!!
Sent from my iPhone using DO THE TON
I just thought i would also add that earlier on in the rebuild, the bike was not starting. and i was having trouble. I realised that it was because it has low compression and it also had a faulty kill switch, because of the faulty kill switch the spark was very inconsistent .
So i had another fresh top end rebuild done. replaced everything! that fixed the compression issue. now the engine is absolutely perfect!!
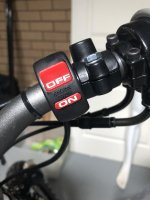
Installed a brand new kill switch also.
So i had another fresh top end rebuild done. replaced everything! that fixed the compression issue. now the engine is absolutely perfect!!
Installed a brand new kill switch also.
Attachments
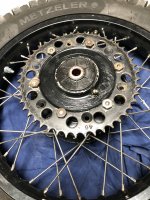
Today, i noticed my rear sprocket was a bit wobbly. Not too bad but definitely some movement!
So i replaced all the rubber dampers and o rings and its now super tight and snug. So that fixed the issue if anyone else is having the same problem.
So i replaced all the rubber dampers and o rings and its now super tight and snug. So that fixed the issue if anyone else is having the same problem.
Attachments
teledan said:Nice work! That old XT is getting some love!
Yes definitely! I have done every inch of this bike!
Nearly finished! Parts should arrive tomorrow. Can’t wait to get it going.
Sent from my iPhone using DO THE TON
JustinLonghorn
No Purple Hearts, No Blue Ribbons
I can dig it.
I have a question, i hope someone can help.
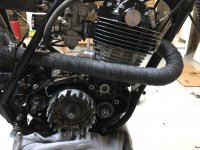
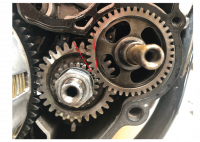
There doesnt seem to be any marks on any of these cogs. So while re-installing the clutch basket. how do i know i have the clutch basket cog line up with the correct teeth. i have read the manual but cannot seem to find a clear answer.
I assume the clutch basket must line up with the oil pump cog, the kick starter and the contact breaker cog. All on the correct teeth.
but there are no marks apart from the marks on the contact breaker.
So can anyone help?
Attachments

Really?teazer said:Crank and breaker shaft are geared together to set ignition timing. The rest don't matter. Just fit the clutch basket and keep going.
Ok great thanks for the help. I’ll get onto it!
Sent from my iPhone using DO THE TON
Quick question for everyone!
While lining up the marks on contact breaker shaft. and installing it.
Where does the piston need to be. does it need to be TDC ? because i have noticed it goes around twice, and i dont want my timing to be 180 degrees out!
So do i line up the marks on the "T" mark as per the pic. with piston at the top?
Any help is very much appreciated.
Attachments

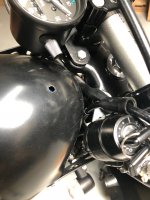
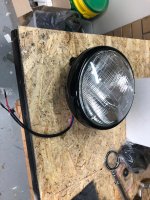
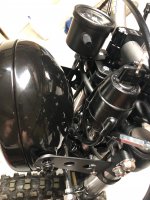
The headlight i have been using is good, but it really has been too tight for all the cables and wires, the headlight shell was too wide. So i am going to swap it out for a thinner headlight.
A couple of times the throttle cable especially was pulling when i turned the handle bars, i am really unhappy with everything so squashed. So a new thinner headlight and some cable re routing will be the best option for a smooth turning circle and free up some space.
Dont want any issues while fanging it down the street on one wheel. brrraaaaaaaaabbbb!!!!