
We noticed you are blocking ads. DO THE TON only works with community supporters. Most are active members of the site with small businesses. Please consider disabling your ad blocking tool and checking out the businesses that help keep our site up and free.
You are using an out of date browser. It may not display this or other websites correctly.
You should upgrade or use an alternative browser.
You should upgrade or use an alternative browser.
Honda RS1000 - CB400F Mini Replica
- Thread starter Rick4004
- Start date
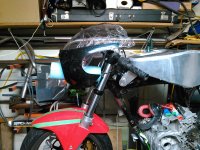
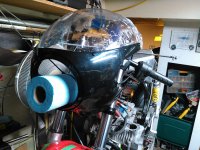
I am only keeping the windscreen. I'll use the uppermost 2" or so of the fairing as a pattern to start building the aluminum fairing. Look back to the very beginning of the thread, you will see a CAD model of the fairing. The end result will hopefully be very close to the original RCB upper.
")
eyhonda
Coast to Coast
Following! Awesome work, Rick! I thought you had mad skills before, but now you're killing it! I've been away from here for a long time since I have a HawkGT and VFR8. Anyway, I also got a 3D printer (Ender 3 w mods) and yes it decreases prototyping times. I love the metal work going on here! Any new progress?
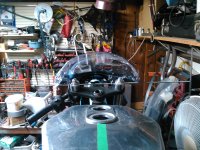
After much searching I finally found the tank rubbers that I was looking for. I could find them for a good price, but the shipping to Canada was crazy, or I could find good shipping but the price was 2-3 times more than the cheaper ones. I finally found some from Mead Speed in the UK that were about $5 each with reasonable shipping.
Attachments
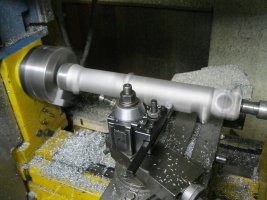
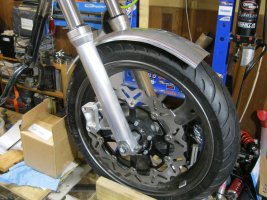
The CBR600F4 fork were finished in a really rough cast texture, where as the RCB race bikes had smooth for legs. Doing the brake side was a P.I.T.A, but using a combination of the lathe, an air belt sander, and much manual sanding I finally got it smooth. The non brake side was much easier as I cut off the brake mounts on the band saw and just spun it in the lathe to get rid of the textured finish.
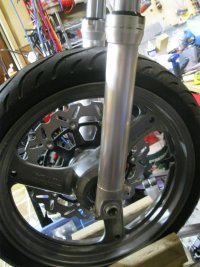
I also got to work and made a fender for the front. It still needs some fine tuning, but I'll do that when I make the mounts.
I've also decided that the wavy brake rotor doesn't fit with the vintage vibe so I will be replacing it with a stock CBR954 rotor.
I also got to work and made a fender for the front. It still needs some fine tuning, but I'll do that when I make the mounts.
I've also decided that the wavy brake rotor doesn't fit with the vintage vibe so I will be replacing it with a stock CBR954 rotor.
Attachments
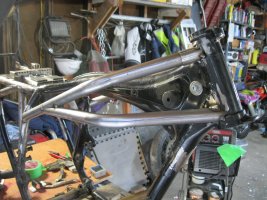
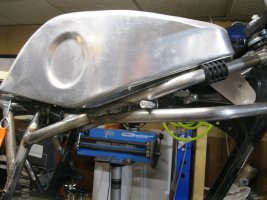
On the original racers the sear is mounted up above the frame rails

I didn't really like this so I lowered the seat to cover the frame rails. This was all good until I actually sat down on the the seat. With the rearsets I was going to use it felt like my knees were up into my armpits. I spaced up the seat by 3/4" and built some new adjustable rearsets.


.
If you like the carbon fiber shift link rod, it is a carbon fiber arrow covering an M6 threaded rod. Arrows come in different wall thicknesses and it's easy to find one that just fits over an M6 rod. Once the length is finalized I like to cover the rod with Exopy glue and slide the arrow on. Makes for a strong flex free shift rod.
I didn't really like this so I lowered the seat to cover the frame rails. This was all good until I actually sat down on the the seat. With the rearsets I was going to use it felt like my knees were up into my armpits. I spaced up the seat by 3/4" and built some new adjustable rearsets.
.
If you like the carbon fiber shift link rod, it is a carbon fiber arrow covering an M6 threaded rod. Arrows come in different wall thicknesses and it's easy to find one that just fits over an M6 rod. Once the length is finalized I like to cover the rod with Exopy glue and slide the arrow on. Makes for a strong flex free shift rod.
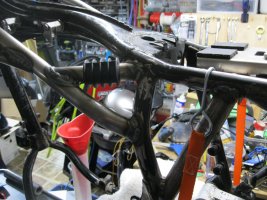
Christmas eve progress. I finished the mount for the rear master cylinder and reservoir.

I also "finished" the gauges/dash. The black 3d printed cover over the speedometer will be replaced with a machined aluminum part. The 5 grommets will hold LED's for the turn signals/high beam/neutral/oil pressure. I left room on the right for a toggle switch that I might need for the lights. It's just clamped in place for now until I get further along with the fairing mounts and cables before I commit to a location.

I also "finished" the gauges/dash. The black 3d printed cover over the speedometer will be replaced with a machined aluminum part. The 5 grommets will hold LED's for the turn signals/high beam/neutral/oil pressure. I left room on the right for a toggle switch that I might need for the lights. It's just clamped in place for now until I get further along with the fairing mounts and cables before I commit to a location.
Well, 2024 has been a s**t show so far. Hurt my back moving snow, got sick for a month, and had a total computer melt down. But, I've still been plugging away at the project. I'm reached the tipping point of the 80/20 rule, where the last 20% takes 80% of the time.
Fairing - I resurected an RC30 fairing from an old Hawk GT project, got it mounted, and formed a number plate from aluminum to cover one of the headlights.

I also got a battery box mounted.

The wiring looks a bit of a mess but actually it is all ready to be pulled out and given a final wrap. That is definitely one of those projects that takes a huge amount of time for a good result. The more time you spend the less you see.
Fairing - I resurected an RC30 fairing from an old Hawk GT project, got it mounted, and formed a number plate from aluminum to cover one of the headlights.
I also got a battery box mounted.
The wiring looks a bit of a mess but actually it is all ready to be pulled out and given a final wrap. That is definitely one of those projects that takes a huge amount of time for a good result. The more time you spend the less you see.
One last major component is half done. I finished the front half of the 4 onto 1 collector, and got the link pipe assembled. Right now I have this D&D muffler fitted, and it could run with this, but I really want to do the curved aluminum muffler like the original race bikes. I haven't completely figured out how I am going to actually build it, so that is consuming brain cells right now. If all else fails, I'll use the D&D.


Even with a CAD system, you still make mistakes. After I had the system all built it dawned on me that I didn't have as much room as I thought for the oil filter, and I was right. I had to remove some fins to get it to fit, and there is just enough space to change the filter without removing the pipe.

Even with a CAD system, you still make mistakes. After I had the system all built it dawned on me that I didn't have as much room as I thought for the oil filter, and I was right. I had to remove some fins to get it to fit, and there is just enough space to change the filter without removing the pipe.


