The 74 TX650.was in a pretty crook condition when I bought it: Every nut and bolt was rusted, aluminium was badly,oxidised admitted, and it looked lime the only tools the POhad were a hammer and chisel. After getting the engine out of the bike I got it up on the bench and started stripping it.
In pulling the engine apart I discovered the previous owner had installed a new set of rings on a bore and pistons that were way out of spec, bodged up an auto advance unit that was 80 degrees out, elongated the points backing plate slots to allow for a stretched cam chain, put a kit through the carbs without bothering to clean them and the two oil filtrs didn't look like they'd ever been cleaned.
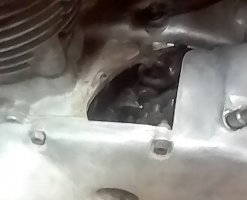
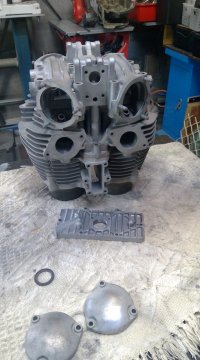
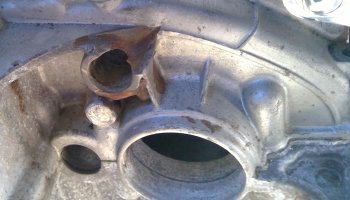
I knew the top crankcase had been smashed by an errant chain, unfortunately, the damage was a bit more extensive, the chain had ripped the alternator cables and the shifter drum bearing housing was also damaged. I stripped the motor down and found the piston to bore clearance was way out of spec, the valve seats were badly pitted, the cam chain was stretched so much the motor couldn't be timed, I noted the previous owner had extended the slots on the points backing plate, but still there simply wasn't enough movement in the backing plate to time it.
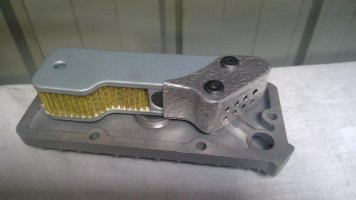
Rather than buy a new auto advance unit, the previous owner had bodged up a replacement, it put the timing out by around 80 degrees. The cam chain guides had delaminated leaving bits of black stuff hanging off the aluminium base guides. The shifter drum was missing a pin, so no hope of getting any gears. Sump and side filters were so gummed up I'd be surprised if any oil actually got through them. All the JIS headed screws were absolutely mangled, the eight chrome rocker dome nuts were rusted as was the oil pipe, engine oil seals were all buggered the springs behind the lips on some had actually popped out.
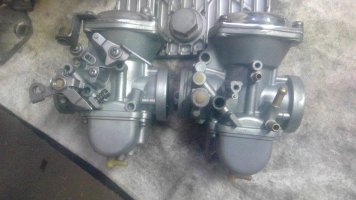
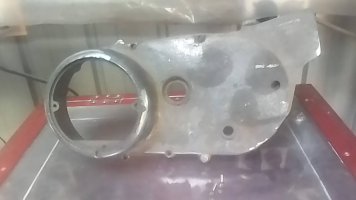
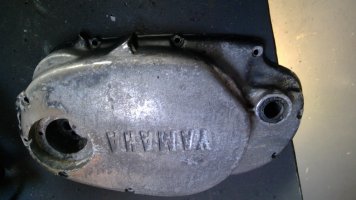
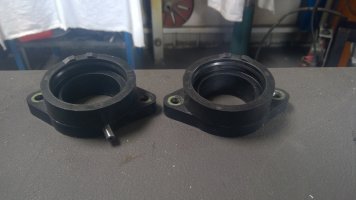
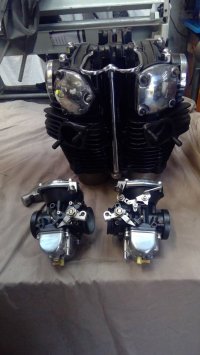
The barrel gasket had developed a serious leak at some time but had never been seen to, drive sprocket looked like a series of hooks. The sprocket nut had nearly been cut in half by a chisel, side covers were badly pitted and oxidised. Carb float chambers were gummed up and pitted on the bottom, manifold rubbers were split. Luckily there were no stripped gears and the Crank and associated mains, conrods and so on were all in good condition. A feature of these bikes is the bullet proof crank.
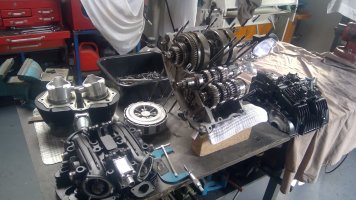
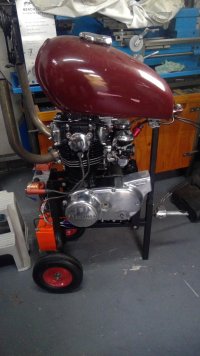
I bought some new, second hand cases, had the barrel rebored and valve seats reground, bought two new pistons plus rings, gudgeons and circlips, made up a pin for the shifter drum, bought new gaskets and seals plus a stainless Allen head kit, bought a new auto advance unit, had the point and advance covers, rocker domes and oil pipe re chromed.
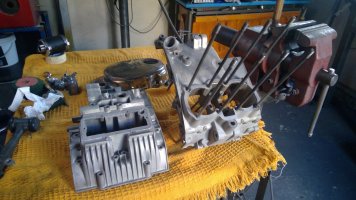
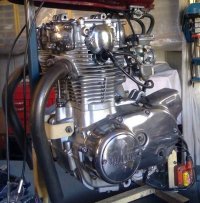
I blasted the crankcase halves, barrel, head and rocker cover and carb bodies, then pressure cleaned everything several times making sure I got rid of all the blasting media from all the orifices and nooks and crannies, then soaked them in a bath of degreaser and pressure cleaned them again a few times then blew everything out with High pressure air.
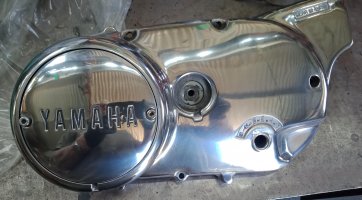
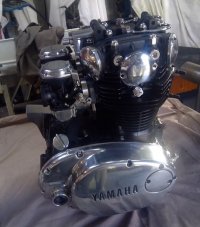
I smoothed over all the casting flashes on the crankcases and painted them silver, squared up the cylinder head fins and removed any casting lumps. The side covers were blasted inside and the outsides were polished along with the valve covers, breather box, dipstick, cam chain adjuster and carb tops and float bowls.
I pulled the starter motor apart and found all in order, so polished up the aluminium ends and painted the body Black. The starter gear spring gave no tension on the gear so I reshaped that a little.
In pulling the engine apart I discovered the previous owner had installed a new set of rings on a bore and pistons that were way out of spec, bodged up an auto advance unit that was 80 degrees out, elongated the points backing plate slots to allow for a stretched cam chain, put a kit through the carbs without bothering to clean them and the two oil filtrs didn't look like they'd ever been cleaned.
I knew the top crankcase had been smashed by an errant chain, unfortunately, the damage was a bit more extensive, the chain had ripped the alternator cables and the shifter drum bearing housing was also damaged. I stripped the motor down and found the piston to bore clearance was way out of spec, the valve seats were badly pitted, the cam chain was stretched so much the motor couldn't be timed, I noted the previous owner had extended the slots on the points backing plate, but still there simply wasn't enough movement in the backing plate to time it.
Rather than buy a new auto advance unit, the previous owner had bodged up a replacement, it put the timing out by around 80 degrees. The cam chain guides had delaminated leaving bits of black stuff hanging off the aluminium base guides. The shifter drum was missing a pin, so no hope of getting any gears. Sump and side filters were so gummed up I'd be surprised if any oil actually got through them. All the JIS headed screws were absolutely mangled, the eight chrome rocker dome nuts were rusted as was the oil pipe, engine oil seals were all buggered the springs behind the lips on some had actually popped out.
The barrel gasket had developed a serious leak at some time but had never been seen to, drive sprocket looked like a series of hooks. The sprocket nut had nearly been cut in half by a chisel, side covers were badly pitted and oxidised. Carb float chambers were gummed up and pitted on the bottom, manifold rubbers were split. Luckily there were no stripped gears and the Crank and associated mains, conrods and so on were all in good condition. A feature of these bikes is the bullet proof crank.
I bought some new, second hand cases, had the barrel rebored and valve seats reground, bought two new pistons plus rings, gudgeons and circlips, made up a pin for the shifter drum, bought new gaskets and seals plus a stainless Allen head kit, bought a new auto advance unit, had the point and advance covers, rocker domes and oil pipe re chromed.
I blasted the crankcase halves, barrel, head and rocker cover and carb bodies, then pressure cleaned everything several times making sure I got rid of all the blasting media from all the orifices and nooks and crannies, then soaked them in a bath of degreaser and pressure cleaned them again a few times then blew everything out with High pressure air.
I smoothed over all the casting flashes on the crankcases and painted them silver, squared up the cylinder head fins and removed any casting lumps. The side covers were blasted inside and the outsides were polished along with the valve covers, breather box, dipstick, cam chain adjuster and carb tops and float bowls.
I pulled the starter motor apart and found all in order, so polished up the aluminium ends and painted the body Black. The starter gear spring gave no tension on the gear so I reshaped that a little.