1963 Suzuki Colleda Black Betty cafe-ish build

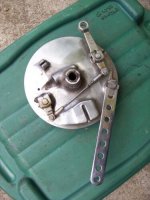
So looking at this front wheel, I can't find anything Suzuki that matches up to it, I have been searching and looking at different front hubs and I believe this is a Honda 350-360 brake backing plate, two things I noticed , most of the Suzuki backing plates have a slot to locate the plate, this uses a brake stay arm and looking at the speedometer cable it looks like a Honda setup to me, slotted piece sticking out to drive the cable, round hole with a single retaining screw, most of the Suzukis have a cable that fits into a slot and the drives have male treads that the cable screws on to.

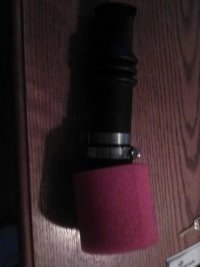
Motion pro will make any kind of cable you want but then we are talking about an $80-90 dollar speedo cable, my thinking is I am going to get a new CL 350 cable and a new bellmouth cable ferrule and try to make my own cable with parts off of the old Suzuki one, I also have to get a new speedo, I did get this one freed up but the clock spring is broken and it does not return to zero.
 
That looks like a 72 GT380 2ls front wheel to me.
Here is a pic of a GT380 backing plate, while it does have a brake arm stay it also has a notch and the speedo drive does not have a screw, I will post a pic up of the brake backing plate on mine later today, the wheel may be a GT380 IDK it came with the bike as did the backing plate, I did have one hell of a time getting the brake linkage to fit which to me indicates it may be a Honda setup instead of a Suzuki one.
 

Attachments

  • s-l500.jpg
    s-l500.jpg
    30.2 KB · Views: 181
The linkage certainly looks like Honda, but I don't know of any Honda front brakes with that slot arrangement. And the drum itself looks like a Honda style That slot is a very Yamaha approach.

Look inside the drum and brake plate for an cast in numbers or manufacturer's logo. If the castings are Suzuki, then it's just a case of making the linkage work efficiently.

If it's too much of a PIA to get cables to fit, it might be easier to just slip a complete CB350/360 front wheel and brake in there or perhaps a CB160 which is probably lighter and more effective. They use an external speedo drive and I have no idea if they are a suitable ratio for your speedo.
 
The brake cable mount on the pull arm isn't right for Honda, that's why I though it might be GT380. The GT380 uses the threaded adjustment through the arm, but the Hondas adjust further up the cable and have a flanged end of the cable.

s-l500.jpg
 
I guess where the confusion is here is that the brake levers are original Suzuki T10, I got them off of Ebay and put them on this brake backing plate, this backing plate didn't have any, it looks just like the one you posted with Suzuki brake arms attached. I already have it all mounted on the bike, the brake is hooked up and working, that is handled I am working on the speedometer now.

I robbed a chain of my TL125 and put it on, put the gas tank back on, fired it up and rode it down the road this morning, no surprises and I hit it very close on the rear front sprocket- rear sprocket combo , I am happy with it.
 
Irk, That looks like a CB175 front brake plate in your last picture. Early Hondas like say CB160, CB175, CB72/77 and 450 all had a threaded adjuster at the brake plate end. I can't say when they changed to a mid cable adjuster, but I'm pretty sure the wheel is off a Honda and there should be a part number or Hm cast inside the drum and/or backing plate.

Pull the wheel off, look for cast in or stamped numbers or logos and measure the width and diameter of the drum and we should collectively be able to ID it. I have a pair of SL175 hubs here somewhere as well as CB77 and 160 and early CB450 brakes I can compare dimensions to.
 
when I pull off the front wheel again to do some polishing on the hub I will see what I can find as far as stamps or part numbers, luckily the brake shoes are good so I shouldn't need any parts for this setup for a while.
 
Test ride was successful as in everything worked and it didn't break down however when I went to put it up yesterday the chain popped off, this is the second time it has done so both times at no speed. I decided I needed to have another look at the sprocket alignment.

On a normal bike this would be easy just sight down the chain but with this enclosed chain guard not so much, I found a piece of 1/4" metal bar and clamped it to the rear sprocket with a set of vice grips, then I could see how far I was off center, the wider front sprocket was really loose and wobbling around also, it seems the spines inside the sprocket are not machined properly.

I decided to give it a whirl and fired up the big ole Lincoln with a 1/4" carbon arc gouging rod and removed the center from the sprocket, then I ground down the teeth on an old sprocket and welded the two together, this further widened the sprocket by the width of a regular sprocket, the runout is ok but nothing to write home about.

I then removed the rear wheel and rear sprocket carrier, I don't have any machining tools as such to play with , but I do have a giant table saw with a carbide blade so I made up a jig for the table saw and removed about 1/4" off the rear sprocket carrier, a lot of cussing and hand filing was involved to get the socket to seat flat and true but other than looking like something a beaver machined with its teeth it turned out pretty well.

I reassembled everything but by my homemade gauge I am still a good 1/4' off from where it needs to be, I believe I can grind on the frame some and get the engine to slide over another 1/4 "then make new spacers for the engine mounting bolts, we will see tomorrow , if that doesn't take care of it I still have a small amount I can take off of the sprocket carrier to make up the rest.
 
Last edited:
Removed the engine and ground the frame. I was able to move the engine about 1/4" to the left, the new chain came in today and it looks like we are in business !

I snapped a pic of the magneto cover as it had to be trimmed up as well, by looking at the first pic and then the second you can see how far the engine was moved, before the cover was actually behind the chain guard , now the cover lines up almost perfectly with the chain guard, the top is recessed slightly which it needs to be to allow for movement of the swingarm.

I also changed out the bars to the superbike bars I had, much , much better, the other bars were straight and they just didn't feel right as they put your hands in an unusual position .The other issue is it was getting really squirrely when the front brake was applied, I put it on the centerstand and grabbed the front forks, steering head bearings were noticeably loose so I adjust them and took it for a spin, pretty happy with it now, handling is good for an antique bike, power is decent.

I based the sprocket selection off of a Honda Grom since both are the same size engine and the weight is probably similar so I am guess it runs around 60 MPH, I will know more when the speedo gets sorted out.
100076-98fa7fb0f5e005d5b3154d8a6c64089d.jpg
IMG_20191119_155638.jpg
IMG_20191119_135742.jpg
 
Last edited:
I looked at the speedo cable today , I have a 78 CB125 that I was able to rob the cable off of, the cable fit the drive as I suspected it would so I cut the ferrule off of the old cable and the ferrule off of the CB cable.

I was able to unwind the housing and get the rest of the cable out , I cut the plastic back a bit , slid the CB cable up into the Suzuki ferrule and used my hydraulic crimper to attach the two together.

I believe I got a little too much with the crimper because it bound the inner cable up, I was able to get it free and run a small drill bit down the inner housing, now the cable rotates nice and free. I do need to get some white lithium and lube the cable up so it runs smoothly.

Plugged the cable up to the drive routed the cable and spun the wheel, cable rotates, sorry Motion Pro no $80.00 cables for me this week !

Speedometer was ordered today . I found a good used one on Ebay cheap.
 
I sorta finished this up however the chain alignment was giving me issues, I tried with my limited machining capabilities to rectify the issue, the problem is 428 offset sprockets to fit this engine are not available. The last time I rode it the front sprocket stripped out, luckily I was at the top of a hill by my house and was able to coast it home.

I have located a local guy who has a lathe and a CNC mill at his house so sometime next week we are meeting up and maybe I can remedy the situation, I did look at it yesterday and the rear wheel is not properly centered in the swingarm , hopefully solving that issue will help with the other issue, I will be tackling that today.
 
So after thinking on this a while I decided to go at it in small increments, I located a 7MM offset sprocket for a Z50, of course that is a 420 chain size and a 428 won't fit the front sprocket, but a size 40 industrial chain will fit the front sprocket. Rebel gear can cut me a new rear sprocket for a #40 chain size, the #40 chain will somewhat fit on the 428 for testing purposes only and until I get the new sprocket.

I also had a look at the swingarm mount bolt and bushings, I was able to remove one brass bushing and cut the frame back the width of the bushing , maybe 3mm, then reinstall the bushing and swingarm and shim it at the other side , this moved the rear sprocket over 3mm, that 3mm I don't have to fudge somewhere else. and now we are 10mm over and almost lined up.

The rest will be a combination of recutting the rear sprocket carrier and relieiving the sprocket are where it mounts to the carrier Rebel sprocket can set that up when they make the new sprocket.

I am going to get one of my friends to eyeball the sprocket alignment just to make sure I am not just seeing what I want to see.
 
So possibly I may have overcorrected this. I strung the bike today to check the wheel alignment, once I had it set I locked it down. Then I rechecked the sprocket alignment, this is tough to do on this particular bike because of the enclosed chain, but basically I laid a flat steel against the sprocket and looked to see where it ended up on the front sprocket. With the 7mm offset sprocket on it was to much, so I grabbed another sprocket off of a junk atv and checked the alignment again, this time it came in pretty much dead nuts on, at that point I reinstalled the 428 chain adjusted everything out and reassembled the bike.

Of course it won't crank because it's been sitting all Summer, no gas coming out of the float bowl screw, of comes the carb, no gas coming out of the petcock, off comes the petcock, gas tank is empty, so I run through the petcock and reinstall it , clean the carb and reinstall that . Go to put gas in the tank, fuel is going everywhere, the balance hose on the bottom of the tan has sprung a leak, kinda explains where the gas in the tank went, I replace the hose and notice the petcock is leaking badly, it was leaking before but not this badly.

Screw it I start it up and go for a ride, everything is good except for the petcock leak, I get back , lay the bike over and pull the petcock apart, I see no way the petcock was ever really sealed. Thats when I decide to do an upgrade, there is just enough room to cut a groove and install an o-ring. I mark the piece with a tubing cutter then with a hacksaw I make a groove all the way around the lever, then with a needle file I finish off the groove, I found a stretchy small o-ring and install it on the lever , with a little white lithium lube it pushes into the petcock securely. I reinstall the stopper screw , tilt the bike up and voila , no more leaky petcock.
 
16 tooth front sprocket installed this got all of my chain adjustment back where it should be, we will see how it pulls when it warms back up a it.
 
I finished up the air filter setup today, a uni pod filter , a cut off piece of vacuum cleaner pipe , two clamps and some kind of rubber boot I acquired in one of my parts purchases, the frame had to have a spot ground down a bit at the seam to make it fit, all buttoned up and tucked inside the frame now. I will probably shorten it up some to make more room for the battery when I get that far.
 

Attachments

  • IMG_20201220_110938.jpg
    IMG_20201220_110938.jpg
    328 KB · Views: 143
Pulled the trigger on this this morning , it should be here before next year, I am thinking it will make the bike look and sound a lot better , I just hope that it fits. I may have to drill through some baffles to get the sound and performance where I want it.
 

Attachments

  • s-l300 (1).jpg
    s-l300 (1).jpg
    10.9 KB · Views: 141
Pipe is in, it doesn't really fit but it looks like I can make it fit with a few tweaks, adjustments and some mods to the right side footpeg etc. Pics later this week, it gives the bike more of a classic look and really cleans up the lines on the right side of the bike.
 
Last edited:
Back
Top Bottom