
Cool stuff bud.
We noticed you are blocking ads. DO THE TON only works with community supporters. Most are active members of the site with small businesses. Please consider disabling your ad blocking tool and checking out the businesses that help keep our site up and free.
You are using an out of date browser. It may not display this or other websites correctly.
You should upgrade or use an alternative browser.
You should upgrade or use an alternative browser.
1965 Matchless G15-CS
- Thread starter AgentX
- Start date
AgentX
Over 1,000 Posts
Nice. Find springs yet?
I did find some, for $125/pr. I do want them to have in my pocket in the event I ever need to go back to stock internals (broken cartridge etc) but since the carts have integrated springs (vice the stock external), it's not really a pressing need right now.
Last edited:
Maritime
Over 10,000 Posts
Ok I see. good it worked out.I did find some, for $125/pr. I do want them to have in my pocket in the event I ever need to go back to stock internals (broken cartridge etc) but since the carts have integrated springs (vice the stock external), it's not really a pressing need right now.


AgentX
Over 1,000 Posts
Welp, had some issues with the fork sliders sticking at the extremes of travel when no internals were in there. Narrowed the sticking point down to the bottom bushings. I think it may just result from how they wore together over last 54 years, but the new carts may provide a bit more travel and hit the less-worn internal section of the slider. If I was smart and competent like most people here, I'd no doubt be machining the inside of the slider to a specific diameter and turning some custom bushings to match.
Being a hack, I purchased a set of turcite bushings from JS Motorsports. Besides being (supposedly) better for stiction and wear, these have a slit in them which lets them adapt to small variations in slider size.
Other issue is the top cap bolts of the cartridge. They are sized for a Commando, with a little longer thread than the shorter caps of the G15. It's not that big of a deal, but I will need to get some extra washers to take up the difference. I don't think the 7mm shorter effective fork length will be noticable.
AgentX
Over 1,000 Posts
Turcite bushings:

My slide hammer for oil seals. Nice, thick cardoard...think I was saving it for packing material:

I cut old bushings into spacers for the top cap:

Got the carts into position:

Could not get the foot bolt through the access on the legs due to the washer size, so I polished the openings on the leg with the Dremel and flap-wheeled the washers a little on my drill-as-lathe...

Ultimately, though, the spacers I ghetto-fabbed were too thick, so I ordered some appropriate parts from RGM in the UK. I want to maximize thread engagement at the top nuts, so I think it is worth the wait. Likely will drop the factory headlight ears, too, simply because of how much of a pain in the ass they are.
Sigh. Maybe next week...
Looked good while it was set up tho:

My slide hammer for oil seals. Nice, thick cardoard...think I was saving it for packing material:
I cut old bushings into spacers for the top cap:
Got the carts into position:
Could not get the foot bolt through the access on the legs due to the washer size, so I polished the openings on the leg with the Dremel and flap-wheeled the washers a little on my drill-as-lathe...
Ultimately, though, the spacers I ghetto-fabbed were too thick, so I ordered some appropriate parts from RGM in the UK. I want to maximize thread engagement at the top nuts, so I think it is worth the wait. Likely will drop the factory headlight ears, too, simply because of how much of a pain in the ass they are.
Sigh. Maybe next week...
Looked good while it was set up tho:
AgentX
Over 1,000 Posts
That's a face and front legs there, it is.
Carts finally fit up dry in the legs with the new bushings, and the headlight in the new brackets. The way everything fits together, it is pretty hard to do piecemeal.
Now to get things bolted up and filled with damper oil...! Hope to have a test ride today.

Carts finally fit up dry in the legs with the new bushings, and the headlight in the new brackets. The way everything fits together, it is pretty hard to do piecemeal.
Now to get things bolted up and filled with damper oil...! Hope to have a test ride today.
AgentX
Over 1,000 Posts

Finally there. Damping at the front end is amazing. The cerianis in back are pretty nice, too, after their rebuild.

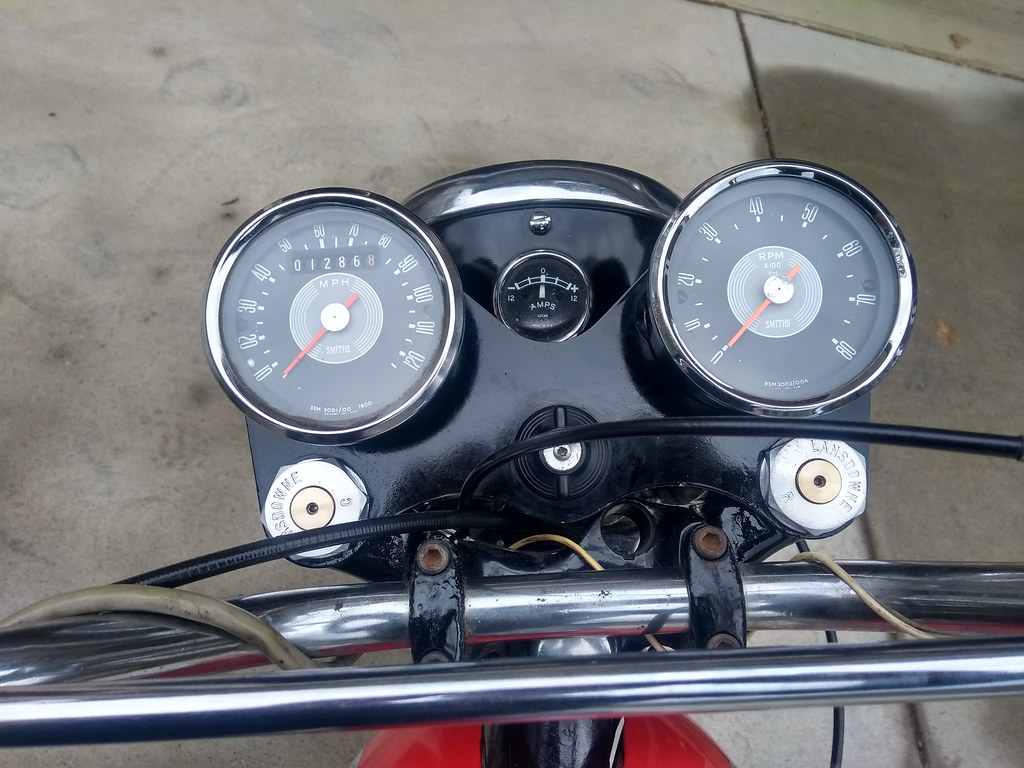
A nice pair...haven't had the clocks on it in forever, and the tacho works now thanks to the recent overhaul. Speedo was wacky so I need to check the cable.
https://flic.kr/p/2iVAiNR]
 IMG_20200315_120157373_HDR[/url]
I like the Ceriani ears...to me, it looks pretty "desert sled" in their incongruity with the fatter lowers. Need to put some black silicone at the shrouds under the clamp to keep water from running inside and then collecting. Drilling the lower shroud for some drainage might also be a good idea.
Best part is the Stig loves her improved passenger space over the Enfield.
https://flic.kr/p/2iVAiNR]
IMG_20200315_120157373_HDR[/url]Lots of little things to keep tweaking, but now I have a running, plated motorcycle! (With a headlamp, I now realize, which needs to be pointed at something terrestrial, lol...)
Last edited:
AgentX
Over 1,000 Posts
Thanks, Doc! I'm super-happy with it all.
I would like to go to rubber boots on the fork, which were what came stock on the bike. Previous owner put on the shrouds after dry-rotting through lots of boots in New England... As I'm going to have to store the bike for 3 years soon, though, I figured I'd leave the metal in place for now. (Moving internationally and the country doesn't allow vehicles over 8 years old to be imported, plus several other bureaucratic issues....) And in any case I just wanna ride the thing while I can!
Need to redo the clutch and brake adjustments now. Working but not perfect.
AgentX
Over 1,000 Posts
Also--speedo seems smooth when I drive the cable with my electric drill, but bounces wildly when attached to the new (repop) speedo drive. Original unit's ring gear couldn't engage the hub, so I had to replace the whole thing. Going to try to see how it works if I change which end of the cable I screw down first...but if anyone has advice I'm glad to hear it...
And I've re-oriented the headlamp so as not to blind passing satellites. I was so busy being happy it was all assembled that I ignored the fact that it looked like a flounder.
And I've re-oriented the headlamp so as not to blind passing satellites. I was so busy being happy it was all assembled that I ignored the fact that it looked like a flounder.
Last edited:
If that's the stock throttle, looks like you need a better cable, one with an elbow at the throttle end.
If that's the stock throttle, looks like you need a better cable, one with an elbow at the throttle end.
Maybe, but it looks the same on my stock P11 throttle setup. That's pretty much how they came.
That's odd having the cable hanging out like that. Not used to seeing it, I guess. I've done it before myself, but it was a situation of an aftermarket cable.Maybe, but it looks the same on my stock P11 throttle setup. That's pretty much how they came.
AgentX
Over 1,000 Posts
Yeah, when I make a new cable sometime I'll put an elbow in it, but it was hardly on my list of priorities given the things that were making the bike not-work, lol...
I've never had a multi-cylinder bike before, either, so it'll be my first time making one with a splitter.
I guess there's a possibility for me to just cut the throttle end off right where the wire enters, trim the housing and wire as required, add the elbow, and solder the thing back up with a new end in-situ. But still have other things to do first.
AgentX
Over 1,000 Posts
Social distancing achieved! First ride anywhere out of the 'hood, but the tacho drive spat its guts out the bottom somewhere along the way. Had issues with it before, but thought I'd gotten it fixed. New innards are unobtainable, and repop drives are not cheap. And I certainly wouldn't want to put a repop on just to end up with it exploding, too. Guess I gotta get to the bottom of what actually happened.
To sum up:
On first startup, tacho cable sheared off (or was already sheared) ostensibly due to a frozen bearing in the gauge. Not realizing, I replaced cable which promptly sheared itself off.
Found tacho drive not functioning at all. Discovered guts had displaced themselves outboard inside the housing, the cover almost coming off but being retained by safety wire. Found that it ran fine if I took off cover and used a probe to press the gear inwards towards the timing cover while cycling the kickstarter. Reassembled with the cover holding the gear in to this depth, staking it in place with a punch in 3 places.
Put new cable on with newly-serviced tach. Ran fine for several test rides and the first 2/3 of our Social Distancing ride yesterday. Heading home, I saw the tach was dead...in driveway, took cable off to look for the issue and found I was seeing the ground from the cable end of the tach drive. I didn't even know there was a cover underneath, but apparently it shat its innards out in the other direction this time...
So now the question is what to do...hmmm. I have another tach drive of the improper ratio. Dunno what kind of diagnostics I can do on this. Doesn't seem like it could be the interface with the cam shaft which drives it, otherwise it just wouldn't work...and the camshaft is obviously turning just fine. Ugh, dumb, expensive stuff here.
Also gotta richen the idle mix just a tad, I think...after it was heated up and running nicely, it still liked having a little bit of choke on from the air lever at the bar while idling at stoplights.


