1975 Honda CB360T

Another rim question that I'm struggling to find the answer on...why are the front and rear two different sizes? I understand that the front and rear tires are often time different in size for handling...does the same apply to the rims?

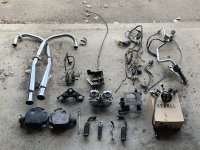
Also, I've spent a good portion of today looking for some additional parts I'm going to need/want to replace. I'm starting with the exhaust as that will be needed for me to complete the installation of the Mikuni's...I'm looking at sourcing just headers so that I can do a non megaphone style exhaust. Can someone confirm these will work? I know it says CB360 on the web site but I'm surprised at the price. Not sure if I am missing something?

https://www.shironetw.com/index.php?main_page=product_info&products_id=798956

As always, thank you, and happy building!
Different width tires may require a different width rim. A 90/90 - 18 tire will have the correct profile on a 1.60 or 1.85 width rim. A 110/90-18 rear tire will have the correct profile on a 1.85 or 2.15 rim. That being said, you could run a 1.85 rim on both the front and rear and it would fit both rims. Here is the kicker, you don't know for sure what rim is optimal for each tire without checking with the manufacturer of the tire.
Besides having the correct profile, the appropriately sized tire will also give the designed handling characteristics for the bike. In an earlier post, I noted that I had run a 110/80 - 18 front and a 130/65 - 18 rear on my CB350 race bike. Those were the Avon Am22 front and the AM23 rear and they are both speced to be used with a 2.15 width rim, because that is what some vintage race organizations limit some classes to. Both of those tires made the bike heavy handling and reluctant to initiate a turn. That is what I wanted, because I am a big guy, like to transfer weight to the front in a turn and have many years of racing experience and know what I need for handling, for me on a specific bike.

The pipes look like they would be what you need, but they are just the head pipes.
 
Front wheel size (OD) effects stability and rate of turn. The larger the front wheel, the more stable and the slower the turn.
 
Best combo is probably 1.85 front, 2.15 rear which is what most of my 350cc race bikes had, but you could probaby go up to 2.15 front 2.50 rear - same as an RZ.
 
Best combo is probably 1.85 front, 2.15 rear which is what most of my 350cc race bikes had, but you could probaby go up to 2.15 front 2.50 rear - same as an RZ.
Unless you had a specific reason for wanting something different and knew why, then Teazer is right with a 1.85 front and a 2.15 rear rim. I would run a 90/90-18 front tire and a 110/90 - 18 rear. It will look good, fit right and handle the way it was designed.
 
I was simply curious as to why the rim sizes were not the same, but it would make sense that - since the bike has different tire widths the rims would also require different widths.

For now I’m going to stick with the idea upgrading to a 1.85 on the front and a 2.15 on the back.

Thanks to the current economic situation, I found myself with Friday off unexpectedly and decided to start going further with my bike! When I first started my post last year, I’d talked about doing only a few changes and going from there...in classic form, I decided to jump in head first and will be going all in.

I’m going to strip the bike down to the frame and slowly build it back up as time and money permit. Once the bike is down to the frame, I’m going to do the standard cutting of unnecessary tabs, cut for the tail, weld the new seat loop on, and get everything nice and pretty. I’ve already found more parts to add to my “to buy” list, including the triple tree, which I’ve read is common; Mine was broken around one of the fork tube bolts.

The process will definitely take longer now due to funds, so I’m also investigating having some parts fabricated to add to the overall final product. Since I plan on keeping this bike, and because I’m doing the work myself, I may add some cool upgrades.
 

Attachments

  • 9535487B-2C1A-4658-B655-50F7F8CF806E.jpeg
    9535487B-2C1A-4658-B655-50F7F8CF806E.jpeg
    4 MB · Views: 229
Last edited:
And so it goes, day 2!
 

Attachments

  • 47FEE49A-EA98-4BA0-8EA8-FDE6F88A3584.jpeg
    47FEE49A-EA98-4BA0-8EA8-FDE6F88A3584.jpeg
    3.4 MB · Views: 198
  • 30444A27-27C2-45EC-A4C1-28A6A43D3225.jpeg
    30444A27-27C2-45EC-A4C1-28A6A43D3225.jpeg
    2.9 MB · Views: 257
Hi Guys!

I've almost finished stripping the bike down to just the frame. I have a few screws and bolts on the engine and frame that are either damaged or torqued, so I reached out to a friend who is going to bring over a few tools to allow me to finish the tear-down process. I've ordered a kit from Common Motor to do the Engine Rebuild, so that's exciting! If anyone has any photo heavy tutorials or video's on doing a tear down for the 360, please feel free to share. I did some quick Google and Youtube searches and found bits and pieces, but not a full-cohesive guide. I do have the full shop manual, as well as the Clymer, but large color photos or a full video, would be even better.

I was rereading some of the information posted from my initial days and Turnturtle mentioned installing a CJ360 oil pickup and doing Crazypj's oil mod. I did a search through some of the posts looking for more information about the recommendations but could not find them. Needless to say, I could use some further help on that front if anyone knows specifically where to read more about Turnturtle's recommendations.

As always, thanks for reading and helping!
Happy Building!
 
Trek97, PJ and I, plus a few others have a bunch of that stuff in our build threads. My first CB360 build on DTT with the mod starts here. Trek97's threads are about as thorough as you will find. Here is his 360 thread. It's long, so you'll have to dig. This thread from Crazy PJ is chock full of stuff. My Fallin Ditch Hellride also has some oil mods, including an external oil line from pump to cam. See signature for both threads of mine.
 
Don’t get pods unless u hit up PJ for a mod makes it impossible to tune
Get electronic ignition
Don’t get rid of electronic start
Keep mechanical advance
Don’t get inline fuel filters
Get dynamic timing light, set static once just to get the triggers exactly 90degrees apart
Get carbs bench synced
 
Last edited:
Trek97, PJ and I, plus a few others have a bunch of that stuff in our build threads. My first CB360 build on DTT with the mod starts here. Trek97's threads are about as thorough as you will find. Here is his 360 thread. It's long, so you'll have to dig. This thread from Crazy PJ is chock full of stuff. My Fallin Ditch Hellride also has some oil mods, including an external oil line from pump to cam. See signature for both threads of mine.


Thanks for the links! There was one in there provided that I hadn't been able to find for some reason. Would replacing the oil pick-up from the CB to the CJ360 still be beneficial if I do not do the drilling of the cam and case?

Raportmeat, I will be upgrading the ignition as well as keeping the electronic start. To start, I'm going to try and do ALL of the work on this bike myself; We'll see how that goes. LOL. I'll have to do more research on the static timing. I'm still also researching syncing/tuning the carbs as they are not stock and I will be changing the exhaust.

I’ve either made a grave mistake or this is going to be my biggest, baddest, D.I.Y./Hobby ever!
The bike - excluding the motor - is entirely disassembled and I did it almost 100% by myself. I’m impressed with myself as I did this entirely with hand tools - I don’t own any power tools, and I’m all of 5’3 - also, for anyone who doesn’t know, I have never owned - nor worked on - a motorcycle. I have next to zero mechanical exposure, save the one small engines class I took in high school, where my lab partner never let me do anything...

Next on the to-do list is to get the engine removed, clean and weld the frame, and install my custom seat from Tran Nguyen (https://www.occaferacer.com/). From there, I’ll do a full engine rebuild utilizing a kit from Common-Motor.

So far I have the following new parts to be installed at various stages:
Fuel Line + Clamps
Petcock

Mikuni VM 28's - (Still need to purchase jets and needles)
Mikuni Intake Manifolds - (Still researching which filters to buy. 44MM?)
2-1 Universal Throttle Cable

Speedometer & Tachometer
110 Speedo/Tach Connection Cable

Wiring Harness
Rectifier, Regulator, Stator
LED Flasher and Diode Pack

Complete Engine Rebuild Kit - (Still checking to make sure I don't need any additional seals)
Honing Tool
Cam Chain
Kickstarter

Custom Seat

Shocks

1586439372077.png
 
Dana,
It looks like you have turned this into a major project, at this point. Not the way I would have gone at it, but you are into it now. Why are you tearing into the engine, Is it low on performance or leaking oil or having an issue? If not, I would suggest you leave it alone for now and spend your time money and effort on the chassis and running gear. You will have enough tuning work to do with the intake and exhaust. Once you get the bike up and running you can then decide what the engine needs.
My other suggestion, since this bike is going to be down for a while and spring is almost here, is that you get another bike that is turn key ready and reliable. Given your height, I would look for a Rebel 250 or Ninja 250 or something like that. They are available for < $1000 all day long and won't need any work other than routine maintenance. You should get some riding time in on a reliable bike to better give you a frame of reference and experience when it comes time to ride and tune the CB360.
I don't know if you have any experienced motorcycle friends that can help you with all of this, but I took a quick look through the Eden Prairie Facebook Marketplace and saw several possibilities. I can help with any of this if you want, I am retired and have plenty of free time. I can also give you my phone number if you want to have conversation about any of this stuff.
Ken
 
My first bike was a CB360. Not sure why adding a $1000 second bike to the stable is a thing, especially when I built my second 360 for under $1000. That bike was bored to 385, total engine rebuild, CB750 front end, upgraded brakes, new wheels and tires, seat, the whole nine. Wanting something small enough to wrench on and customize in my small city garage that doubled as good urban transport is what prompted me to get into bikes in the first place. Remove the wrenching part and you remove my entry into motorcycles. That's my personal story, and I realize others may be different.

Anyway, the CJ pickup is mostly to solve the bikes tendency for oil starvation when it's on the side stand. Don't idle on the side stand and you essentially solve the issue. Most of us remove the center stand, so that makes the pickup a little more important. Technically, the oil mods improve a situation that CB360s found themselves in for oil starvation to the top end. In all truthfulness, a well maintained machine will be fine without any of the mods, as proven by thousands of 360s still on the road and with thousands of miles on the clock. The tensioner and at least one of the mods (pickup? I can't remember) was a factory recall item. If you've checked your engine number plate for punch marks, the tensioner may have been done already. Sparck Moto and Common Moto sell the upgraded tensioner.

I had one 360 with a starter motor and another without one. These aren't exactly a high compression engines and it was the 385 that was kick only, so not sure why such strong advice against removing the starter. Some people prefer the electric leg, some people like to strip it down to minimum weight. As easy as it is to make these bikes capable of 110mph plus, some of these things are just fun engineering exercises whether you intend on going that fast or not. They can be built into a super fun, nimble bike capable of surprising a few people.
Comparing your mechanical experience to those of the OP is why I suggested getting a running functional bike, on which to gain experience with routine maintenance and riding. I suspect the 360 will be down for a while and riding season is just around the corner, here. When I see a poster who is buying "kits" of stuff to put on their bike, it indicates to me that there is not much experience and understanding of mechanical devices. The only way to get that is to either have a mentor or to just jump in and get after it. It appears that dberkshire is just jumping in and, hopefully, this board can help with some mentorship.
 
Ex, I am doing the motor for a few reasons:

1. It is a little high in mileage (approximately 15,000 miles)
2. The history of this bike is fairly unknown. It has not been titled since 1990 which means it may have been sitting for 30+ years.
3. When I took the lower crankcase cover off, I was met with lots of gravel, dirt, and what appears to be a slightly oily tar.

Based on these factors, I feel that the Engine could benefit from some TLC. New gaskets and a solid cleaning.

I decided to break the bike down to the frame because, as I started to conceptualize what I wanted the end product to be like, that required more parts. I got to the point of "if I am going to replace part X, I'm going to have - or may as well - replace part Y and Z." I spent almost two years researching which donor bike I would be getting before I purchased one. During that time, I researched the bike as well as many of the components. While my shopping list has expanded, as have the steps I will need to take to complete the project, my decisions have been made only after extensive research and questions via multiple platforms. Each part I am purchasing is based on their current condition on the donor, requirements for other components I plan on adding, or things things that are known to go bad/have issues.

I purchased the wiring harness because I had several casings on the wires that were cracked. Additionally, based on their age, it doesn't hurt to replace the harness. I purchased the regulator, rectifier, and stator because I plan on running all LED components along with an anti-gravity battery. Also, my regulator/rectifier was in pretty bad shape. I replaced the Speedo/Tach because the Tach was non-operational. It's also bulky and does not fit the vision I have for the final project. Kickstart Arm was added because it was missing. Shocks were spongy. Seat had tears and also did not fit my vision.

While it is true I do not have much experience, I am doing my best at being thorough and giving each step I take a hard thought and research before proceeding. I have a friend who likes to work on Vintage cars and another who used to ride dirt bikes semi professionally in his teens. The semi pro rider is an Engineer with lots of mechanical experience as well. While I am going at this mostly alone, and utilizing this group for their specialized knowledge, I'm not completely without fail-safes.
IRK,

I noticed the recall on another web site for the cam chain and tensioner. I have seen any dots on on/near my serial number to indicate that the recall was performed. I'm going to re-check the engine again to confirm. Either way, I may replace the components to err on the side of caution. I have not decided if I am going to put the center stand back on. Truthfully, I find the original to be rather bulky/ugly and feel it may take away from the overall conversion. If I were to find a replacement that had a smaller profile I would consider it. I do not plan on idling on either stand but, I can't say never. I found a replacement oil pick-up for around $30 on Ebay. There's also a used vintage shop about 20 minutes from house that may have one for sale. I'll have to check.

I appreciate any and all feedback and information, as well as the offers for assistance!
Happy Building!
Dana
 
Hey-o!

Not a lot to report of as of today. We got some unexpected cold - and snow - here in MN and that kept me out of the garage most of the last week. I spent some time doing some simple cleaning of parts and cataloging anything damaged or in need of replacement. So far, thankfully, I'm mostly looking at new bolts and such as the previous ones have been stripped, chipped, and damaged. I did find a screw/bolt on one of the shocks that is sheared off in the hole. I'll have to work on getting that removed either with pliers or maybe a bead from a welding machine.

I received my engine rebuild kit and am just waiting to finish making a "proper" work space before I get started. I'm in the midst of designing a workbench that I can put the frame on as well as organize any new parts as they come in. Potential bench idea is attached. I've never really used SketchUp before so hopefully this is an okay representation of what I"m thinking. I'll add caster wheels to the bottom so that it is mobile. 2 x 2 Pegboards will be on both sides allowing the attachment of hangers and boxes. I'm only 5'3" so with caster wheels on the bottom - and the bike on the box - I may still need a step stool to do certain functions, ha. But, at least with this box, I'll be able to better organize and get off of working on the cold concrete of my garage floor!

Anyways, whether I builder the bench, or move the engine to a friends house, I hope to get started on that soon. I'll be trying to buy a new part (or parts) with each paycheck to continue with moving on towards completing the bike. Here's to hoping I can keep to that timeline while also being a financially responsible adult and paying my bills :D.

Happy Building!
Dana
Motorcycle Lift (1).png

Before
CaseBefore.jpg

After
CaseAfter.jpg

Before
ShocksBefore.jpg

After
ShocksAfter.jpg
 
You didn't lose that bearing ball in the middle of the clutch actuator, did you? I don't see it.
 
You didn't lose that bearing ball in the middle of the clutch actuator, did you? I don't see it.

I did not lose the ball bearing. When I initially dissembled the clutch actuator, the bearing was packed in there with a lot of crud. I cleaned the piece out and now the bearing is clean/clear of debris. It's currently in a small parts bag with the other pieces so that it does not get lost.
 
Irk Miller - if you see this - I’m assuming that ball is supposed to be loose/free for optimal movement, with maybe a small amount of lubrication. Is this correct?

Update for today: I’m alternating purchasing parts on one paycheck, and paying down my debt on my other paycheck. This weeks paycheck went to a rebuild kit for the forks, bearings for the wheels, and a clutch kit. When I rode the bike I had a hard time getting it in to neutral sometimes. I’m not sure if this is user error or a ground gear plate. As mentioned, given the age of the bike, the unknown history, and my new vision - I figured I’d replace the clutch plates and springs.

At the current state, it may be a far out future part, but I had an idea for the headlight. Just not sure how to make it happen. Does anyone have some knowledge, or links with good info, on making a custom headlight? Other than how to make it compatible (wiring wise) I may need some parts 3D printed or made via CNC. I don’t want to over share because - if I can make the design happen - it will be a dope surprise element. But yeah. If anyone has any knowledge, info, or maybe wants to help build it - please reach out .

Oh! Lumber was purchased and has been cut to make my table. Just need to assemble it. I’ll post some more info on that once it’s done. Hopefully in the coming week so I have a better workspace than the garage floor, ha.

Happy Building!
 
Yes. I use a sticky bearing grease and just roll in in my fingers to coat it and put it back into the hole. Not sure it hurts to fill it all with grease, but not necessary.
 
Back
Top Bottom