
We noticed you are blocking ads. DO THE TON only works with community supporters. Most are active members of the site with small businesses. Please consider disabling your ad blocking tool and checking out the businesses that help keep our site up and free.
You are using an out of date browser. It may not display this or other websites correctly.
You should upgrade or use an alternative browser.
You should upgrade or use an alternative browser.
1982 CB750F...Better Devil
- Thread starter Jimbonaut
- Start date
Bike of the Month nomination, well what d’you know. Better get my shit in gear and get this thing back on the road. Thing is, me and the missus are in the middle of selling our gaff so not having much time to work on the bike. Still, in between house visits and dealing with the realtor I’ve been in the garage and making it happen.
Carbs were broken down again and thoroughly cleaned and rebuilt, this time using Randakk’s gaskets and o-rings. I also deleted the air cut off diaphragm - punched out small disks out of some thin rubber and switched those out for the small o-rings. New fuel lines and inline filters, and also took the opportunity to switch out the shitty oil pressure switch (which leaked) for a new one (which, thankfully, does not).
Carbs are back in, hooked the bike up to an auxiliary tank and she fired right up, growling like a bulldog chewing wasps on all four cylinders. Vacuum synched and ColourTune’d the carbs again, sounding great.
Next job is to line the tank with the Dragons Blood - hopefully tomorrow.
I’d post pics but Imgur’s a dick and I can’t paste links from my phone. Can’t get to the desktop as it’s buried in a wardrobe while the place is all cleaned up for the (hopeful) sale.
Gotta get the Better Devil roadworthy. BOTM man, rules are rules
Sent from my iPhone using DO THE TON
Carbs were broken down again and thoroughly cleaned and rebuilt, this time using Randakk’s gaskets and o-rings. I also deleted the air cut off diaphragm - punched out small disks out of some thin rubber and switched those out for the small o-rings. New fuel lines and inline filters, and also took the opportunity to switch out the shitty oil pressure switch (which leaked) for a new one (which, thankfully, does not).
Carbs are back in, hooked the bike up to an auxiliary tank and she fired right up, growling like a bulldog chewing wasps on all four cylinders. Vacuum synched and ColourTune’d the carbs again, sounding great.
Next job is to line the tank with the Dragons Blood - hopefully tomorrow.
I’d post pics but Imgur’s a dick and I can’t paste links from my phone. Can’t get to the desktop as it’s buried in a wardrobe while the place is all cleaned up for the (hopeful) sale.
Gotta get the Better Devil roadworthy. BOTM man, rules are rules

Sent from my iPhone using DO THE TON
pidjones
Over 1,000 Posts
>>>I’d post pics but Imgur’s a dick and I can’t paste links from my phone. Can’t get to the desktop as it’s buried in a wardrobe while the place is all cleaned up for the (hopeful) sale.
If you have Facebook, start an album in Photos for it and upload from the phone to it. Then, you can add links from it. Works on forums that don't host and no Imgur/smugmug/photobucket crap.
If you have Facebook, start an album in Photos for it and upload from the phone to it. Then, you can add links from it. Works on forums that don't host and no Imgur/smugmug/photobucket crap.
Quick test to see if this works (trying to upload a photo from the phone via Tapatalk. One small step for man...)

Edited to add - well apparently that works. If you can’t see it (maybe on a desktop browser or some shit) let me know and I’ll repost the photos from imgur once my computer is unearthed from under a pile of t-shirts in the cupboard.
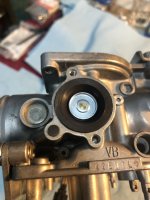
That photo shows the air cut off delete. I punched the perfect size disc with my born-to-do-it disc puncher/sharpened petcock from some old kawa -

Getting to the diaphragm assembly on these carbs without splitting the bank is a bit of a bitch truth be told. Doable though. Having replaced the steel hardware on a previous rebuild with ss Allen bolts (with knurled heads) however definitely made accessing the covers a bit easier, and made this little tool to get at them -

Loading down the springs with small zip ties also made the rebuild slightly less of a headache -

Getting the carbs back in is a bit of a dark art but I’ve done it a few times now on several bikes and there are a few tricks to make it easier. Wedging a socket into the throttle assembly on the rack keeps it in a more accessible position for hooking in the pull throttle cable - removing the socket then gives you easy access to the push. Having new carb insulators helps no end (the insulators in my other cb were hard as rock - not helpful at all), and pulling the airbox absolutely as far back as possible is key. I do this by unbolting and loosening off the battery box, pulling the airbox absolutely as far back as possible (making sure no hoses or cables are blocking the way) and then clamping the airbox to the bike frame to gain a bit more space -


So all that and the carbs will have just enough space to locate without tearing the airbox boots out - a real pisser.
Sent from my iPhone using Tapatalk
Edited to add - well apparently that works. If you can’t see it (maybe on a desktop browser or some shit) let me know and I’ll repost the photos from imgur once my computer is unearthed from under a pile of t-shirts in the cupboard.
That photo shows the air cut off delete. I punched the perfect size disc with my born-to-do-it disc puncher/sharpened petcock from some old kawa -
Getting to the diaphragm assembly on these carbs without splitting the bank is a bit of a bitch truth be told. Doable though. Having replaced the steel hardware on a previous rebuild with ss Allen bolts (with knurled heads) however definitely made accessing the covers a bit easier, and made this little tool to get at them -
Loading down the springs with small zip ties also made the rebuild slightly less of a headache -
Getting the carbs back in is a bit of a dark art but I’ve done it a few times now on several bikes and there are a few tricks to make it easier. Wedging a socket into the throttle assembly on the rack keeps it in a more accessible position for hooking in the pull throttle cable - removing the socket then gives you easy access to the push. Having new carb insulators helps no end (the insulators in my other cb were hard as rock - not helpful at all), and pulling the airbox absolutely as far back as possible is key. I do this by unbolting and loosening off the battery box, pulling the airbox absolutely as far back as possible (making sure no hoses or cables are blocking the way) and then clamping the airbox to the bike frame to gain a bit more space -
So all that and the carbs will have just enough space to locate without tearing the airbox boots out - a real pisser.
Sent from my iPhone using Tapatalk
Attachments
Last edited:
It's your air cutoff valve correct?
Yup
Sent from my iPhone using Tapatalk
If anyone is wondering why it’s impossible to drain your CB750K gas tank via the petcock hole, here’s a pic of the inside taken with my new endoscope -

There’s a raised lip - no amount of backwards and forwards swishing is going get whatever you want out, out.
The vacuum brake bleeder tool I bought a while back however is great for the job. Just turn it on and shove the hose into the tank, sucks it all up.
Sent from my iPhone using Tapatalk
There’s a raised lip - no amount of backwards and forwards swishing is going get whatever you want out, out.
The vacuum brake bleeder tool I bought a while back however is great for the job. Just turn it on and shove the hose into the tank, sucks it all up.
Sent from my iPhone using Tapatalk
It really is. I messed about with an el-cheapo wifi scope that worked for literally 2 mins before bricking itself. This one is much better, and for around $50us it’s already come in pretty useful. Literally gives you eyeballs on places you never thought possible - still can’t find that damn 10mm socket though.
Sent from my iPhone using DO THE TON
Sent from my iPhone using DO THE TON
Ha! Last time I was in HF I took a look at their closeout shelf and picked up a socket set they had marked down. Reason? Because the 10mm socket was missing!It really is. I messed about with an el-cheapo wifi scope that worked for literally 2 mins before bricking itself. This one is much better, and for around $50us it’s already come in pretty useful. Literally gives you eyeballs on places you never thought possible - still can’t find that damn 10mm socket though.
Got the Caswell Dragons Blood tank liner applied yesterday. Made a rod for my own back by not doing it before paint and clear - but such is the nature of life in my garage.
The tank was (I thought) already pretty clean, but the rust I found in the carb bowls forced my hand. Couldn’t use acetone to clean out the tank as it would screw up the paint, so called Caswell and was told that a good rinse with warm water and some Dawn would do it (there was no oil and only trace amounts of gas in there anyway). Dumped a load of drywall screws in there too to key up the surface steel, and rinsed thoroughly. Swiped the wife’s hairdryer to dry the tank and made sure all the water was out with my vacuum brake bleeder (quickly becoming the best money I’ve spent in a while).
Plugged up the petcock hole, mixed the 2 part resin and dumped it all (a pint and a half) into the tank and spent the next half hour making sure every inner surface in the tank got coated. Not much to it, but prep with this stuff is everything. Not using acetone is maybe a bit of a question mark, guess I’ll find out one way or another. After half an hr or so I drained what I could from the petcock hole - very little came out. It’s been sitting for 12 hours next to a shop fan and is already rock hard - instructions call for it to be left for 36 so tomorrow I’ll hook the tank up and see what gives.
Sent from my iPhone using DO THE TON


