
We noticed you are blocking ads. DO THE TON only works with community supporters. Most are active members of the site with small businesses. Please consider disabling your ad blocking tool and checking out the businesses that help keep our site up and free.
You are using an out of date browser. It may not display this or other websites correctly.
You should upgrade or use an alternative browser.
You should upgrade or use an alternative browser.
1982 Virago 920 engine up build
- Thread starter Knifemaker87
- Start date
03rangerxlt
Been Around the Block
After looking at this thread again, if I were you, I'd put some sort of Virago logo on that tank, because no one is going to believe that was once a virago! (except for the obvious virago motor ") )
)
)Danny3zzzs
Active Member
Beautiful bike, any updates? You possess great fabrication skill that is truly inspiring.
Hey everybody
Well, i am finally back on the project, and wrapping it up. Since the end of the last build-off I have moved two hours north, got a new job, lost my new job, decided that my wife and I are gonna take a trip around the world, got an interim job till we leave in december, and then that job fell through as well. So my life has been a bit up in the air for the last 11 months. However, i am now working on the motorcycle as a high priority because i am going to try and finish it and sell it before i go to help pay for 6 months of travel abroad.
Sob story complete, i will try to get you up to date on the work i have done in the last couple weeks.
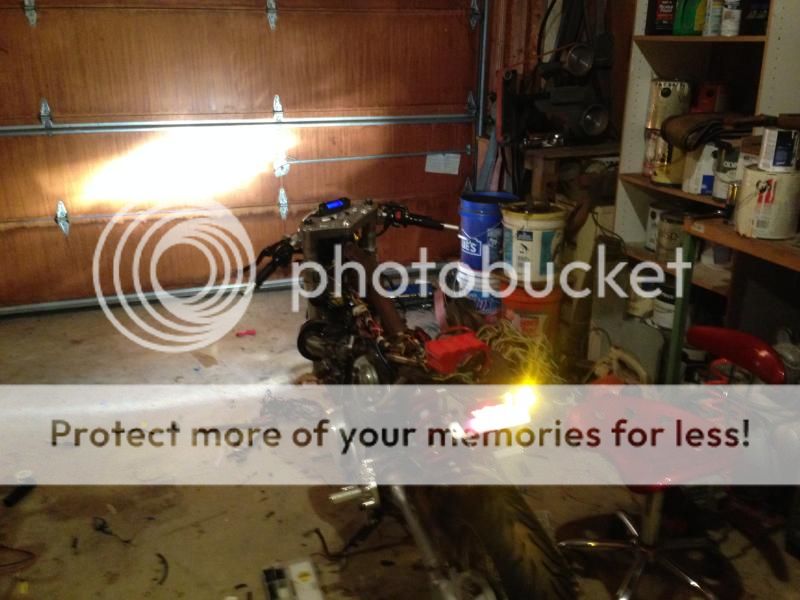
The biggest hurdle to overcome was the wiring. i had most of it routed, but the wires were all too long and nothing was in its final place as i had to find new locations for everything with the from-scratch harness.
so, i got the battery tray and underseat placement figured out.
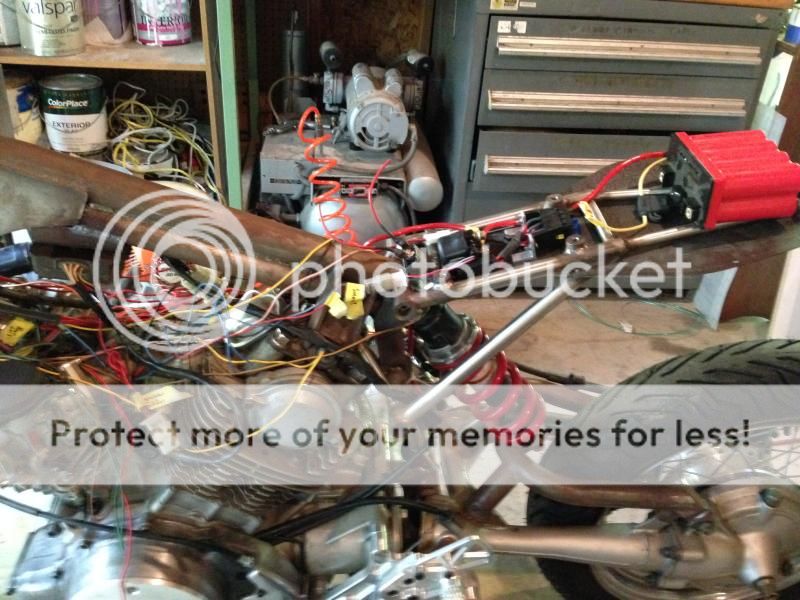
now everything was more or less where i wanted it... but they wires had no connectors, not spliced etc..
A dedicated day of clipping, routing, connecting, and splicing got me this: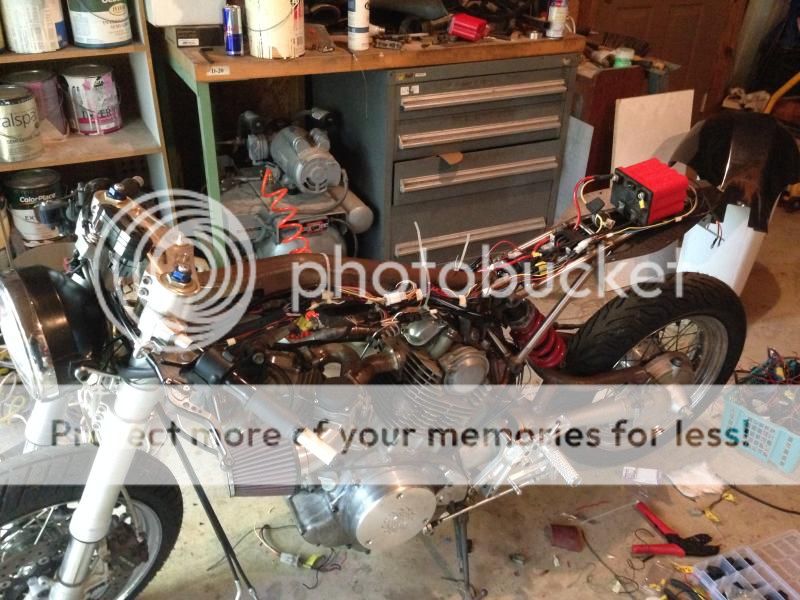
and this:
and this:
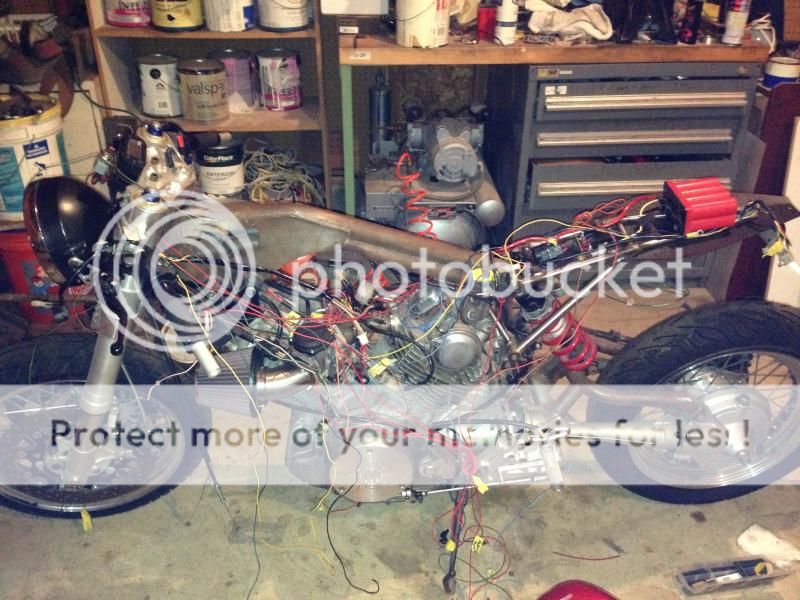
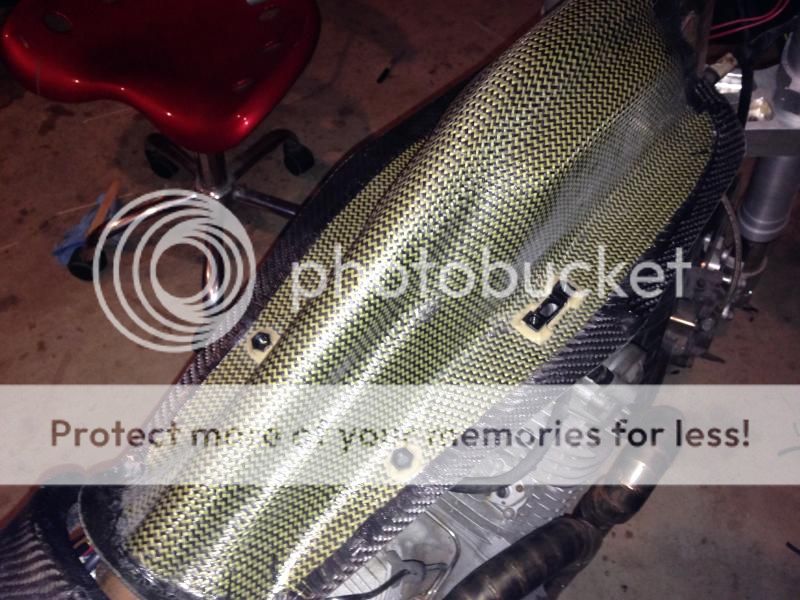
with everything figured out, i got the wiring off and got the final to-do's done before teardown. tank fittings and mounting points. here the equalizing mounts and petcock mounts are in:
then both halves got treated with Caswel's fiberglas tank sealer. i only used half the kit so i can use the other half once the tank halves are togther. i didnt realize it was clear. pretty cool and very tough stuff.
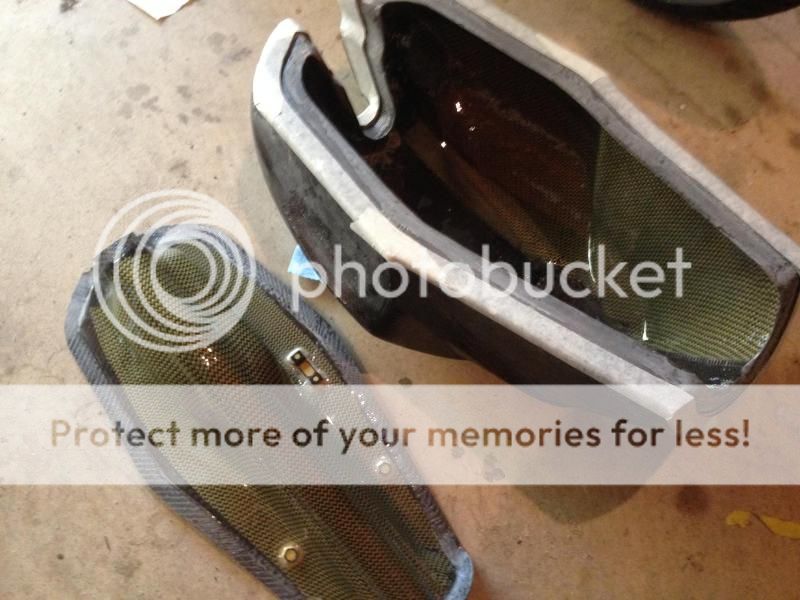
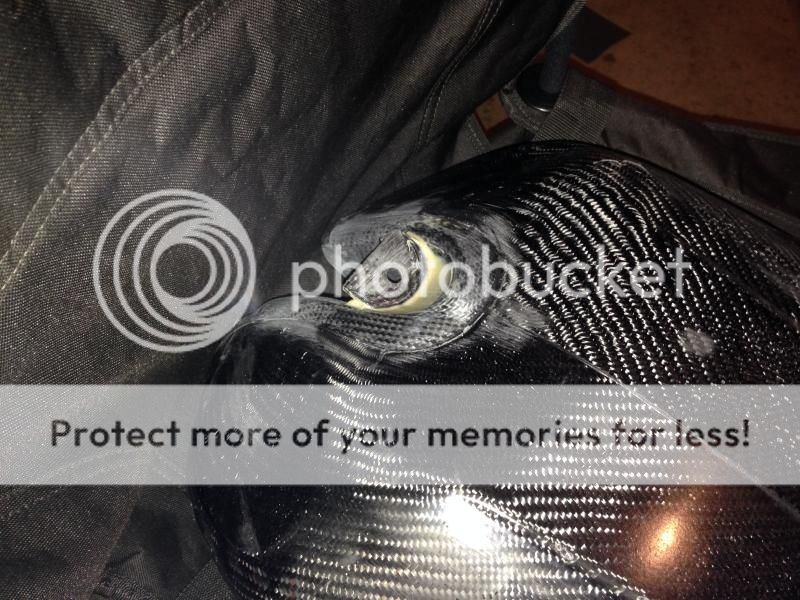
the two halves went together, the tank mounts went in on the frame, then put some on the tank. you will see more of them when i finish the tank.
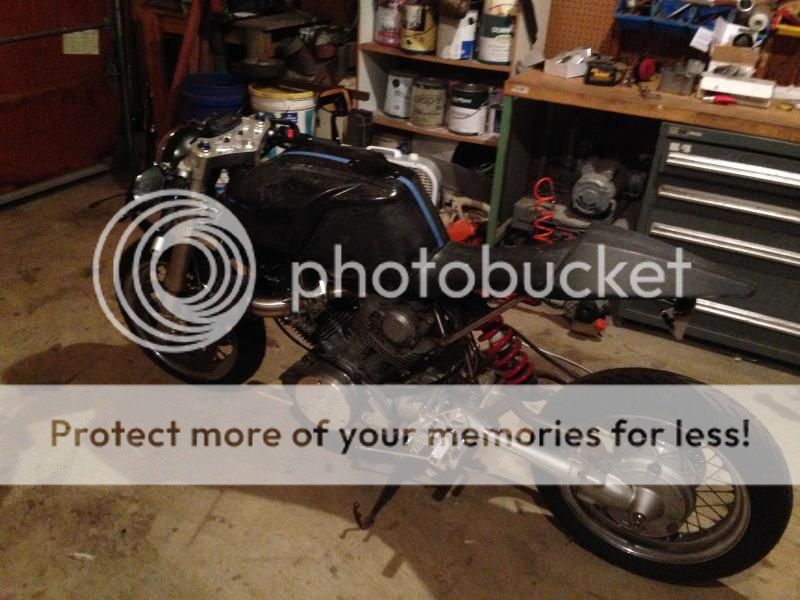
final mock-up before teardown. looking pretty good!
Well, i am finally back on the project, and wrapping it up. Since the end of the last build-off I have moved two hours north, got a new job, lost my new job, decided that my wife and I are gonna take a trip around the world, got an interim job till we leave in december, and then that job fell through as well. So my life has been a bit up in the air for the last 11 months. However, i am now working on the motorcycle as a high priority because i am going to try and finish it and sell it before i go to help pay for 6 months of travel abroad.
Sob story complete, i will try to get you up to date on the work i have done in the last couple weeks.
The biggest hurdle to overcome was the wiring. i had most of it routed, but the wires were all too long and nothing was in its final place as i had to find new locations for everything with the from-scratch harness.
so, i got the battery tray and underseat placement figured out.

now everything was more or less where i wanted it... but they wires had no connectors, not spliced etc..

A dedicated day of clipping, routing, connecting, and splicing got me this:

and this:

and this:

with everything figured out, i got the wiring off and got the final to-do's done before teardown. tank fittings and mounting points. here the equalizing mounts and petcock mounts are in:

then both halves got treated with Caswel's fiberglas tank sealer. i only used half the kit so i can use the other half once the tank halves are togther. i didnt realize it was clear. pretty cool and very tough stuff.

the two halves went together, the tank mounts went in on the frame, then put some on the tank. you will see more of them when i finish the tank.

final mock-up before teardown. looking pretty good!

let the tear-down begin!
In 4 hours i had the bike from as you saw it in the last picture, to this:
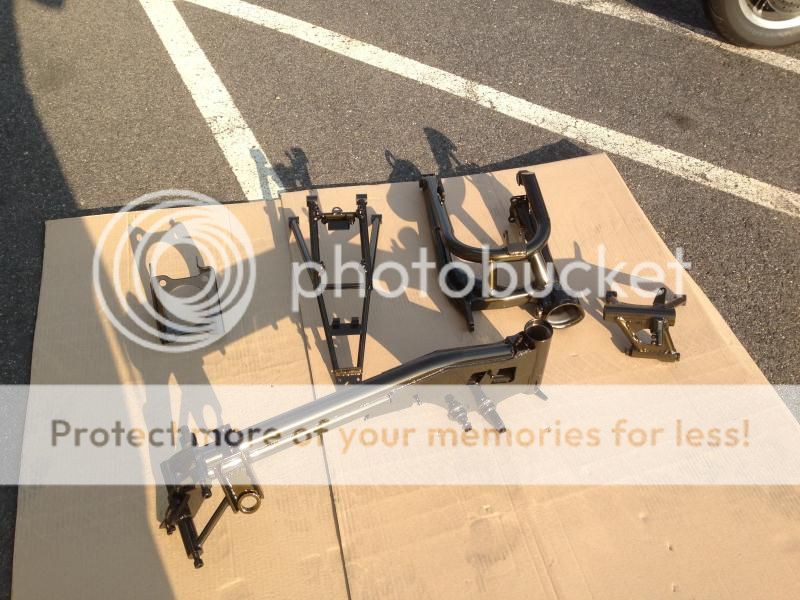
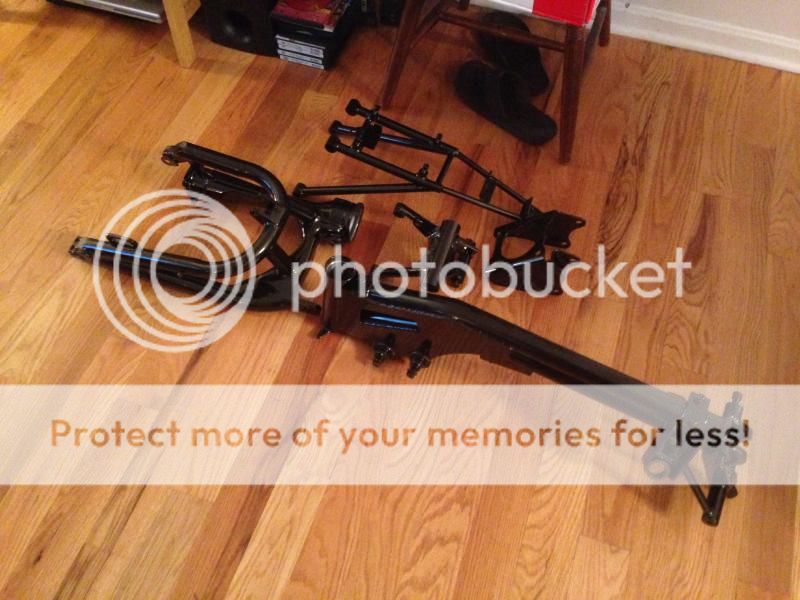
all the frame components were stripped, cleaned, and sandblasted.
I got them powdercoated in a color called "sunken treasure" which is a black with gold pearl in it to give it a black/bronze/gold color depending on the light. here the parts are in the sun
and here it is inside.
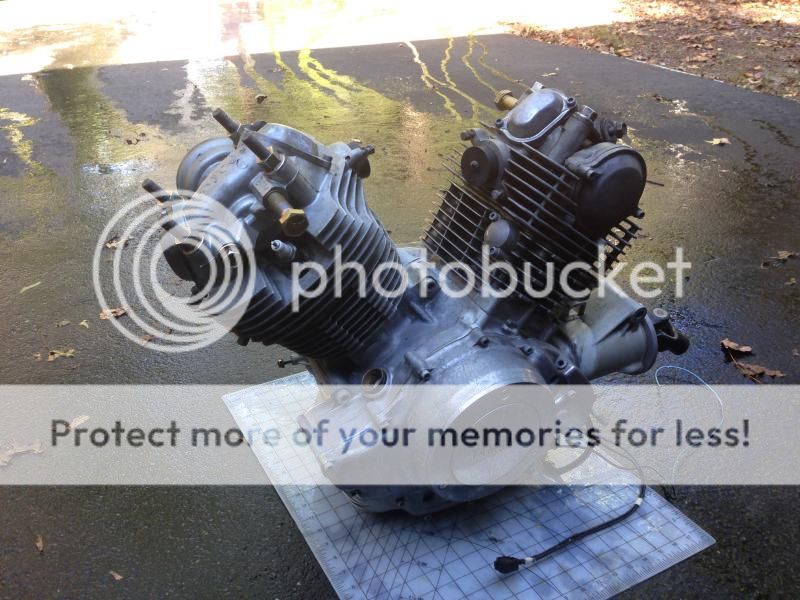
then, it was time to start on the engine. I rebuilt the engine, but the in progress pictures all turned out horrible. so you will just have to imagine all of the mechanical goodness. All new internal parts and everything. aparently grease and camera lenses = bad

then the engine got a bath
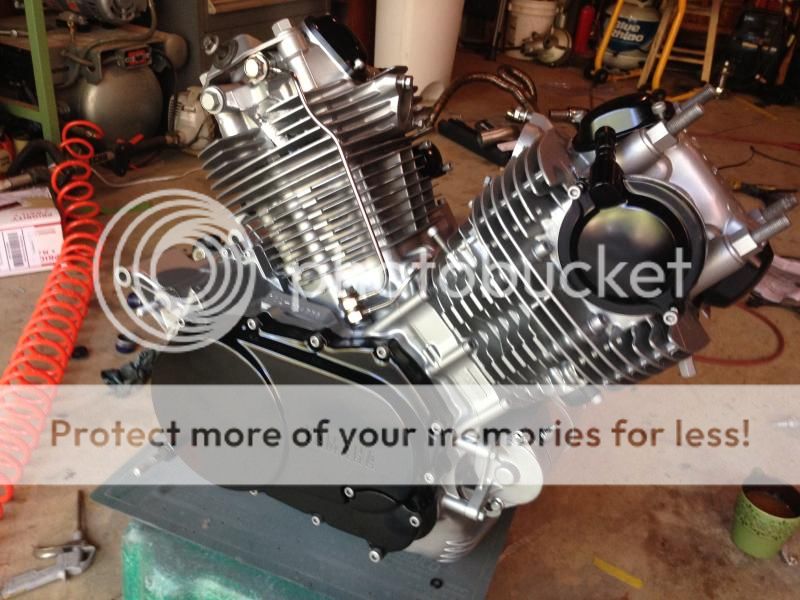
a little silver...
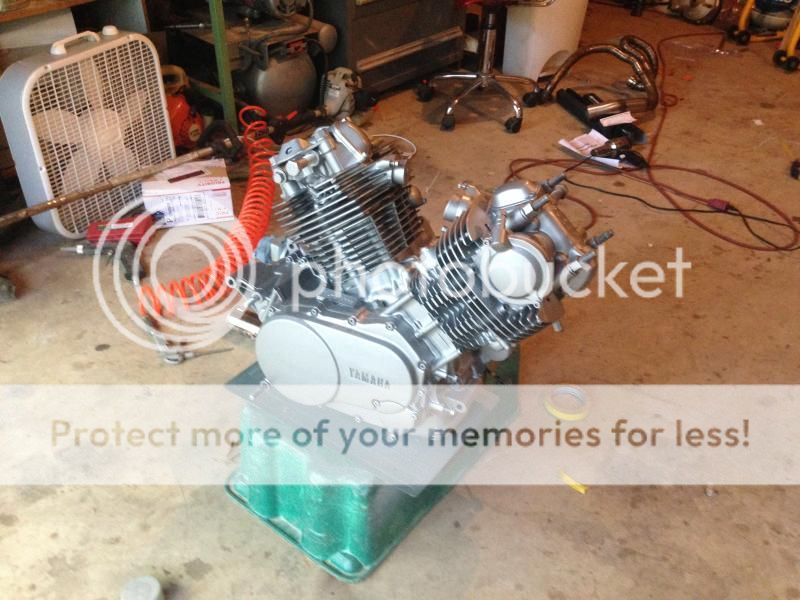
and a little black, and looking pretty good
time to move on. the engine is covered up and it is time for some paint. forks and final drive and gonna be black. and before anyone cries "foul play!" the reason for paint is the forks were slightly undersized and the paint will help bring them up to size for the triples and clip-ons.
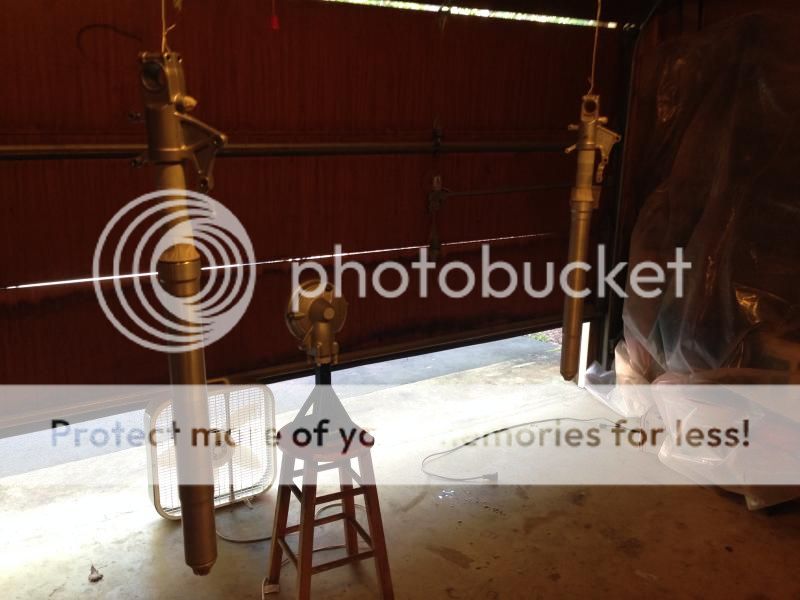
a little black direct-to-metal epoxy primer...
those are drying so i figure out how to hang my wheel components, let the forks dry overnight and took them inside.
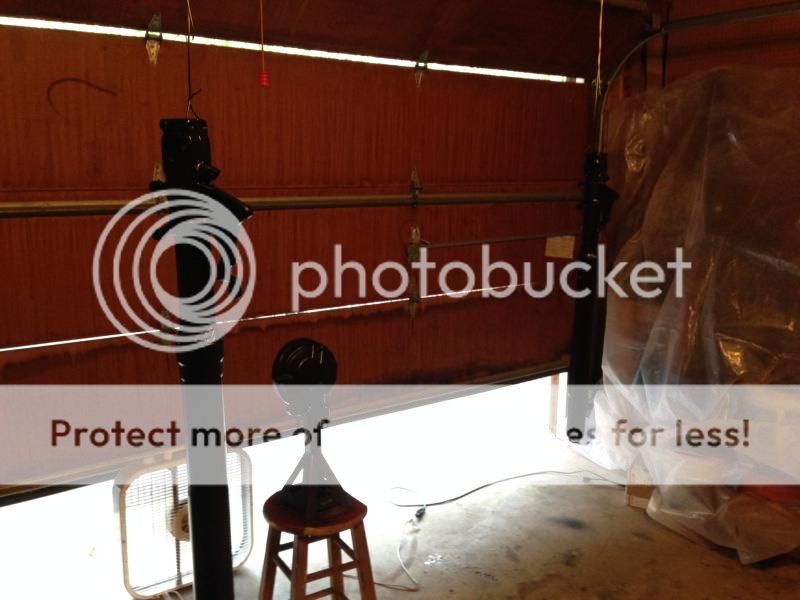
Now, a little gray direct-to-metal epoxy primer, then some silver
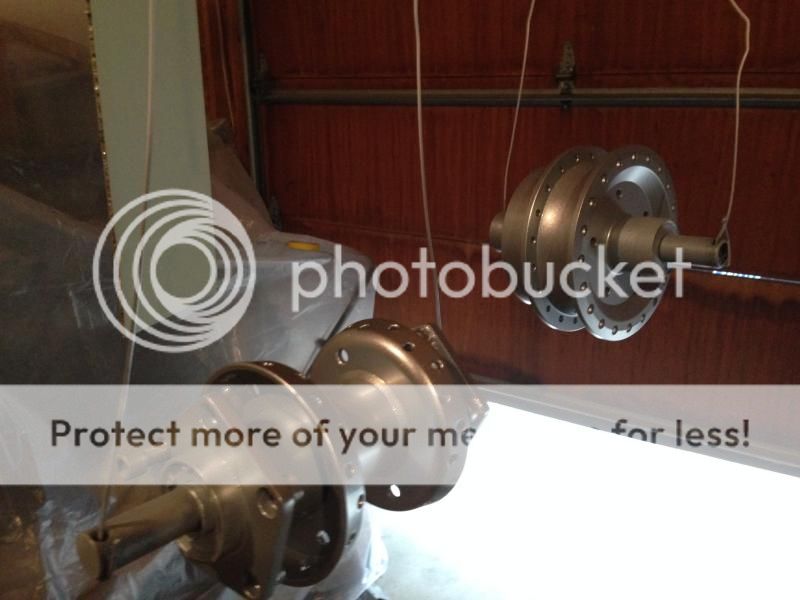
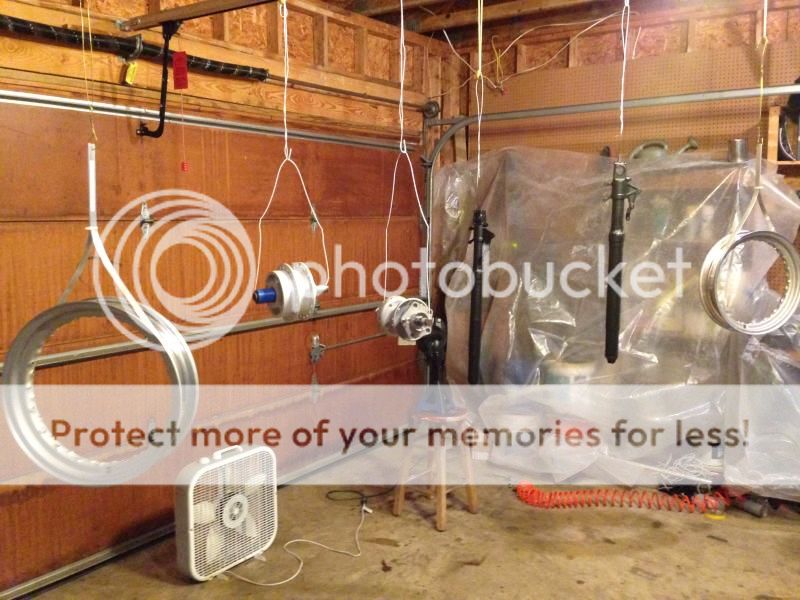
then those silver parts got a pagan gold kandy urethane. then the black parts came back out for some two-part clear.
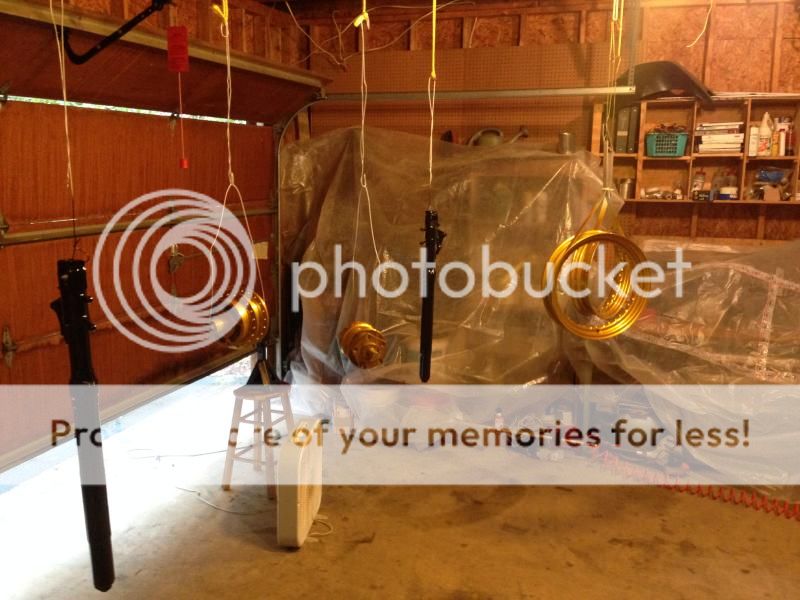
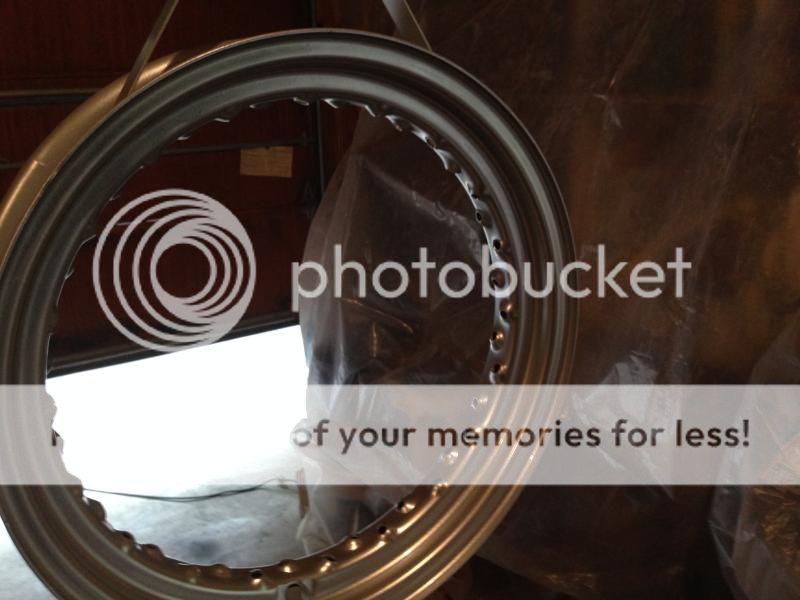
All those parts dried over the weekend while we were out of town. then i laced my front wheel.
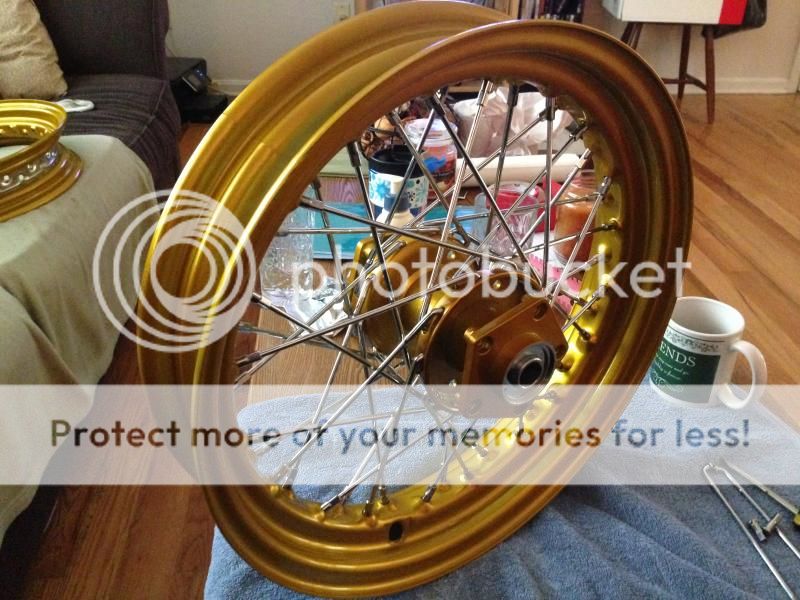
I am waiting on a set of custom spokes from Buchannans for the rear wheel. and i am going to start the pre-paint prep on the body-work.
more soon!
thanks
~Chris
In 4 hours i had the bike from as you saw it in the last picture, to this:

all the frame components were stripped, cleaned, and sandblasted.

I got them powdercoated in a color called "sunken treasure" which is a black with gold pearl in it to give it a black/bronze/gold color depending on the light. here the parts are in the sun

and here it is inside.

then, it was time to start on the engine. I rebuilt the engine, but the in progress pictures all turned out horrible. so you will just have to imagine all of the mechanical goodness. All new internal parts and everything. aparently grease and camera lenses = bad

then the engine got a bath

a little silver...

and a little black, and looking pretty good

time to move on. the engine is covered up and it is time for some paint. forks and final drive and gonna be black. and before anyone cries "foul play!" the reason for paint is the forks were slightly undersized and the paint will help bring them up to size for the triples and clip-ons.

a little black direct-to-metal epoxy primer...

those are drying so i figure out how to hang my wheel components, let the forks dry overnight and took them inside.

Now, a little gray direct-to-metal epoxy primer, then some silver


then those silver parts got a pagan gold kandy urethane. then the black parts came back out for some two-part clear.

All those parts dried over the weekend while we were out of town. then i laced my front wheel.

I am waiting on a set of custom spokes from Buchannans for the rear wheel. and i am going to start the pre-paint prep on the body-work.
more soon!
thanks
~Chris
Well damn, I just read through the whole thing... Realized that you were in Newport News (30 mins north of me) figured I needed to get my shitbox done so we can ride... then I caught where you moved 2 hours north. Great lookin bike man... looking forward to seeing what this thing will look like when its done.
wynand2000
Active Member
Woowww. good to see you`re back at it, great!
focusinprogress
City Limit Moto:Parts-Service-Apparel (716)8038606
I'm super glad this thread is back haha.
I've got a question about the 535 rear hub you set up before making your own hub for the disk. I assume you turned the 535 hub in a lathe to remove the shoulder at the mating interface with the splined coupler. How did you secure it to the lathe? Did you bold something to the hub that you could clamp in the chuck or did you secure it to a temp axle down the center of the hub? I'm pretty sure the lathe I have access to doesn't open anywhere near wide enough for the drum brake to fit in the chuck.I know it was a couple of years ago, but if you can recall your approach I would greatly appreciate it.
I guess I could press the new bearings into the hub and turn it on the bike's axle with the end held by the tail stock and some kind of pin between the chuck and the hub to make it spin, but I'm afraid I'll have too much play from the bearings. I'm hoping to figure it out before making the trip to the shop. I feel like I will spend far more time tackling this than actually turning the shoulder down.
Also, do you recall if you had clearance issues between the bolts in the final drive and back sides of the spoke nipples? Looks like they don't clear by much, I will probably grind the hex heads down.
Congrats on the imaginative build and good luck in finding your next job, someone will be lucky to have your skills at hand.
Edit: Nevermind the drum side fits in the chuck.
thedutchguy
New Member
Hello, I discovered your build yesterday.
Truly awesome.
I'm currently building a xs 650 street tracker but I am scavenging for parts for the 750 virago i just got..
Are your rear set adapters hand milled or do you have dxf files for these?
I saw that you are busy with the wiring, Is a motogadget can bus system no option for you?............superclean handlebars !
http://motogadget.com/en/electrics/overview.html
keep up the good work
Bozz said:I dare say the board would be very interested when you go to sell it.
Give us a chance, eh? Damn impressive all the way around!
The board? The bike is going up for sale basically as soon as i get the new custom title for it. but we are going out of the country on december 6th so that doesnt leave me much time. So i am totally interested in any interested party.
gdavid said:I've got a question about the 535 rear hub you set up before making your own hub for the disk. I assume you turned the 535 hub in a lathe to remove the shoulder at the mating interface with the splined coupler. How did you secure it to the lathe? Did you bold something to the hub that you could clamp in the chuck or did you secure it to a temp axle down the center of the hub? I'm pretty sure the lathe I have access to doesn't open anywhere near wide enough for the drum brake to fit in the chuck.I know it was a couple of years ago, but if you can recall your approach I would greatly appreciate it.
I guess I could press the new bearings into the hub and turn it on the bike's axle with the end held by the tail stock and some kind of pin between the chuck and the hub to make it spin, but I'm afraid I'll have too much play from the bearings. I'm hoping to figure it out before making the trip to the shop. I feel like I will spend far more time tackling this than actually turning the shoulder down.
Also, do you recall if you had clearance issues between the bolts in the final drive and back sides of the spoke nipples? Looks like they don't clear by much, I will probably grind the hex heads down.
Congrats on the imaginative build and good luck in finding your next job, someone will be lucky to have your skills at hand.
Edit: Nevermind the drum side fits in the chuck.
i am pretty sure that i used the drum side to hold the rim, and then i indicated it in for round before i cut it. then i ended up making my own, so i never got to really check it for if the spokes had clearance.
I did have clearance issues with my custom spokes and the final drive, but with my new spokes i laced them all from the inside. I do actually have a spare hub that needs bearing and the drive spline, and the CBR 600 rotor, i have a brake holder and caliper. i also have a set of spokes that are pretty close to the right length. i got a custom set made that were a bit shorter. i also have a couple harley rims.... let me know if you are interested. i could just never get over the 15" rim and the drum brake. hit me up if you are interested.
thedutchguy said:Hello, I discovered your build yesterday.
Truly awesome.
I'm currently building a xs 650 street tracker but I am scavenging for parts for the 750 virago i just got..
Are your rear set adapters hand milled or do you have dxf files for these?
I saw that you are busy with the wiring, Is a motogadget can bus system no option for you?............superclean handlebars !
http://motogadget.com/en/electrics/overview.html
keep up the good work
my rearset adapters were designed on CAD and then machined on a CNC machine, however i dont have DXF files for them.. i only have the FeatureCam files and i cant open them without the software. I had no idea about the can bus system. maybe for my next build, but i dont really have the time to o back and redo the wiring at this point, but it is a great idea.
And now... i have a nice update for yall.
I got the bodywork off the hangers and set aside, trying to keep the dust off while i get everything else assembled.

Just a few feet away i have this beautiful pile of shiny new parts. i wonder what i will do with them?

Here is the frame, next to the original frame, just for comparison... its a BIT different.

Frame meets engine...

Then on goes the lower support and brace to tie the two together. i am terribly sorry for the picture quality, it was storming outside and i had no natural light.

now for the swingarm and the rear shock..

then my whole plan to take a picture at each major component went out the window as i needed the wheels for balance, so I put on the front suspension and the wheels.

by this time it was about 9 pm, but i wanted to see what it looked like with the tins... super excited.

After that it was a whirlwind or parts pieces and tweaking. Everything got cleaned torqued lock-tighted greased or lubed. still missing some stuff, but wanted to share a better idea of "what it would look like" hope you like:


And then... after playing around with pictures, I got back to work and got the wiring finished up and a bunch more bits and pieces on, like the brakes, oil filled up, final drive topped off, and all that good stuff.

ill have more soon, and more details. the wiring all works, and i got the engine to fire up with a bit of starter fluid in the intake ports. and it is LOUD. i smoothed out the intake manifold, and i sealed it with tank sealer so it would be super smooth inside.
I got to get the carb all tweaked up and the cables mounted.
thanks
~Chris


