1982 Virago 920 engine up build

Hey everybody,
My heater died, so while waiting for the repair-man to fix my quickly cooling house, i did get some work done.

I got the other side flange done, and got this picture with the part all lined up before i put the flange in.


With both side flanges done, i put the halves back into their prospective molds, and bolted it down, lining both sides up. This is why you make a two part mold that will go back together just perfectly.


Carbon seam all laid up. With the weather being so cold (in the 30's and we got some flurries) i laid everything up outside and then brought the parts in and popped them in the oven for a little bit at 150 degrees.


Now it's hard to see with my terrible picture taking, but with both halves finally together i lined up the throat and laid up the support on that too.


It doesnt line up perfectly, but it is pretty darn close. also, you can see what happens when you let humidity get into your resin and hardener; it hardens opaque. good thing this part will be covered with paint.


This is with the bottom just laid on, but you get the idea. all matchy matchy


So now, the top three parts are one, and fit seamlessly onto the bottom half so it will be a gas-tight fit. now i just need to fit the gas-cap, the spigot and fixtures before i can seal it up and bond it together.


thanks for looking! more soon, and you wont have to look at the tank anymore
 
Such a bueautiful tank and seat. You really need to get a vacuum bag setup, I believe that would help you immeasurably with the composite. The work you have done with the equipment you have is awsome.
 
VonYinzer said:
Can't even wrap my head around the awesomeness.

How much for the battery by the way?
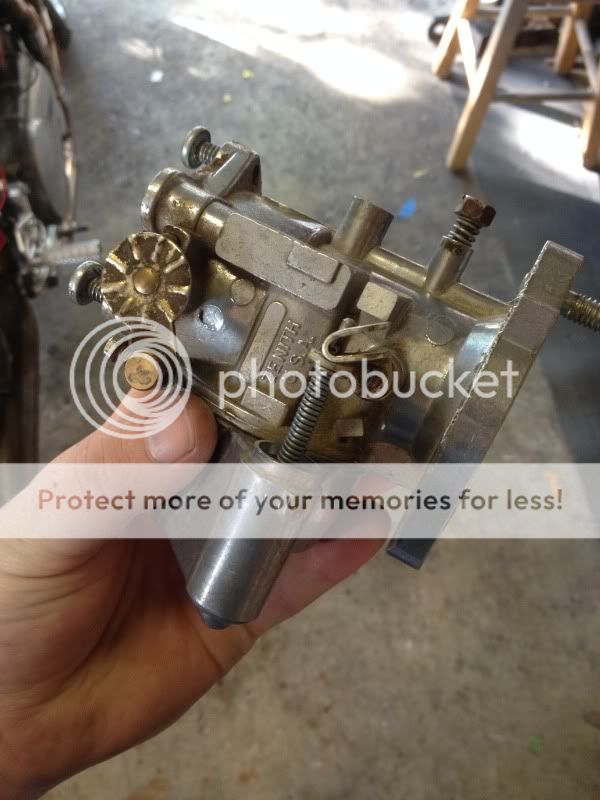
thanks guys! it has been a long time in the making, and figuring out how to make it all match took me six months of sleepless nights. the closer i got to the end the clearer i could see what i needed to do.

as for the battery, i got mine as cheap as i could find it, for $165 plus shipping. I will sell it for $150 shipped within the US. it is brand new. never used. i just used it for mocking up. If you want the stainless box i made for it, i will sell it for $175 shipped.

let me know
thanks
~Chris
 
the next step in finishing the tank was getting the gas cap mounted.

first things first... gotta cut a hole. What this photo doesn't show is the two hours it took me to fine tune this hole so it was a tight slip fit on the Ducati 999 aftermarket gas cap.


the way i decided to mount the cap was onto an aluminum plate which you can see here:


But i didnt want gas or rain water to corrode it, so, i anodized all the tank fittings. the cap base, the petcock mount and the equalizer mounts.

in the acid bath


out and ready to go into the dye. (they will all be black)


with the parts anodized, i needed to seal the gap between the cap and the base. so i used some modeling clay to fill the gap.


this was then trimmed flush, and some high gloss tape was applied around the cap and clay(which supported and sealed it) but not around the base, as i want the resin and carbon fiber to stick to it.


then i sealed up against any possible gaps with a little more clay. This also served to reinforce the positioning, though it was very snug in the hole.


i laid up the carbon fiber around the assembly, (sorry no pictures of that, but i will get them) and once cured, popped out the cap, clay and tape. I also used some really fancy tape to keep the clay and resin off the sealing surface of the base. this is right after i popped the cap out.


So here you have the mount and recess. The cap is vented, and there is enough room for air to get in, but the cap is sealed against the base around the gas inlet.


and with the cap in:


the splitter plate was slightly off center, so i will need to run a stripe down the center of the tank, but this is all i am going to cover of the seam. the rest of the raised section will just be clear coated.


Now i just need to mount the petcock and equalizers before it gets a final clean so i can seal it and put it together permanently.

thanks for looking
~Chris
 
This is some serious carbon skills. It's amazing stuff to work with and as easy as fibreglass, UNLESS you want it to be visual, then it takes incredible expertise.
Stuff is incredibly strong. I've seen CF tails with an alloy sub-frame, but you could really almost eliminate the subframe.

Just make sure you wear a good N95 mask at all times when sanding, the micro fibers from carbon fiber can be very dangerous and toxic, can lead to cancer if inhaled.
 
and back at it...

After wracking my brain on how to mount and support the tail unit i went through several ideas that didnt work, and ended up going with aluminum supports bonded to the tail, and threaded stainless support bungs welded to the subframe. It makes the tail slightly heavier, but makes me feel a little better about it supporting my weight. here i have the bolts upside down to locate them while bonding


here the rear supports are tacked in place and the tail is bolted in place


another gratuitous shot..


then disaster struck. while i was welding the supports on, the arc stopped on the TIG torch, and started inside the welder box... got a little toasty in there


So i am dead in the water till i can get the welder running. The problem is that it is a knock off brand and i can find any info on it anywhere. it is a Precise-weld TIG200ACDCS anybody have any experience with those? My friend is currently looking at it and said the whole power control board is fried. not sure what i will be doing, i have to wait and see what my options are.

thanks for looking and i hope to have a good update soon.
thanks
~Chris
 
For bolting to composite parts with metal fasteners, I use barbed inserts bonded in place. Magnobond 92-1 works very well for the bonding material. I bead blast the inserts and use an etching agent to assure bonding. Be careful that no epoxy makes it's way on to the threads. That's one of the reasons I prefer PrePreg carbon. Vacuum bagged in place with a small fixture to hold the inserts in proper position.
Pity about your welder, I'd look at a used brand name like Miller (my brand) or that red one, they're both good. Always remember the machine is the welder and you're the weldor.
Cheers, 50gary
 
Re: Re: 1982 Virago 920 engine up build


Knifemaker87 said:
to get right down to it, a co-worker gave me old sportster carb; a Zenith. Anybody have any experience with this carb? i am going to try and hook it up so i can see the difference between this pure mechanical carb and my more modern CV Kehin carb.

I have used one. Yours is missing parts. There is a rubber cover for the plunger in the pic which is a sign it's not fully together. I don't remember it to be a threaded rod either. I had a low psi fuel pump on mine as well.

The bore tops out at 41mm. There are mods for them. The slow jet and main jet are adjustable. Personally I think it's a pile of shit. It's nice to be able to adjust at any time just expect to lose power due to not being able to fine tune.

I have one and I'm using the Cv carb like yourself for my xv920rh. It's winter here and I'm half way through my build. I will give the Cv a try and if I don't like it then I'll either go hsr42 or dual fcr's.
 
50gary said:
For bolting to composite parts with metal fasteners, I use barbed inserts bonded in place. Magnobond 92-1 works very well for the bonding material. I bead blast the inserts and use an etching agent to assure bonding. Be careful that no epoxy makes it's way on to the threads. That's one of the reasons I prefer PrePreg carbon. Vacuum bagged in place with a small fixture to hold the inserts in proper position.
Pity about your welder, I'd look at a used brand name like Miller (my brand) or that red one, they're both good. Always remember the machine is the welder and you're the weldor.
Cheers, 50gary

i will def have to look into those mounting options. The reason i went with the aluminum on this is that i will be sitting right on the carbon fiber, and i wanted some lateral support in the seat mounts themselves to try and spread the load on the carbon fiber. I am sure that it could have taken the stress, but i would rather go a little overboard on this since it is litterally my a$$ on the line.

@ HollywoodMX;
With the Carb i think it is just a cool piece of hardware as it is so simple. i am going to be sticking with my CV carb till i can actually try and run the bike and then i will reserve the right to ditch it for something better. but thanks for the input that is very helpful

Since I couldnt get the forward seat mounts on due to the welder situation, i decided to at least manage the wires and tuck them out of place till i can actually get up the nerve to finish the wiring. so here are some "progress to date" pictures


Trying to get the welder situation sorted. I may end up having to get a new one. if so, are there any recommendations? i need to keep it under $2k

thanks for looking!
~Chris
 
I have the Eastwood Mig and it makes me happy ....everyonce in awhile they have a Package Deal This TIG and a Plasma Cutter for Under $1500

http://www.ebay.com/itm/Eastwood-Pro-200-AMP-Tig-Weld-Welder-For-Welding-Aluminum-Stainless-and-Steel-/360791011753?pt=BI_Welders&hash=item5400d1f1a9


... Ur bike is making modern 15k sportbikes look like childs play... Good Show
 
I like eastwoods products as well, I've used all sorts of their equipment and products. Not sure what the availability of replacement boards is but all the consumables are standard issue though, so you might call them directly and inquire.

http://www.eastwood.com/tig200-ac-dc-and-versa-cut-60-kit.html $1499 free shipping.
 
I just found this thread. I read the whole thing. It was better than watching stupid gold rush or some crap show. I think your great. I have mixed emotions though. Like why the hell didn't I become a machinist! Love the way you think. Not your first rodeo. You make me better!
 
Back
Top Bottom