sprocket2cog
Been Around the Block
5 MINUTE FIX
talking about the back brakes got me thinking again how to make the back drum better on the older aces with out too much fuss.
so with that in mind i applied some high school physics to the problem and have come up with a 5 min fix for the stock brakes on the early ace.
You will need two pairs of small pliers and a split pin to replace the one you need to take out.
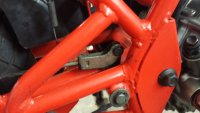
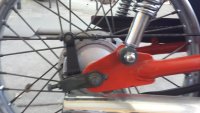
step one- remove the nut on the brake end of the main linkage
step two - remove the split pin from the back of the horn at the lever end of the main linkage its on the back behind the rear wheel and remove the main pivot pin and washer
step three - rotate the rear linkage so the horn is now facing up instead of down. reinsert the main pin and washer then replace the split pin retainer making sure to fold the legs around the pivot pin the same as the old one was
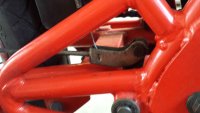
step four -put the linage back in the rear drum arm and replace and adjust nut until it is not dragging the shoes in the drum.
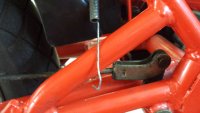
step five- look at the spring in the photo , you want to bend the spring straight and then make a small little hook on it.
if you look inside the horn where the spring was attached you will see a small protrusion where the rod comes in , just hook the spring under that.
adjust the play on the brake switch to get the lights working correctly wiggle the linage up and down etc to set it as vibrations can set off the light if the spring is too tight.
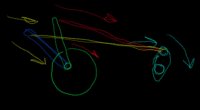
the reason it works, by moving the pivot of the likage closer to the fulcrum you decrease the effort needed to apply the brakes but increase the amount of travel needed, so its easier to get the same amount of force as before which means more brakeing power for a given weight on the pedal
talking about the back brakes got me thinking again how to make the back drum better on the older aces with out too much fuss.
so with that in mind i applied some high school physics to the problem and have come up with a 5 min fix for the stock brakes on the early ace.
You will need two pairs of small pliers and a split pin to replace the one you need to take out.
step one- remove the nut on the brake end of the main linkage
step two - remove the split pin from the back of the horn at the lever end of the main linkage its on the back behind the rear wheel and remove the main pivot pin and washer
step three - rotate the rear linkage so the horn is now facing up instead of down. reinsert the main pin and washer then replace the split pin retainer making sure to fold the legs around the pivot pin the same as the old one was
step four -put the linage back in the rear drum arm and replace and adjust nut until it is not dragging the shoes in the drum.
step five- look at the spring in the photo , you want to bend the spring straight and then make a small little hook on it.
if you look inside the horn where the spring was attached you will see a small protrusion where the rod comes in , just hook the spring under that.
adjust the play on the brake switch to get the lights working correctly wiggle the linage up and down etc to set it as vibrations can set off the light if the spring is too tight.
the reason it works, by moving the pivot of the likage closer to the fulcrum you decrease the effort needed to apply the brakes but increase the amount of travel needed, so its easier to get the same amount of force as before which means more brakeing power for a given weight on the pedal