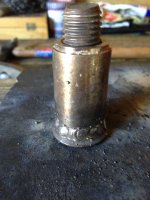
'73 CB250 - Doing it right this time round.

deviant said:
If you're going to do a fair bit of welding, it's worth it to pony up for the gas bottle of 75/25 industrial mix. Flux core wire costs more and it's messier. Some people use the flux core outside because it's not affected by wind. If your welder isn't going to be moved around much, or if you're putting everything on a cart, get the bottle. That said, it's more important to have infinite adjustments on the voltage and wire speed. Many of the cheaper welders are less adjustable.


Sent from my iPad using Tapatalk

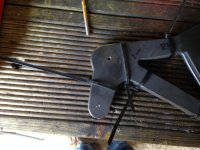
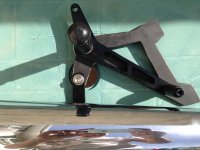
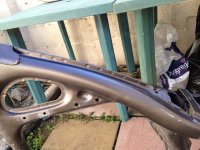
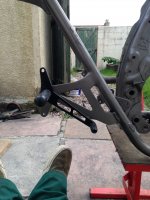
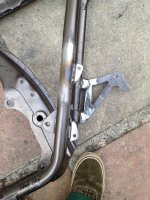
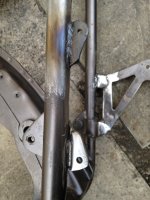
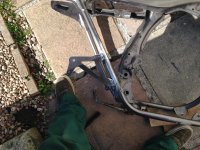
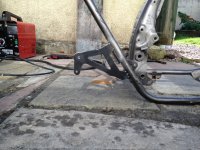
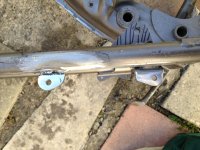
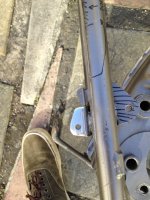
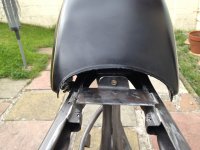
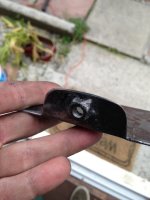
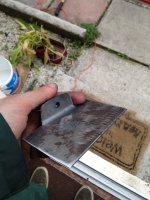
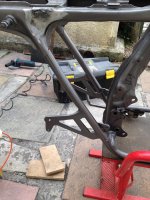
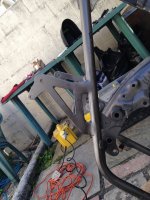
Im not sure if I will be doing a lot, I know there are a few jobs to do on this build that I need doing, but that's all I have to do really. I don't have a lot of shop space at the minute, so all welding will have to take place outside, which is another reason i'm heading down the flux core route.
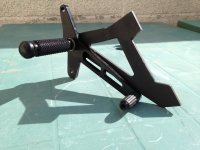
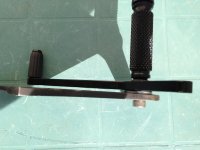
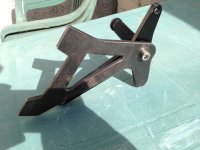
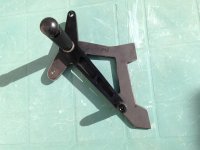
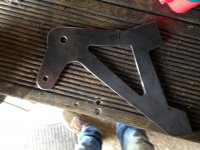
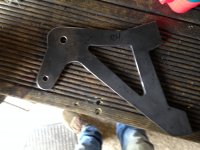
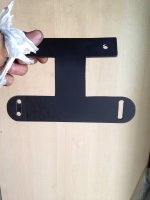
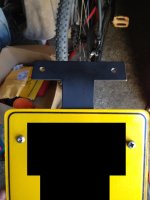
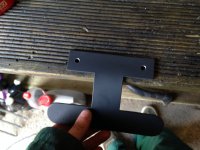
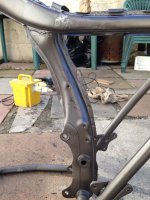
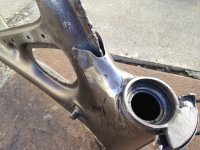
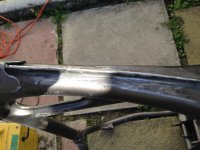
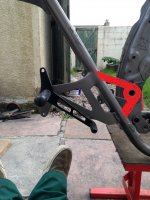
 
Green199 said:
True, but they are widely known as gasless MIG over in the UK. Obviously that's due to the shielding gas being produced by the flux cored wire....anyway.

Have you had experience using flux core wire? Is it any easier to weld with compared to standard MIG, and do you get the same penetration etc?
No joust.

Yes I have quite a bit of experience with both, and I use both all the time. Flux cored welds are actually hotter and get better penetration compared to a mig weld produced by equal amperage.

Good points so far.

MIG makes a nice pretty weld, and one that is easier in my opinion to see into, making it that much easier to get uniform welds. This may in fact be the only real benefit to using gas.

Bottles tend to always be empty at the worst times.

Cleaning slag and spatter is as about as much fun as a tornado in a trailer park.

High quality flux wire welds much cleaner than cheap wire. There are also ways to keep slag and spatter off of your workpiece. In the first place.

Gas is a lot more picky about having consumables that are in good shape.

Most of the old bikes we work on have some pretty ugly welds to begin with. Seems like almost anyone from the u.s. can outweld vintage honda welds. And others.

It's really nice to have the option for either, especially if you build a show bike now and then.
 
DohcBikes said:
No joust.

Yes I have quite a bit of experience with both, and I use both all the time. Flux cored welds are actually hotter and get better penetration compared to a mig weld produced by equal amperage.

Good points so far.

MIG makes a nice pretty weld, and one that is easier in my opinion to see into, making it that much easier to get uniform welds. This may in fact be the only real benefit to using gas.

Bottles tend to always be empty at the worst times.

Cleaning slag and spatter is as about as much fun as a tornado in a trailer park.

High quality flux wire welds much cleaner than cheap wire. There are also ways to keep slag and spatter off of your workpiece. In the first place.

Gas is a lot more picky about having consumables that are in good shape.

Most of the old bikes we work on have some pretty ugly welds to begin with. Seems like almost anyone from the u.s. can outweld vintage honda welds. And others.

It's really nice to have the option for either, especially if you build a show bike now and then.


Haha! I've seen some of the factory Honda welds on my frame...can't be too hard to improve upon!

I've not seen very many good reviews for anti-spatter spray. Are there alternatives to minimise spatter apart from meticulously clean metal?
 
Got some time to drill the holes for the footpegs and exhaust hangers on the rear set mounts today.

I didn't like the amount of material on the exhaust hanger as it looked too big and out of place, so I drilled the hole so it wasn't concentric to the bottom, and will shape it further with the grinder to remove some more material.
 

Attachments

  • IMG_1309.JPG
    IMG_1309.JPG
    2 MB · Views: 204
  • IMG_1317.JPG
    IMG_1317.JPG
    2.3 MB · Views: 224
  • IMG_1313.JPG
    IMG_1313.JPG
    2.1 MB · Views: 207
  • IMG_1312.JPG
    IMG_1312.JPG
    2.7 MB · Views: 205
  • IMG_1311.JPG
    IMG_1311.JPG
    2.1 MB · Views: 197
  • IMG_1310.JPG
    IMG_1310.JPG
    2.3 MB · Views: 203
  • IMG_1314_edit.jpg
    IMG_1314_edit.jpg
    1.6 MB · Views: 202
  • IMG_1314.JPG
    IMG_1314.JPG
    1.7 MB · Views: 209
thats real nice fab work ,in that you have an excellent eye for getting the perpotions correct in a design strenth and aesthetic sence
 
Thanks Yogi and XB!

Everything would be a bit neater if I had a proper shop to work in, but I've got to deal with what I've got.

I picked myself up a Sealey MightMig100 fluxcore welder for cheap the other day, so have been practicing welding for the last few days in anticipation of some frame work.

I'm getting some good penetration, and the welds aren't as messy as I thought they would be, but still think I may have to use the grinder a bit on my frame welds. I'll get some pictures up later for some critiquing.
 
doing some pretty serious pre-heating of the metal just before your final welds will help a great deal
i am not talking red hot but with a good propane torch you can pretty easilly get close to 400f which really should make a huge diff in how easy the weld goes .and more importantly the weld will haqve better penetration and should float the flux better
you can get temperature sticks which are like a crayon looking thing and they are even diff colors as per their temp. rating,you draw it across hot metal and it only gets slick and melty when it sees its own temp rating
 
Ahh haven't tried any pre-heating of the metal yet. May have to give it a go the next time I practice. I need to pick up some steel so I can have some more material to practice on.

I found a scrap steel sleeve, so I tried welding it on to a bolt. Didn't go too bad I don't think. Any advice on the welds below?

I also got around to sorting the mounting for my number plate bracket. Drilled the mounting holes, and got one of the slots 'cut'.

I still need to a bit more shaping and de-burring, but my arms is knackered from all the filing haha.
 

Attachments

  • IMG_1345.JPG
    IMG_1345.JPG
    765.3 KB · Views: 198
  • IMG_1342.JPG
    IMG_1342.JPG
    984.6 KB · Views: 205
  • IMG_1340_edit.jpg
    IMG_1340_edit.jpg
    1,020.8 KB · Views: 205
  • IMG_1337.JPG
    IMG_1337.JPG
    1.7 MB · Views: 200
  • IMG_1332.JPG
    IMG_1332.JPG
    961.4 KB · Views: 192
  • IMG_1330.JPG
    IMG_1330.JPG
    1 MB · Views: 193
I tore the bike down to the frame so that I could weld the new rearset mounts on without ruining anything else. I'm also correcting a few thing while its torn down ready for powdercoat at a later stage.

I seam welded the backbone and downtube in order to increase rigidity. They could still do with being tidied up a bit with the grinder as my welds were far from pretty.

I also finally got around to removing the steering lock from the headstock as I didn't need it and forgot to remove it the first time around.

The rear has been shaped a little bit more, in preparation for a new seat pan. It will look and function exactly the same as the previous one, but will be welded on instead of bolted, and will have battery mounts etc now that position has been finalised.
 

Attachments

  • 480.JPG
    480.JPG
    1.4 MB · Views: 194
  • 482.JPG
    482.JPG
    1.3 MB · Views: 188
  • 472.JPG
    472.JPG
    2.3 MB · Views: 193
  • 478.JPG
    478.JPG
    2.6 MB · Views: 187
  • 477.JPG
    477.JPG
    1.9 MB · Views: 185
  • 470.JPG
    470.JPG
    2.2 MB · Views: 192
For the rear sets,

I cut the original mount into 2 so that I could basically 'lap weld' the bracket onto is, as well as welding it directly to the frame tube.

I had to weld the part I removed further up the frame tube so that it coincided with the top arm of my bracket. I then spot welded my rearset bracket on to check position, then welder it up fully.

I still need to weld the bracket to the mounts on the left side, and tidy a few of the welds up.

With the tank and seat in place, the mounts look much better than the cheap bolt on brackets I had!
 

Attachments

  • 500.JPG
    500.JPG
    2.8 MB · Views: 194
  • 499.JPG
    499.JPG
    1.3 MB · Views: 188
  • 495.JPG
    495.JPG
    1.5 MB · Views: 197
  • 494.JPG
    494.JPG
    974.3 KB · Views: 198
  • 489.JPG
    489.JPG
    3.2 MB · Views: 189
  • 487.JPG
    487.JPG
    2.7 MB · Views: 200
  • 486.JPG
    486.JPG
    2.2 MB · Views: 191
  • 483.JPG
    483.JPG
    1.1 MB · Views: 186
Thanks Yogibear, the tail flows much better with the 500t tank than it did with the 650 tank I had on first.

Looking at the mount on the bike, I think I want the bracket which ties into the swingarm pivot bolt to complement the design of the rear set bracket, rather than just having a plate sticking across. Thinking of something like this, with any necessary bracing.
 

Attachments

  • Bracket mockup.jpg
    Bracket mockup.jpg
    2.5 MB · Views: 175
Erskine said:
Nice stuff, stick with it

Thanks Erskine! I've decided it needs to be done! Spent far too long on this with not enough motivation on getting on the road as opposed to making it looks alright.
 
Welded the second rear set mount in place today. I still need to do a bit of blending in to the frame tubes. I'm waiting on a die grinder to clean out inside the cutout sections as hand-filing was taking ages.

I also started work on the rear tank mount. It's replacing the original plate I had welded in place which secured the front of the seat, so it will secure both items now. I just need to weld a 90 degree plate on to the existing tank mount on the tank. It will then sit in front of the frame plate, and then be secured with the nut. Again, as I only had access to an angle grinder, the cuts and shaping are all a bit rough, so i'm going to tidy it up at a later date with hand files once I know it works as expected.
 

Attachments

  • 513.JPG
    513.JPG
    2 MB · Views: 188
  • 507.JPG
    507.JPG
    750.5 KB · Views: 184
  • 506.JPG
    506.JPG
    927.9 KB · Views: 173
  • 508.JPG
    508.JPG
    1.5 MB · Views: 182
  • 504.JPG
    504.JPG
    1.2 MB · Views: 180
Got the plate welded in place for the tank mount, and welded the mount onto the tank itself. The welds aren't the tidiest but I'll clean them up later.

Also made a mock up for the swingarm bolt supports.
 

Attachments

  • 519.JPG
    519.JPG
    2.1 MB · Views: 179
  • 521.JPG
    521.JPG
    1.8 MB · Views: 175
  • 522.JPG
    522.JPG
    2.2 MB · Views: 185
  • 523.JPG
    523.JPG
    661.4 KB · Views: 176
  • 525.JPG
    525.JPG
    996 KB · Views: 169
  • 530.JPG
    530.JPG
    2.5 MB · Views: 164
Looking good so far mate ;) most on here don't get enough mig/tig time unless its ya trade :-\ so long as they hold up then there doin there job you can only get better, keep it up enjoying this one 8)
 
yorkie350 said:
Looking good so far mate ;) most on here don't get enough mig/tig time unless its ya trade :-\ so long as they hold up then there doin there job you can only get better, keep it up enjoying this one 8)

Thanks Yorkie! Definitely struggling with the welds, but if they hold and do their job then the grinder can do its job! haha!
 
Back
Top Bottom