Follow along with the video below to see how to install our site as a web app on your home screen.
Note: This feature currently requires accessing the site using the built-in Safari browser.
We noticed you are blocking ads. DO THE TON only works with community supporters. Most are active members of the site with small businesses. Please consider disabling your ad blocking tool and checking out the businesses that help keep our site up and free.
*UPDATE* Top Mechanics have discovered this one weird trick to make your RD go faster, look below for information "THEY" don't want you to know!!!
I'm going to do a little write up on how I modified Banshee pistons to work with the RD. There are many places online where you can order pistons for the RD, you will notice in most that you can add a $20-ish modification. It's where they take a water cooled RZ or Banshee piston and modify it to work with the air cooled RD. Without the mod the pistons can interfere with cylinder porting and cause all kinds of mean, nasty, ugly things to happen. My main reasoning for choosing this method came down to cost and availability here in Nova Scotia especially during COVID, however there were some technical points to look at as well. RD pistons are worth their weight in gold and generally only come in .5 step sizes. I only wanted to go up .25 and Banshee pistons come in every imaginable step at a reasonable price. Another thing to consider is that these are water cooled pistons going into an air cooled motor, you'll have to make your own choice between cast and forged pistons based on how much and how fast your expecting them to expand. This may also change how much clearance you machine for, just food for thought. I used a hand file to remove the tabs off the bottom of the skirts, it only took around 10 min a side, just take your time and go slow. Before I started and once completed I weighed my pistons on a Canadian. . . "Piston Scale"... that will measure grams very closely. This is something I would consider an optional step. In my case they were still within the range of difference that I got them from the factory, so it was good enough for me. Pics below, any questions feel free to ask.
RD update. It finally came time to throw the motor back together. I unfortunately forgot to take pics of the assembly, but things went pretty smooth. I can however offer a few pics of an auto oil pump block off plate I made. The previous / in between owner of the bike had disassembled the auto oil injection, but left the pump on the case still operational. This may be a stretch, but part of me thinks the seals in the pump may have dried out allowing excess air into the crank case, possibly leading to the crank seal failure. I'm sure that wasn't the cause, but I can speculate. I decided the pump should be removed, as it's obviously robbing valuable horsepower with no benefit. I noticed online I could order a block off plate, but they were in the range of $30 USD plus shipping, just mentioning as useful information for someone who wants the same outcome, but doesn't have the desire or resources available to make their own. I had some aluminum bar left from a previous project so I cut a rectangular chunk, traced the gasket and went to work with a hand file. It took around 15 - 20 min to come up with the finished product. Pics below.
New bars, mounts, mirrors, and breaks! After I had rebuilt the calipers I decided the old break lines were in need of replacement. I ordered some custom length stainless lines off Fortnine and was happy with delivery time\prices. I also ordered some bars and bar mounts as my back doesn't really appreciate the clip on style as much as my eyes do. This was also the first time I had seen the bike with mirrors on it in over a decade. Unfortunately I wasn't able to order the front line with the proper fitting on the caliper side, but I was able to flare a new steel line with the proper fittings to make the rigid section of the line an adapter.
It seemed like the easiest and least involved solution. You can order the proper line from places like HVC or Economy Cycle but the prices are 3 to 4 times what it cost me to order a generic line and flair a piece of steel. I understand if your a purest and or trying to restore to factory original that those options are nice to have, but my bike has already been molested enough to not be bothered.
It seemed like the easiest and least involved solution. You can order the proper line from places like HVC or Economy Cycle but the prices are 3 to 4 times what it cost me to order a generic line and flair a piece of steel. I understand if your a purest and or trying to restore to factory original that those options are nice to have, but my bike has already been molested enough to not be bothered.
Normally I would do the same, but the RD caliper side isn't a banjo style. Its more like a 3/8th style double bubble flare you'd find in an automotive capacity.
Normally I would do the same, but the RD caliper side isn't a banjo style. Its more like a 3/8th style double bubble flare you'd find in an automotive capacity.
They can be converted to banjo. Hondas and pretty much most Jap bikes ran the same hard line on the front brake. You can use a 90 degree banjo to 3/8-24 banjo or run an AN fitting on the brake side to banjo at the handlebar. If it is in fact 3/8", then that is 3AN. I have converted both BMW front brakes and Honda CB front brakes to 3AN fittings on stainless steel hoses in the same way.
Ha, that's probably true. It's hard to find things here and it really sucks that just 15 min away I can get 100X's more choices in products and usually get them at 50% less cost even with 1 USD = $1.30 CAD. The Vid-19 has made getting bike and car parts so much harder and it really sucks. I either have to get stuff from Asia direct and it takes 6-8 weeks or pay a premium to get it over the border. The actual selection of parts in Canada is few and far between, the only thing I have managed to get reasonably fast and in-expensive were the Michelin tyres and tubes.
That's probably because you were buying tyres and tubes. If you had been trying to buy tires and tubes they, undoubtably, would have cost much more. I put Michelin Street Pilot tyres/tires on the Hedgehog and I thought they were very (surprisingly) reasonable in price and great tyres/tires.
All you have to do is screw a sheetrock screw down into the brass flare at the bottom of the hole and pull it out. Then a fine metric thread banjo bolt fits it fine. I just used a 45 degree banjo and aimed it toward the fork. The line then runs up , loops back and gives a decent amount of flex reserve.
All you have to do is screw a sheetrock screw down into the brass flare at the bottom of the hole and pull it out. Then a fine metric thread banjo bolt fits it fine. I just used a 45 degree banjo and aimed it toward the fork. The line then runs up , loops back and gives a decent amount of flex reserve.
Learned it on a 2T forum. Had to, because my 400 came with no calipers at all. I bought repops that both had the flares in the brake line port, but could easily be removed. Didn't want to mess with the short hard line (it did have that) and finding a line to hook up to it. Found cheap SS braid teflon Chinabay line that fit fine. I do have to loosen the banjo and let it pivot about 45 degrees when mounting or dismounting the caliper, but with the rubber gasket banjo fiitings it doesn't leak. Also learned a long time ago to put wooden shims (like used to level windows and doors) between the pads when removing the calipers. Yamaha's pad shims have to be the fussiest to keep in place when mounting! I might try a spot of sticky no-squeal on them next time to keep the shim in place on the pad.
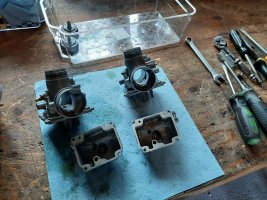
With how busy I've been it's been hard to find time to add to the build thread. I've made significant advancements on the build, and I'm feeling motivated today so here's some pics of the carbs disassembled and the kit I used to clean them generously donated by a friendly neighbor. The reason I went with foam pod filters is that I've heard the RD's don't like anything with a backing plate. Like you'd see with a K&N style that includes a chrome back plate. I read something a few years back about it causing turbulence in the carbs and I don't want to set myself up for that headache. If anyone on here can confirm or deny that, I'd be curious.
I can't confirm or deny the backing plate but I can say a lot of folks I know with RD'd use Uni-Foam filters exclusively so there must be something to it.
This site uses cookies to help personalise content, tailor your experience and to keep you logged in if you register.
By continuing to use this site, you are consenting to our use of cookies.