'81 TR1 build.................(yup another Mojave tank combo!!)

jpmobius said:
Exceptionally nice engineering on the details - much appreciated! I have not seen the push buttons before - source?

Thanks guys........
switches can be found here: http://motone.com/dual-button-microswitch-7-8-metric-handlebar-black/
 
Wow, we have had some excellent TRi-Virago builds, and this joins towards the top. Very nice detailing and an excellent overall form. Just beautifully conceived and executed.
 
Update time.............its been a while.

Just been looking through some of the old pictures of the build progress, just a reminder before posting some of the latest update stuff. Its come a long way since that pile of rust!!!!
 

Attachments

  • IMG_2742.JPG
    IMG_2742.JPG
    2.8 MB · Views: 321
  • IMG_6014.JPG
    IMG_6014.JPG
    637.1 KB · Views: 253
  • IMG_2997.JPG
    IMG_2997.JPG
    2.7 MB · Views: 260
  • IMG_5677.JPG
    IMG_5677.JPG
    2.7 MB · Views: 249
  • IMG_2778.JPG
    IMG_2778.JPG
    2.9 MB · Views: 260
  • IMG_5702.JPG
    IMG_5702.JPG
    2.6 MB · Views: 302
  • IMG_2777.JPG
    IMG_2777.JPG
    2.8 MB · Views: 296
  • IMG_5685.JPG
    IMG_5685.JPG
    2.4 MB · Views: 292
  • IMG_2775.JPG
    IMG_2775.JPG
    2.7 MB · Views: 307
  • IMG_5954.JPG
    IMG_5954.JPG
    2.7 MB · Views: 304
  • IMG_2757.JPG
    IMG_2757.JPG
    2.6 MB · Views: 296
  • IMG_5713.JPG
    IMG_5713.JPG
    2.7 MB · Views: 312
  • IMG_2760.JPG
    IMG_2760.JPG
    2.8 MB · Views: 300
  • IMG_6022.JPG
    IMG_6022.JPG
    2.7 MB · Views: 310
Righto, update time...................I have been working on the bike, honest. Not too much revolutionary big stuff going on, just plodding along to the finish line.

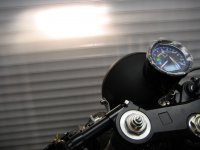
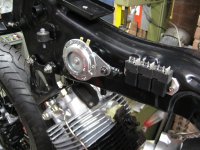
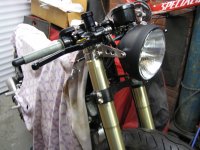
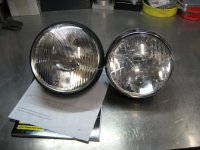
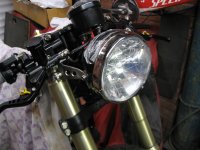
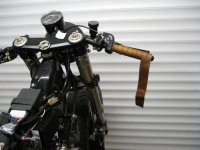
Had a rethink about the headlight, was never really 100% happy with it, so decided to change it to a design more in keeping. Preferred the lense pattern, and finish compared to the original one. so few mods to the brackets and on that went.

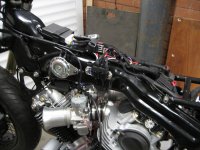
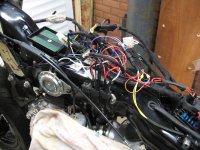
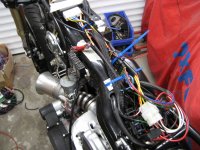
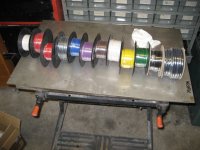
The the biggest obstacle I've been dreading for months, the wiring!!!!..................Loom from scratch, first build, what could go wrong !!!

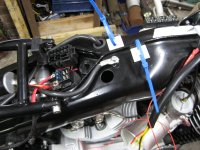
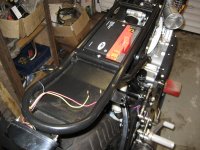
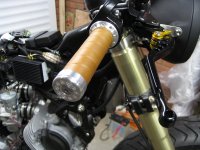
The loom duly arrived in 50m coils, so I set about making some colorful spaghetti. Most time consuming bit has been hiding as much of the cabling as I can, running it in the frame, handlebars, routing it neatly, out of harms way etc......

Had to get a new battery as the other one was a little bit too big for the battery box I made. It fitted in OK, but with the heavy cables in there it was getting a bit squashed. I bought a LiPo battery as its got the same Uumphh, in a smaller case and weighs next to nothing....not too many shots of the wiring as its pretty boring stuff.....and it got a bit wild at points
 

Attachments

  • IMG_6442.JPG
    IMG_6442.JPG
    2.8 MB · Views: 302
  • IMG_6423.JPG
    IMG_6423.JPG
    2.8 MB · Views: 307
  • IMG_6403.JPG
    IMG_6403.JPG
    2.7 MB · Views: 318
  • IMG_6388.JPG
    IMG_6388.JPG
    2.6 MB · Views: 304
  • IMG_6249.JPG
    IMG_6249.JPG
    2.5 MB · Views: 294
  • IMG_6246.JPG
    IMG_6246.JPG
    2 MB · Views: 298
  • IMG_6231.JPG
    IMG_6231.JPG
    2.3 MB · Views: 301
  • IMG_6241.JPG
    IMG_6241.JPG
    2.7 MB · Views: 311
  • IMG_6239.JPG
    IMG_6239.JPG
    2.8 MB · Views: 301
  • IMG_6234.JPG
    IMG_6234.JPG
    2.7 MB · Views: 300
Few more shots showing the electricity flowing through the veins................

Wrapped the loom in the proper tape, and gently coaxed it into its resting place under the tank.
 

Attachments

  • IMG_6451.JPG
    IMG_6451.JPG
    2.6 MB · Views: 298
  • IMG_6444.JPG
    IMG_6444.JPG
    2.7 MB · Views: 284
  • IMG_6443.JPG
    IMG_6443.JPG
    2.3 MB · Views: 294
  • IMG_6441.JPG
    IMG_6441.JPG
    1.9 MB · Views: 283
Enough of that electricity nonsense, back to the engineering bits.............

Made a couple of little detailed brackets to help support the carbs as they do stick out a fair bit, and I was concerned they might start making a break for it.

Found some nice dark heat warp for the rear cylinder. This is to help keep the heat down where the header runs through the frame, as some of the afore mentioned cables run through there. I sheathed them with high temp braiding, but I wanted to belt and braces it so they come to no harm?

Speedo used a magnetic reed switch to pick up magnets from the rear sprocket, so made up a little bracket to hold the sensor in its new home.
 

Attachments

  • IMG_6482.JPG
    IMG_6482.JPG
    2.6 MB · Views: 298
  • IMG_6470.JPG
    IMG_6470.JPG
    2.3 MB · Views: 291
  • IMG_6467.JPG
    IMG_6467.JPG
    2.5 MB · Views: 296
  • IMG_6454.JPG
    IMG_6454.JPG
    2.5 MB · Views: 297
  • IMG_6453.JPG
    IMG_6453.JPG
    624.1 KB · Views: 291
  • IMG_6228.JPG
    IMG_6228.JPG
    2.4 MB · Views: 285
  • IMG_6230.JPG
    IMG_6230.JPG
    2.5 MB · Views: 295
Another thing which bugged me was the grips I'd bought a few years back. I wanted a brown set, but struggled to get anything that really floated my boat. I settled for a pair from our mates from the far east, but when they turned up they were horrible!!!

So I set about making my own................courtesy of a nice Italian cow

I might go ahead and anodize the alloy bits as I've been wanting an excuse to have a go for a while.

They might be a bit too shiny for the overall look???
 

Attachments

  • IMG_6520.JPG
    IMG_6520.JPG
    2.7 MB · Views: 261
  • IMG_6517.JPG
    IMG_6517.JPG
    2.4 MB · Views: 262
  • IMG_6506.JPG
    IMG_6506.JPG
    2.6 MB · Views: 259
  • IMG_6502.JPG
    IMG_6502.JPG
    2.8 MB · Views: 256
  • IMG_6496.JPG
    IMG_6496.JPG
    2.4 MB · Views: 261
  • IMG_6489.JPG
    IMG_6489.JPG
    2.5 MB · Views: 262
  • IMG_6487.JPG
    IMG_6487.JPG
    486.9 KB · Views: 266
  • IMG_6485.JPG
    IMG_6485.JPG
    2.7 MB · Views: 259
  • POSH-gumbrown-560x560.jpg
    POSH-gumbrown-560x560.jpg
    28.5 KB · Views: 795
Whilst I got the mill covered in Ali swarf (horrible stuff!!) I decided to make a new cap for the petrol tank. The 1/4 turn one I've got is a little bit anonymous, so wanted to add a bit of presence to the tank, again I might anodize it when I've got the process sussed....

its more of a cap for the cap, as the original one is a breather type...
 

Attachments

  • IMG_6538.JPG
    IMG_6538.JPG
    2.7 MB · Views: 274
  • IMG_6534.JPG
    IMG_6534.JPG
    2.4 MB · Views: 264
  • IMG_6533.JPG
    IMG_6533.JPG
    2.6 MB · Views: 253
  • IMG_6531.JPG
    IMG_6531.JPG
    2.4 MB · Views: 240
  • IMG_6530.JPG
    IMG_6530.JPG
    2.6 MB · Views: 272
  • IMG_6543.JPG
    IMG_6543.JPG
    590.1 KB · Views: 250
dude, this build is outta control. great work man. Thanks for sharing it here.
 
cheers fellas. looking forward to getting out and riding it, and having a look at it from a distance............when the weather gets better, cannot get more than 6 feet away from it to have a good look from in the garage ;D ;D
 
Back
Top Bottom