
We noticed you are blocking ads. DO THE TON only works with community supporters. Most are active members of the site with small businesses. Please consider disabling your ad blocking tool and checking out the businesses that help keep our site up and free.
You are using an out of date browser. It may not display this or other websites correctly.
You should upgrade or use an alternative browser.
You should upgrade or use an alternative browser.
82 Honda Ascot FT500 project
- Thread starter slim67
- Start date
slim67
New Member
Thank you sir!xb33bsa said:yeah it would best of course to have the kicker installed ,in the engine,engine in frame so you can design for the situation
im onnit ill fire off some pics tomorrow
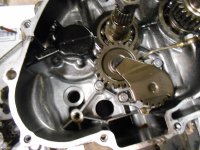
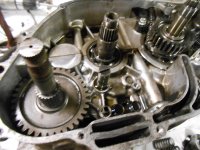
progress on the kicker conversion
everything looks like it will work but I need to pull the bottom case off as will you..
the kicker return spring is trapped inside so the job is more involved than just pulling the clutch cover
I am going finish this up in the morning the sun came out ;D
everything looks like it will work but I need to pull the bottom case off as will you..
the kicker return spring is trapped inside so the job is more involved than just pulling the clutch cover
I am going finish this up in the morning the sun came out ;D
Attachments

slim67
New Member
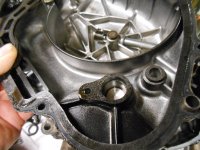
xb33bsa said:progress on the kicker conversion
everything looks like it will work but I need to pull the bottom case off as will you..
the kicker return spring is trapped inside so the job is more involved than just pulling the clutch cover
I am going finish this up in the morning the sun came out ;D
ehhhh...I was hoping that I didnt need to split the cases. I had heard you neededto , but hoped for a small miracle. since shes runs and I need to rebuild the starter anyway- Im not super anxious to split her belly open, but let me know what you think you want for all the parts- just in case!
slim67
New Member
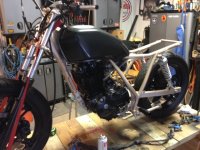
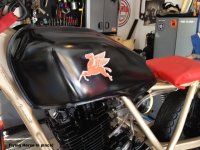
Slow going, but steady progress- Now looking for Opinions- Im thinking of leaving the tank black, with perhap Johnd900's suggestion tday of a thin gold and red pin stripe detail- I have these vintage style Mobil Pegusus decals I think would look very cool- ala vintage motor racing liveries of the 60's. Thoughts?
Also, Im not doing rear sets, because frankly they are uncomfortable! And Im cheap! So...I stole the grind pegs from my kids BMX bike and I think the look kinda cool- bulky but still effective?
Also, Im not doing rear sets, because frankly they are uncomfortable! And Im cheap! So...I stole the grind pegs from my kids BMX bike and I think the look kinda cool- bulky but still effective?
Attachments
slim67
New Member
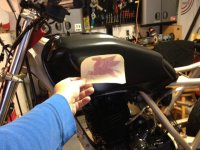
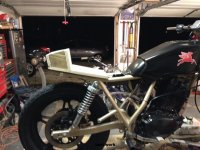
Impatience......its my thing. Here is the tank with the Flying Horse in place- and a symbolic red fabric where the seat will be made up to kind of show the color of how it should come together- Seat work is next and electrical!
Attachments

slim67
New Member
caferay said:I would look at a black and burgundy motif on the tank, along the lines of 1930s bikes. Perhaps filling that notch on the tank.
something like this
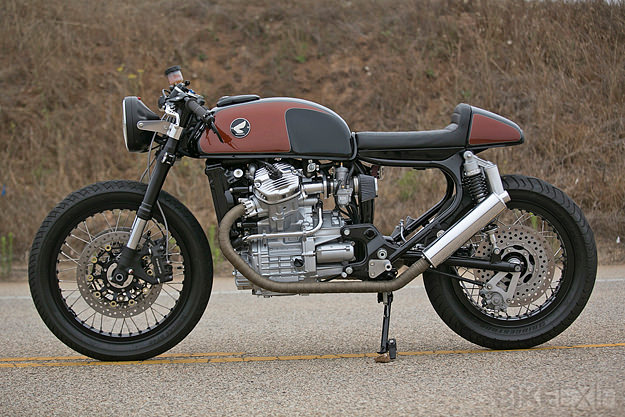
That is good looking! best use of a CX500 yet!
caferay
Been Around the Block
slim67 said:That is good looking! best use of a CX500 yet!
Except for that ridiculous rear brake. Lock-0-matic.
slim67
New Member
Ya- I suppose- Overjacking on the rear brake like that probably gives one a new persepctive on backing her in, especially if you jump on this after riding something with a typically marginal rear brake!caferay said:Except for that ridiculous rear brake. Lock-0-matic.
caferay
Been Around the Block
slim67 said:Ya- I suppose- Overjacking on the rear brake like that probably gives one a new persepctive on backing her in, especially if you jump on this after riding something with a typically marginal rear brake!
It's unsafe design. Another Bike Exif trailer queen.
slim67
New Member
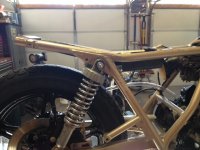
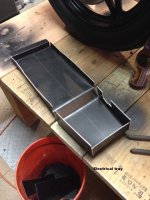
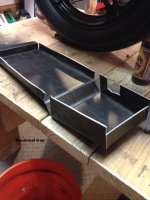
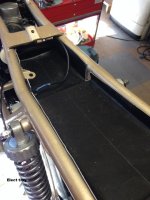
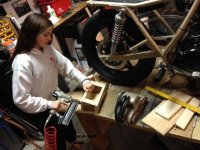
Thanks to the superb pilfering skills of Johnd900, we had the needed stock to build the underseat electrical mounting tray. The idea here is to clean up as much of the electrical as possible, keep it out of sight, neat and organized. We built in with a slightly deeper section toward the front, intended to house the new Lithium batter as well. We built a mock up using foam core, then transfered dimensions to our aluminum sheetstock. Using a block of wood, we formed the new pan.
Attachments
slim67
New Member
No- some kind of heavy duty cabinet panel I believe- 3/32"-1/8" thickTim said:Roadsign?")
slim67
New Member
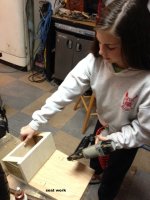
Decided to dance with who brung me......woodworking. I have toyed with fiberglass seats in the past, and this will be resin covered after I shape it a bit as well. I wanted to see if I liked a bit more square edged line with this rather than the typical round backed bump stop seat. We shall see. I recruited child labor as well for this one!
Attachments
caferay
Been Around the Block
If you are going through the effort of a wood base, you could use it as a buck to craft the tail out of metal.
Good on you for getting your daughter involved. My goal with my daughter is to not let her be a woman who does not understand how vehicles work. This bikes-are-for-boys crap is just , uh, crap.
Good on you for getting your daughter involved. My goal with my daughter is to not let her be a woman who does not understand how vehicles work. This bikes-are-for-boys crap is just , uh, crap.


