83 Yamaha TR1 cafe build

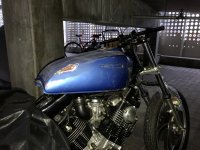
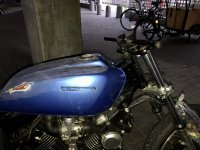
Had a few hours in the garage, so pulled out the big dent in the tank and experimented with a different seat - from a Yamaha Fizzy moped of all things, I like it. Did my first longer ride, about 35 km. It generally runs like a dream, but just as I returned it started running on one cylinder only. Bit of troubleshooting revealed gas was only trickling out of the fuel tap and none got to the front carb. Guessing dirt in the tap/filter.
IMG_4601.JPG


Sent from my iPhone using DO THE TON
 
Started working on the fuel tank paint job. I loved the original CX500 colors and think they fit the period look of the bike, but the paint was pretty damanged, tank dented and with a few rust spots, so it needs a respray. I had a hard time finding someone who could reproduce the original paint in a timely manner, so decided to rattle can it for now, so I can ride it a bit in what is left of the season.


I used VHT paint stripper to remove most of the paint. It's hard finding a paint stripper that actually works these days, but this one was great.
8F3708FF-158F-4E35-B96A-3C04CD9328B9_1_105_c.jpeg


I started out with a coat of 2k epoxy primer, which I of course ran out off before having full cover. I'm located by the seaside in Denmark so need all the corrosion protection I can get.

118A0762-721C-4C8F-8AB4-1EB9B0E0F5A5_1_105_c.jpeg


Afterwards it was on to body filler and sanding


679A1FC8-40F8-4297-8B29-26F830884F7D_1_105_c.jpeg


A few hours and a lot of dust after, everything feels smooth. I had to knock down a few high spots caused by pulling the large dent, but I'm pretty happy with the result.

A19D8916-A732-4999-8B9B-E3A43D7F3B99_1_105_c.jpeg


Now I'm just waiting for some more primer to arrive in the mail so I can continue.
 
Rattle cans + first few coats of spray max 2k clear.

Stripes are crooked, badges not even but shit, I am still proud of my first attempt at seriously painting a tank.


IMG_4739.JPG


Sent from my iPhone using DO THE TON

After 2 cans:

F13B2E0E-D3FE-4CDD-B92E-8D0BEE14FA37.JPG


Did so many mistakes, placed the tank on a roll of tape when masking and made some marks. Got sanding dust on it after doing the clear coat and much more, but hopefully I can buff that out. Looking forward to it being cured so I can sand and polish.
 
Last edited:
Test fitting the tank. Waiting on new rubber grommets so it’s only approximately in the right position.

I have some imperfections and orange peel in the black paint, so will have to try and sand that out.

IMG_4768.JPG

IMG_4766.JPG


Sent from my iPhone using DO THE TON
 
Looks great - kudos on that paint job. Striping a tank can’t be easy at all.


Sent from my iPhone using DO THE TON
 
looks good man, how does it ride? looks like it would be a lot of fun

It’s a great ride. I kinda winged it when it came to rake/trail etc. but it turned out really well. Originally it’s quite slow steering compared to a sports bike, but now it’s light and quick without being nervous. Brakes are amazing compare to the original. Still shaking everything down so haven’t really pushed it.


Sent from my iPhone using DO THE TON
 
Looks great - kudos on that paint job. Striping a tank can’t be easy at all.


Sent from my iPhone using DO THE TON

No, I am happy it’s not easy to see both sides at the same time, they are not exactly even even though I measured like crazy :)


Sent from my iPhone using DO THE TON
 
So basically you had an NOS engine? That's pretty lucky. I was going to ask if the front end nose dives at all with heavy breaking/downshifting.. those bikes are a little front heavy.. I really like what you've done man, the colors are a nice touch
 
So basically you had an NOS engine? That's pretty lucky. I was going to ask if the front end nose dives at all with heavy breaking/downshifting.. those bikes are a little front heavy.. I really like what you've done man, the colors are a nice touch

Thanks! Yes it’s almost a NOS engine. Only downside is that it has the worst virago starter system, TR1 engines usually has the slightly less bad version.

It did dive a bit when braking initially, but cranking up the preload made it feel much better. At some point I should service and rebuild the forks though, I just threw them on when I got them.


Sent from my iPhone using DO THE TON
 
Mate I have a question about those Wago connectors. They look like they make the wiring much easier but I can't for the life of me figure out how they work. Looked at a few videos online and none the wiser - are there male and female connectors? Or do you put all the wires that you want to connect into one connector?

Edit - I'm not sure if my question makes much sense. Here's another effort! For example - if I have three wires at the end of my wiring harness for, say, the taillight, and three wires coming out of the taillight itself, and want to connect them, how would the Wago system do that? Which connector would I need?

Edit of the edit - Ok, so I'm not a total idiot, but definitely have idiot potential. I think I've figured it out. These aren't male and female - you just shove the wires you want to connect into the same connector and job's a good'un. Simple. Right? Right??? Oh god, hope I'm not an idiot...
 
Last edited:
Edit of the edit - Ok, so I'm not a total idiot, but definitely have idiot potential. I think I've figured it out. These aren't male and female - you just shove the wires you want to connect into the same connector and job's a good'un. Simple. Right? Right??? Oh god, hope I'm not an idiot...

You are not an idiot:) They are like wire nuts. As you say, just shove all wires you want to connect into one connector :)

I’m replacing some of them to save space and to water proof external connections, but they certainly made the wiring much easier.


Sent from my iPhone using DO THE TON
 
Sometimes the simplest things really throw me a curveball. I ordered some of their connectors last night - very glad I came across them in your thread here. One more question - I ordered the three-hole Wago connectors. But really I need 4 holes, as I'll have 4 wires that need to be connected in each connector. Think its ok to put two wires into one hole?
 
Think its ok to put two wires into one hole?

I’ve done it a few times, since for some reason there are no 4 connectors, only 3 and 5? I had one where one of the wires popped out, but I had just pushed two wires in one hole. After that I started twisting them together and haven’t had problems since. I try to avoid it when I can, but if you make extra sure they are both secure, I think it’s OK.


Sent from my iPhone using DO THE TON
 
Good to know, thanks a lot.

Really like your bike - I've had my eye out for a '93 monoshock virago for some time. Looking forward to the finished article!
 
What happened to the KZ400 tank ? I can score one but it's smaller than the KZ650 SR, if you've got a pic with that tank on your bike it would be nice !
 
What happened to the KZ400 tank ? I can score one but it's smaller than the KZ650 SR, if you've got a pic with that tank on your bike it would be nice !

I dropped using it since I didn't really like the lines of it on the bike with my setup. It's a little more rounded in the bottom that the 650 and as you say smaller.

Not great pics but this is what I have.
 

Attachments

  • 9B5EAAD2-6AB3-4B9A-8097-5F3383D6DF3D_1_201_a.jpeg
    9B5EAAD2-6AB3-4B9A-8097-5F3383D6DF3D_1_201_a.jpeg
    3.1 MB · Views: 204
  • 5BF96A47-8BA7-4C1F-9BC5-8A32A473603C_1_201_a.jpeg
    5BF96A47-8BA7-4C1F-9BC5-8A32A473603C_1_201_a.jpeg
    3 MB · Views: 184
  • 83C923BD-5E0D-4590-9270-6927BEF06129_1_201_a.jpeg
    83C923BD-5E0D-4590-9270-6927BEF06129_1_201_a.jpeg
    2.6 MB · Views: 189
thanks for the pics, glad I've found a KZ650SR in the meantime, because the 400 looks indeed quite to short !
 
Back
Top Bottom