peez
New Member
Was posting in my member intro thread, but I guess I should move over here! I'll get caught up with the first post. Big time cyclist (road and mountain bike) and always thought it would be cool to throttle on some of these roads I live on, instead of pedal. I sold one of my bicycles I didn't ride that much and bought this 92 Nighthawk CB750 for $1200 that"just needed plugs and a battery". I don't even have my motorcycle license yet, so I figured I would get this thing all cleaned up and road worthy over the winter. I was big into the Honda tuning scene, swapping motors in 90s civics and putting turbo kits on them, so wrenching isn't new to me, just haven't done it in 10 years or so!
Okay, onto some photos.
Day 0:

I did all that and it still wouldn't turn over, so I dove straight into the carbs.

Rather daunting at first, but thankfully I only stripped a few screws in the process that I replaced with 3mm allen bolts instead.
While I was waiting for parts I threw the clip ons I purchased on, just because I was tired of the stock handlebars. Premature, I know")

I was able to jump start it and got it to idle well with some starter fluid. I was pretty stoked. The RPMS would rev high on the choke, remove the choke, back to 1100 or so. Everything seems great!
I go to give it some throttle and it starts to bog down. Very confusing. I look over everything again, carbs are getting gas, all my vaccum hoses are connected. I then noticed this slight leak from the petcock.

I've suspected something with this the whole time as it always slightly leaked, but it was filling the carbs up with gas, so I didn't think anyhing of it. I took it apart this morning and...

There isn't a spring in here. Which is confusing, because all the things I see on the internet on rebuilding these includes a spring. Why would it be missing?
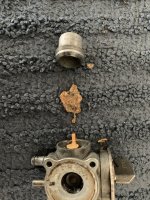
I took apart the nut on the bottom to see what else was lurking for me to find, just to see this throw up at me when I open it

I figured the goop in this area was causing my problem, so I cleaned it quickly and threw it back on, no dice. Actually felt crappier than before. I have a new petcock on order since the rebuild kits I see don't have springs.
So this begs the question, what else could my problem be? I won't have the new one until Wednesday, so my brain will be spinning between now and then!
My only other current plans are to hoop the rear with a new seat and do the fork seals, as this looks rather nasty:

Okay, onto some photos.
Day 0:
I did all that and it still wouldn't turn over, so I dove straight into the carbs.
Rather daunting at first, but thankfully I only stripped a few screws in the process that I replaced with 3mm allen bolts instead.
While I was waiting for parts I threw the clip ons I purchased on, just because I was tired of the stock handlebars. Premature, I know
I was able to jump start it and got it to idle well with some starter fluid. I was pretty stoked. The RPMS would rev high on the choke, remove the choke, back to 1100 or so. Everything seems great!
I go to give it some throttle and it starts to bog down. Very confusing. I look over everything again, carbs are getting gas, all my vaccum hoses are connected. I then noticed this slight leak from the petcock.
I've suspected something with this the whole time as it always slightly leaked, but it was filling the carbs up with gas, so I didn't think anyhing of it. I took it apart this morning and...
There isn't a spring in here. Which is confusing, because all the things I see on the internet on rebuilding these includes a spring. Why would it be missing?
I took apart the nut on the bottom to see what else was lurking for me to find, just to see this throw up at me when I open it
I figured the goop in this area was causing my problem, so I cleaned it quickly and threw it back on, no dice. Actually felt crappier than before. I have a new petcock on order since the rebuild kits I see don't have springs.
So this begs the question, what else could my problem be? I won't have the new one until Wednesday, so my brain will be spinning between now and then!
My only other current plans are to hoop the rear with a new seat and do the fork seals, as this looks rather nasty: