
We noticed you are blocking ads. DO THE TON only works with community supporters. Most are active members of the site with small businesses. Please consider disabling your ad blocking tool and checking out the businesses that help keep our site up and free.
You are using an out of date browser. It may not display this or other websites correctly.
You should upgrade or use an alternative browser.
You should upgrade or use an alternative browser.
An Atlas Craftsman 6" Lathe Non Restoration
- Thread starter kopcicle
- Start date
kopcicle
antidisestablishmentarian
As advertised
Attachments
-
 273934298_1148752229199541_5613395046496394505_n.jpg354.9 KB · Views: 151
 -
 274248286_656541145624753_6636716574080314684_n.jpg288 KB · Views: 130
 -
 274348480_1346238889132637_2468522362355322277_n.jpg408 KB · Views: 128
 -
 274469211_1400664240373882_6273575100771984369_n.jpg358.8 KB · Views: 124
 -
 274575911_285586430323336_6818163183882990427_n.jpg369.6 KB · Views: 130
 -
 274863183_1165701360835149_4452832005111088214_n.jpg483 KB · Views: 135
kopcicle
antidisestablishmentarian

kopcicle
antidisestablishmentarian
The 101.00 Atlas did indeed have tapered roller bearings.
The 101.212 Craftsman uses 6305 deep groove ball bearings
the 10100 uses the 701-088 spindle
The 101.212 uses the 701-083 spindle
30305 Timken would accomplish the the swap but..
They are 18.250 mm wide
If you want 17mm wide use the 237 cone -233 cup and shell out $2k for the pair.
The issue with the swap isn't the width however
How do you preload the bearings? The 701-083 spindle has no threaded preload nut .
Practical consideration is tale of the axial clearance of the 6205 you intend to use.
Getting the back gear off was , umm, yeah well. Use your imagination and at least an entire afternoon.
Filthy but nothing broken. I did have a minor hiccup in the F/R tumbler gears and lever. The detent and spring in the lever is irrevocably seized in place and one of the tumbler gears seized to the shaft and the rivet is turning in the plate.
The lead screw is free, not bent or otherwise abused.
Even with the setscrews removed the collar would not budge. Finally forcing a putty knife between the gear and the collar started it moving. There was actually a whole previous evolution that I don't have pics for.
The direct drive coupling , 141-030 had been attacked by flying monkeys with hammers , pliers and bad intent.
The circlip retaining the direct drive coupling , 141-030, had somehow been peened into place by the same flying monkeys.
Once the mangled part in question had finally been removed from the shaft it was on to the woodruff key and some sort of age hardening shmoo that gave off an odor reminiscent of spoiled meat when heated.
Now we are on to the removal of the 3950-14 spindle pulley assembly.
Even after careful stoning of the spindle and somewhat haphazardly measuring the diameter of the spindle to make sure it hadn't put on weight or diameter over the years I proceeded to attempt to remove the spindle pulley assembly.
The inner bushing stayed behind. 400gr sanding strip had to be applied to the spindle in order to remove the remaining bushing.
Now we're on to the spindle back gear.
Keep in mind here that I had a large selection of prying and stabby things and little else for this operation.
You can get behind the gear somewhat with a large flat blade screw driver and rotate, stab, pry, repeat.
Being careful not to pry anywhere near the gear teeth and applying force through only the thickest portions of the headstock casting the bugger finally moved. Eventually this too stopped short of the end of the spindle and a bit more 400gr was used to reduce the diameter of the spindle further.
Somewhere along the way I seemed to have missed the fact that bearings that appeared to be "Completely Knackered" had now taken on the aspect of perfectly serviceable bearings. I'll have to very closely take a look at the assembly to determine what Murphy snuck in on me.
Compared to all of this the removal of the spindle with the chuck side bearing still attached and it's subsequent removal is only the mater of an hour or so of alternating heating , cooling, swearing and tears.
There is one more thing...
Attachments
kopcicle
antidisestablishmentarian
kopcicle
antidisestablishmentarian
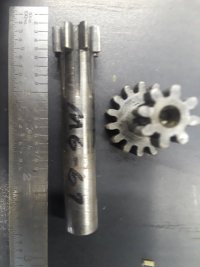
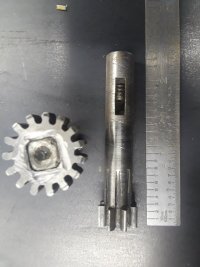
The aforementioned flying monkeys with hammers , pliers and bad intent had in fact caused the random disappearance of two teeth from the M6-68 pinion shaft.
I'm waiting on a few parts from Joel and some monkey repellent from the publishers of the Satanic Bible.
I doubt I'll ever do the tapered roller bearing conversion unless I have to do a bunch of fine facing operations.
Believe me, it is possible to the point of certainty that you can set up a high frequency resonance in the axial plain of the spindle simply by banging the roller bearings back and forth. The noise is rich in harmonics which distinguishes it from ordinary high frequency tool chatter.
Lunch time and the beer is here and I have to be ready to repel flying monkeys with hammers , pliers and bad intent at a moment's notice. I'll be back.
kopcicle
antidisestablishmentarian
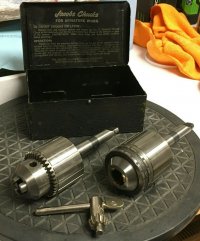
So the parts keep coming in.
The federal test indicator is a welcome addition.
The old skool Starrett base is personal preference. I detest mag bases around magnetic swarf.
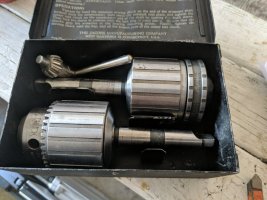
The armature chucks are not only useful but an original Atlas accessory. Tom (Clausing) still has a few sets NOS.
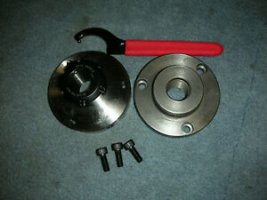
The collet chuck comes for Joel. I think I've been over this before. Most do not get the 1" registration correct.
No , "the backing plate does(not)register on the threads." The backing plate registers on the shoulder and 1" diameter.
littlemachineshop.com gets it right. Carl Siechert understands. So just get the good backing plate or make your own. Today I'm un, re, de, modeling a room and nothing further to report other than we are well (mostly) and cantankerous as ever .
And so it goes...
The federal test indicator is a welcome addition.
The old skool Starrett base is personal preference. I detest mag bases around magnetic swarf.
The armature chucks are not only useful but an original Atlas accessory. Tom (Clausing) still has a few sets NOS.
The collet chuck comes for Joel. I think I've been over this before. Most do not get the 1" registration correct.
No , "the backing plate does(not)register on the threads." The backing plate registers on the shoulder and 1" diameter.
littlemachineshop.com gets it right. Carl Siechert understands. So just get the good backing plate or make your own. Today I'm un, re, de, modeling a room and nothing further to report other than we are well (mostly) and cantankerous as ever .
And so it goes...
Attachments
-
 Atlas_Jacobs.jpg376.8 KB · Views: 142
 -
 Collet_chuck.jpg13.6 KB · Views: 121
 -
 chucks.jpeg309.1 KB · Views: 121
 -
 bits.jpeg344.4 KB · Views: 119
 -
 federal_0001.jpg257.3 KB · Views: 114
 -
 gears.jpeg51 KB · Views: 120
 -
 handle_2.jpeg972 KB · Views: 113
 -
 more_gears.jpeg74.4 KB · Views: 114
 -
 MT2_stub.jpeg396.5 KB · Views: 117
kopcicle
antidisestablishmentarian
And now for something completely different

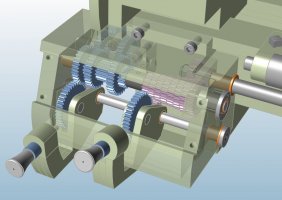
The change gears were really getting on my nerves.

So a gearbox is the new order of the day.
Convince me you are serious in PM, or can contribute and I'll share code an BOM.
The current boggle is sourcing pinion/spur gear stock.
All the gears are 24 DPI 14.5 degree pressure angle.
I'd rather cut off and finish the gears myself as individual gears are $25 and up.
If I'm going to the bother of building one I may as well build a few, or at least the parts for a few.
Anyone that has 6" tooling they can spare can also contact me in PM.
I'm not comfortable releasing the code in public as nearly all of it isn't mine. It may not seem like much on the surface but there are hours of work here without counting the years of experience that led up to it. In short I will reasonably protect the intellectual property and the author will know where each copy is.
I'm getting construction help from the usual suspects.
Tooling , unique and ubiquitous is from Joel @ mymachineshop.net
If you make chips you need to know these guys
Standard Cutting Solutions manufactures industrial cutting tools including drilling applications, milling applications and specialty tools. Factory direct pricing & American made.
Service parts for the lathe are from TMcNett@clausingsc.com
The machine shipping is through Fastenal, Blue Lane. Michelle is great to work with.
Additional support from https://www.facebook.com/groups/956121484439805 The atlas group on FaceBook
Robert Downs WA5CAB and the members of https://www.hobby-machinist.com
These guys do amazing things in miniature and have been a great help.
Home model engine machinists & makers forum. Model engine making forums for engine plans, castings, CAD, CNC designs, lathe, Stirling, boilers & steam.
www.homemodelenginemachinist.com
Many thanks to the patient and humorous knowledge of the members at https://groups.io/g/atlas-craftsman
I can't do these things without family.
Mom
Keith
John
Ben
Sinon
Ryan
Rob
Jim
Jack
Dave
Dick Russell
Highsider, Scott
Jason
Crazy pj
Gary Goetz
Travis
Mrriggs, Brett
Chris , how do you put up with me ?
Dennis (SK)
Morrie Burkman(SK)
Jim Burknman
Ken Austin
John Holloway
Fantom the wonder dog
The entire XS650 community.
And a cast of thousands. You know who you are ;-)
And very special Thank You to Wonder Woman for putting up with me.
Okay , so it reads like a rehearsed acceptance speech. It needed to be said. Again it's my thread and I can do what I want with it.
So starts another chapter in
Meanwhile, out in the garage.
And so it goes ...
The change gears were really getting on my nerves.
So a gearbox is the new order of the day.
Convince me you are serious in PM, or can contribute and I'll share code an BOM.
The current boggle is sourcing pinion/spur gear stock.
All the gears are 24 DPI 14.5 degree pressure angle.
I'd rather cut off and finish the gears myself as individual gears are $25 and up.
If I'm going to the bother of building one I may as well build a few, or at least the parts for a few.
Anyone that has 6" tooling they can spare can also contact me in PM.
I'm not comfortable releasing the code in public as nearly all of it isn't mine. It may not seem like much on the surface but there are hours of work here without counting the years of experience that led up to it. In short I will reasonably protect the intellectual property and the author will know where each copy is.
I'm getting construction help from the usual suspects.
Tooling , unique and ubiquitous is from Joel @ mymachineshop.net
If you make chips you need to know these guys
Standard Cutting Solutions | End Mills | End Mill Cutters |
Standard Cutting Solutions manufactures industrial cutting tools including drilling applications, milling applications and specialty tools. Factory direct pricing & American made.
Service parts for the lathe are from TMcNett@clausingsc.com
The machine shipping is through Fastenal, Blue Lane. Michelle is great to work with.
Additional support from https://www.facebook.com/groups/956121484439805 The atlas group on FaceBook
Robert Downs WA5CAB and the members of https://www.hobby-machinist.com
These guys do amazing things in miniature and have been a great help.
Home Model Engine Machinist Forum
Home model engine machinists & makers forum. Model engine making forums for engine plans, castings, CAD, CNC designs, lathe, Stirling, boilers & steam.
www.homemodelenginemachinist.com
Many thanks to the patient and humorous knowledge of the members at https://groups.io/g/atlas-craftsman
I can't do these things without family.
Mom
Keith
John
Ben
Sinon
Ryan
Rob
Jim
Jack
Dave
Dick Russell
Highsider, Scott
Jason
Crazy pj
Gary Goetz
Travis
Mrriggs, Brett
Chris , how do you put up with me ?
Dennis (SK)
Morrie Burkman(SK)
Jim Burknman
Ken Austin
John Holloway
Fantom the wonder dog
The entire XS650 community.
And a cast of thousands. You know who you are ;-)
And very special Thank You to Wonder Woman for putting up with me.
Okay , so it reads like a rehearsed acceptance speech. It needed to be said. Again it's my thread and I can do what I want with it.
So starts another chapter in
Meanwhile, out in the garage.
And so it goes ...
Attachments
Last edited:
kopcicle
antidisestablishmentarian
Golden spectro https://spectro-oils.com/motorcycle-hypoid-gear-lubricant/
@crazypj Did Jaxson bury the phone out back again ? ;-)
I need to find another mill to make the modification to the saddle or find another saddle and do it myself.
I'm back to making valve guides on borrowed equipment.
Note on OS Valve Guides to the forum.
Previously I could, if you were polite enough, if I could find the material, If you could afford me, (I am not a slut, I am however a bit of a whore) Make oversize valve guides.
The issue often arises in older performance machinery that the guides have been in and out so many times that the head won't hold them any longer. With all the time and money in post cast machining and porting in these heads it makes sense to make the guides.
I'm in no position to take on any work atm but I will share some information.
Do your material research. Different steels have widely different frictional coefficients.
Match your sliding bits carefully.
Choose your tooling carefully. For instance a smaller lathe will not carry the chip load of a profile cutter. I use a floating reamer holder that formerly was used for a chamber reamer driver. (Yes I do that kind of work too and you can't afford me) .
Concentricity is not always your friend. In well worn or heavily modified heads there are occasions where a ID concentric with the OD will result in a valve seat to valve fit so awful that even sinking the valve .030 to .060" won't get full contact.
I have a number of reamers , fixed and adjustable, that I use to gauge and clean up guide bores in the head. I try to follow the bore as best i can and still have seat mismatches. This is why I like to have the head in hand when doing these jobs.
I can purposely mix axial and radial misalignment to get the valve to seal.
Truth be known I learned this by examining my "scrap" . I'm not always perfect, not by a long shot. Even when I do get it right there are still tolerances. When I couldn't get a concentric guide to locate a valve I dialed in a "mistake" guide and indexed its angle.
I took advantage of one misalignment to solve another .
If you've read this far I'll tell you that I have little to no misalignment between bore and OD anymore. It was a simple enough trick but I hesitate to share it publicly. It's not an intellectual property or a trade secret but it has uniquely been the cause of some of the more vehement conversations I've experienced . Feel free to ask in PM . I really do have no problem answering.
Lastly , tools are your friend. I don't count reamers , I weigh them. Measuring and indicating instruments you can trust are essential. Temperature and heat control are important. An extensive tool "library" can save large amounts of time. Find a relaxed and comfortable position for these operations, you'll be in or near that position for hours at a time without realizing it.
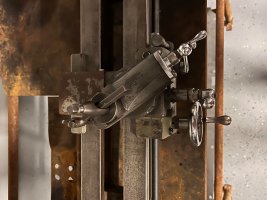
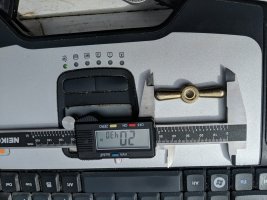
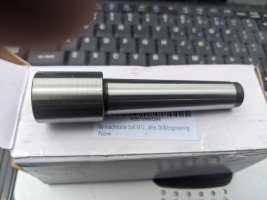
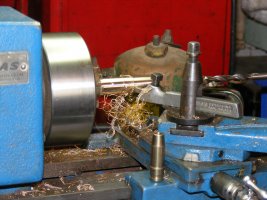
The photo below is how this all started. I made one guide for my 1000P and was caught out by a fellow mechanic. I've since added a wedge lock QCTP, collet chuck, MT2 collets reamed to size, and tailstock live center support. Finding a live center that wasn't crap was an ordeal. New headstock bearings were not cheap. I got good ones.
The original gibs were plastic??!! I finally did get this all inside .0006(5)" across the first 3" of travel and well inside .001" across the entire center to center distance.
All for now
@crazypj Did Jaxson bury the phone out back again ? ;-)
I need to find another mill to make the modification to the saddle or find another saddle and do it myself.
I'm back to making valve guides on borrowed equipment.
Note on OS Valve Guides to the forum.
Previously I could, if you were polite enough, if I could find the material, If you could afford me, (I am not a slut, I am however a bit of a whore) Make oversize valve guides.
The issue often arises in older performance machinery that the guides have been in and out so many times that the head won't hold them any longer. With all the time and money in post cast machining and porting in these heads it makes sense to make the guides.
I'm in no position to take on any work atm but I will share some information.
Do your material research. Different steels have widely different frictional coefficients.
Match your sliding bits carefully.
Choose your tooling carefully. For instance a smaller lathe will not carry the chip load of a profile cutter. I use a floating reamer holder that formerly was used for a chamber reamer driver. (Yes I do that kind of work too and you can't afford me) .
Concentricity is not always your friend. In well worn or heavily modified heads there are occasions where a ID concentric with the OD will result in a valve seat to valve fit so awful that even sinking the valve .030 to .060" won't get full contact.
I have a number of reamers , fixed and adjustable, that I use to gauge and clean up guide bores in the head. I try to follow the bore as best i can and still have seat mismatches. This is why I like to have the head in hand when doing these jobs.
I can purposely mix axial and radial misalignment to get the valve to seal.
Truth be known I learned this by examining my "scrap" . I'm not always perfect, not by a long shot. Even when I do get it right there are still tolerances. When I couldn't get a concentric guide to locate a valve I dialed in a "mistake" guide and indexed its angle.
I took advantage of one misalignment to solve another .
If you've read this far I'll tell you that I have little to no misalignment between bore and OD anymore. It was a simple enough trick but I hesitate to share it publicly. It's not an intellectual property or a trade secret but it has uniquely been the cause of some of the more vehement conversations I've experienced . Feel free to ask in PM . I really do have no problem answering.
Lastly , tools are your friend. I don't count reamers , I weigh them. Measuring and indicating instruments you can trust are essential. Temperature and heat control are important. An extensive tool "library" can save large amounts of time. Find a relaxed and comfortable position for these operations, you'll be in or near that position for hours at a time without realizing it.
The photo below is how this all started. I made one guide for my 1000P and was caught out by a fellow mechanic. I've since added a wedge lock QCTP, collet chuck, MT2 collets reamed to size, and tailstock live center support. Finding a live center that wasn't crap was an ordeal. New headstock bearings were not cheap. I got good ones.
The original gibs were plastic??!! I finally did get this all inside .0006(5)" across the first 3" of travel and well inside .001" across the entire center to center distance.
All for now
Attachments
following along.
In regards to the spur gear dilemma - have you looked at 3d printing them? there seem to be lots of relatively cheap sets of changes gears that are 3d printed on ebay, but i have no experience with them.
In regards to the spur gear dilemma - have you looked at 3d printing them? there seem to be lots of relatively cheap sets of changes gears that are 3d printed on ebay, but i have no experience with them.
kopcicle
antidisestablishmentarian
atlas gears
https://www.thingiverse.com/thing:4918649
https://www.thingiverse.com/thing:4918649
kopcicle
antidisestablishmentarian
Although it's true you can always make smaller parts on a larger lathe but you can't make larger parts on a smaller lathe i had to go with the smaller lathe.
When I'm standing in the new shop space I'm out of room. FML
I found a close cousin to my 10100, a 101.212. There are subtle differences however the major difference is in the headstock bearings.
The 101.00 Atlas did indeed have tapered roller bearings.
The 101.212 Craftsman uses 6305 deep groove ball bearings
the 10100 uses the 701-088 spindle
The 101.212 uses the 701-083 spindle
30305 Timken would accomplish the the swap but..
They are 18.250 mm wide
If you want 17mm wide use the 237 cone -233 cup and shell out $2k for the pair.
The issue with the swap isn't the width however
How do you preload the bearings? The 701-083 spindle has no threaded preload nut .
Practical consideration is tale of the axial clearance of the 6305 you intend to use.
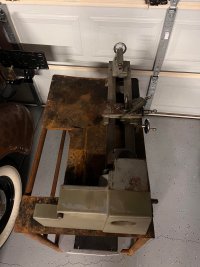
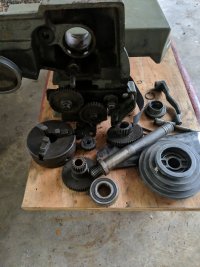
Now on to what I found inside.


It was a full three days getting it apart.


When I'm standing in the new shop space I'm out of room. FML
I found a close cousin to my 10100, a 101.212. There are subtle differences however the major difference is in the headstock bearings.
The 101.00 Atlas did indeed have tapered roller bearings.
The 101.212 Craftsman uses 6305 deep groove ball bearings
the 10100 uses the 701-088 spindle
The 101.212 uses the 701-083 spindle
30305 Timken would accomplish the the swap but..
They are 18.250 mm wide
If you want 17mm wide use the 237 cone -233 cup and shell out $2k for the pair.
The issue with the swap isn't the width however
How do you preload the bearings? The 701-083 spindle has no threaded preload nut .
Practical consideration is tale of the axial clearance of the 6305 you intend to use.
Now on to what I found inside.
It was a full three days getting it apart.
kopcicle
antidisestablishmentarian
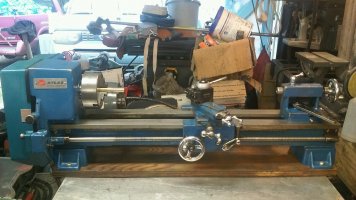
I had to start with something and what I got were the solid bones of a neglected lathe.
Make no mistake it was advertised as is and details of it's sins, omissions and transgressions were fully disclosed.
Any initial benediction should include presumptive thanks to those that have and continue to support this effort.
Larry Vanice
Cody Oswald
Joel Rogers
Tom McNett
Michelle McKinney
Chris Wood
Keith Chapman
Murphy
Karilee
and Fantom the wonder dog.
Cody proceeded with the sale and shipping with zero issues and a well built crate.
Brother Keith works right across from the local Fastenal (Blue Lane Freight) so pickup was no problem.
Initial inspection revealed a multitude of sins previously known and a few surprises.
Murphy is always lurking.
I spent most of the day getting the poor beastie apart and I do have a few recommendations but unfortunately few photos as cleaning up or re-gloving for each shot just wasn't an option. (well, truthfully it was but I'm a lazy and impatient bastich)
Once I've exposed the sins and detritus of the day I'll get some more photos in here.
Dennis
kopcicle
antidisestablishmentarian
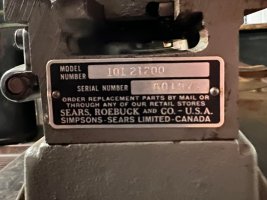
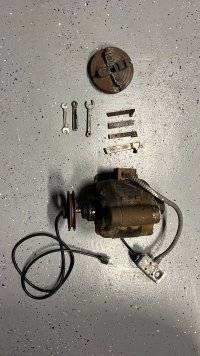
So in no particular order we have the name plate
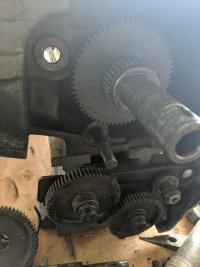
The mid process struggle to remove the spindle back gear. This could be it's own chapter in frustration and eventual success. The metal around the woodruff key was swagged up from the shaft diameter and had a death grip on the Zamak gear. I series of hard wood wedges, dead blow hammers, sweat, swearing, 1/4" at a time ...
At some point the bearings that initially felt like a box-o-rocks freed up and ran smooth. My guess is that something in the back gear stack was missing, or interfering with the casting.
I did get it all the way apart without damaging anything but the circlips.
The forward/reverse lever tumbler gears offered another surprise. One gear had seized to the shaft and spun the riveted/swagged pin the gear rides on. The detent pin on the lever is rust welded in place as well.
The carriage traverse gear assembly is missing a few teeth. I knew this prior to purchase and along the way found that the gear and rack are 20DP 14 1/2PA. This is actually a common gear for hobby RC cars. Daryl gifted for the ride along with some other parts but I'm going to turn the remaining teeth off and swag/solder/braze the pinion on for a repair.
I series of phone calls to Joel resulted in a sufficient honorarium sent his way and a care package sent my way.
Shameless plug for Joel. If you don't know Joel and own a Craftsman/Atlas/Clausing lathe, you need to.
I'll steal minutes as I can to lightly stone the ways with my newly acquired , dollar store, sharpening stone pairs.
If you don't understand why they're acquired in pairs find an Elmer, mentor, two years older than dirt manual machinist and buy him a cup of coffee")
Only the more aggressive bits of oxide death will be attacked by my favorite chemical brew, OsPho (Phosphoric acid concentrate with a wetting agent) You can find it at Most Ace Hardware stores.
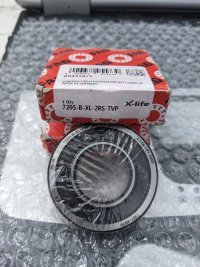
So far the community has been a godsend. I was nearly gifted a 4 jaw chuck. A bunch of 1/4" and 5/16 HSS 5% and 8% cobalt showed up in the mail (I know who you are and thanx). A live center and 2MT test bar arrived from a long time partner in crime. A Welsh expat put me in touch with his brother on the Isle and the bearings arrived Friday. The Armature chucks came from a conversation that began with "what the heck are these for?" and ended with me leveling his lathe over the phone in a little less than an hour when He'd been fighting it for weeks.
A Starrett Dial, test, and back plunger set showed up with instructions to pay as I can and continue to pay it forward (Morrie, I'm humbled) . I'll have the lathe side four step pulley available as all I needed was the motor side and a conversation I'd forgotten about produced both. A local that heard I was starting over dropped off an assortment of drops in Steel , cast, bronze, aluminum, and other weirdness.
I'll finish with a Thank You to those I may have over looked and anyone that actually reads my drivel.
The mid process struggle to remove the spindle back gear. This could be it's own chapter in frustration and eventual success. The metal around the woodruff key was swagged up from the shaft diameter and had a death grip on the Zamak gear. I series of hard wood wedges, dead blow hammers, sweat, swearing, 1/4" at a time ...
At some point the bearings that initially felt like a box-o-rocks freed up and ran smooth. My guess is that something in the back gear stack was missing, or interfering with the casting.
I did get it all the way apart without damaging anything but the circlips.
The forward/reverse lever tumbler gears offered another surprise. One gear had seized to the shaft and spun the riveted/swagged pin the gear rides on. The detent pin on the lever is rust welded in place as well.
The carriage traverse gear assembly is missing a few teeth. I knew this prior to purchase and along the way found that the gear and rack are 20DP 14 1/2PA. This is actually a common gear for hobby RC cars. Daryl gifted for the ride along with some other parts but I'm going to turn the remaining teeth off and swag/solder/braze the pinion on for a repair.
I series of phone calls to Joel resulted in a sufficient honorarium sent his way and a care package sent my way.
Shameless plug for Joel. If you don't know Joel and own a Craftsman/Atlas/Clausing lathe, you need to.
I'll steal minutes as I can to lightly stone the ways with my newly acquired , dollar store, sharpening stone pairs.
If you don't understand why they're acquired in pairs find an Elmer, mentor, two years older than dirt manual machinist and buy him a cup of coffee
Only the more aggressive bits of oxide death will be attacked by my favorite chemical brew, OsPho (Phosphoric acid concentrate with a wetting agent) You can find it at Most Ace Hardware stores.
So far the community has been a godsend. I was nearly gifted a 4 jaw chuck. A bunch of 1/4" and 5/16 HSS 5% and 8% cobalt showed up in the mail (I know who you are and thanx). A live center and 2MT test bar arrived from a long time partner in crime. A Welsh expat put me in touch with his brother on the Isle and the bearings arrived Friday. The Armature chucks came from a conversation that began with "what the heck are these for?" and ended with me leveling his lathe over the phone in a little less than an hour when He'd been fighting it for weeks.
A Starrett Dial, test, and back plunger set showed up with instructions to pay as I can and continue to pay it forward (Morrie, I'm humbled) . I'll have the lathe side four step pulley available as all I needed was the motor side and a conversation I'd forgotten about produced both. A local that heard I was starting over dropped off an assortment of drops in Steel , cast, bronze, aluminum, and other weirdness.
I'll finish with a Thank You to those I may have over looked and anyone that actually reads my drivel.
kopcicle
antidisestablishmentarian
Even with the setscrews removed the collar would not budge. Finally forcing a putty knife between the gear and the collar started it moving. There was actually a whole previous evolution that I don't have pics for.
The direct drive coupling , 141-030 had been attacked by flying monkeys with hammers , pliers and bad intent.
The circlip retaining the direct drive coupling , 141-030, had somehow been peened into place by the same flying monkeys.
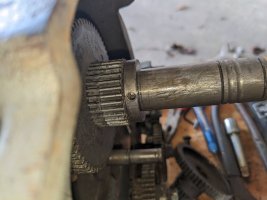
Once the mangled part in question had finally been removed from the shaft it was on to the woodruff key and some sort of age hardening shmoo that gave off an odor reminiscent of spoiled meat when heated.
Now we are on to the removal of the 3950-14 spindle pulley assembly.
Even after careful stoning of the spindle and somewhat haphazardly measuring the diameter of the spindle to make sure it hadn't put on weight or diameter over the years I proceeded to attempt to remove the spindle pulley assembly.
The inner bushing stayed behind. 400gr sanding strip had to be applied to the spindle in order to remove the remaining bushing.
Now we're on to the spindle back gear.
Keep in mind here that I had a large selection of prying and stabby things and little else for this operation.
You can get behind the gear somewhat with a large flat blade screw driver and rotate, stab, pry, repeat.
Being careful not to pry anywhere near the gear teeth and applying force through only the thickest portions of the headstock casting the bugger finally moved. Eventually this too stopped short of the end of the spindle and a bit more 400gr was used to reduce the diameter of the spindle further.
Somewhere along the way I seemed to have missed the fact that bearings that appeared to be "Completely Knackered" had now taken on the aspect of perfectly serviceable bearings. I'll have to very closely take a look at the assembly to determine what Murphy snuck in on me.
Compared to all of this the removal of the spindle with the chuck side bearing still attached and it's subsequent removal is only the mater of an hour or so of alternating heating , cooling, swearing and tears.

The direct drive coupling , 141-030 had been attacked by flying monkeys with hammers , pliers and bad intent.
The circlip retaining the direct drive coupling , 141-030, had somehow been peened into place by the same flying monkeys.
Once the mangled part in question had finally been removed from the shaft it was on to the woodruff key and some sort of age hardening shmoo that gave off an odor reminiscent of spoiled meat when heated.
Now we are on to the removal of the 3950-14 spindle pulley assembly.
Even after careful stoning of the spindle and somewhat haphazardly measuring the diameter of the spindle to make sure it hadn't put on weight or diameter over the years I proceeded to attempt to remove the spindle pulley assembly.
The inner bushing stayed behind. 400gr sanding strip had to be applied to the spindle in order to remove the remaining bushing.
Now we're on to the spindle back gear.
Keep in mind here that I had a large selection of prying and stabby things and little else for this operation.
You can get behind the gear somewhat with a large flat blade screw driver and rotate, stab, pry, repeat.
Being careful not to pry anywhere near the gear teeth and applying force through only the thickest portions of the headstock casting the bugger finally moved. Eventually this too stopped short of the end of the spindle and a bit more 400gr was used to reduce the diameter of the spindle further.
Somewhere along the way I seemed to have missed the fact that bearings that appeared to be "Completely Knackered" had now taken on the aspect of perfectly serviceable bearings. I'll have to very closely take a look at the assembly to determine what Murphy snuck in on me.
Compared to all of this the removal of the spindle with the chuck side bearing still attached and it's subsequent removal is only the mater of an hour or so of alternating heating , cooling, swearing and tears.
kopcicle
antidisestablishmentarian
I'm waiting on a few parts from Joel and some monkey repellent from the publishers of the Satanic Bible.
I doubt I'll ever do the tapered roller bearing conversion unless I have to do a bunch of fine facing operations.
Believe me, it is possible to the point of certainty that you can set up a high frequency resonance in the axial plane of the spindle simply by banging the roller bearings back and forth. The noise is rich in harmonics which distinguishes it from ordinary high frequency tool chatter.
Meanwhile , back to the flying monkeys with hammers.
The list of damage
Someone pounded on the headstock end of the lead screw thinking that it came out of the support casting that direction. Seems reading the parts breakdown wasn't an option. That or monkeys can't read.
While pounding on the lead screw end the end was so severely peened over that removal of the spacer behind the spindle drive gear was impossible. This resulted in hours of careful file and stone to restore the spindle diameter so the spacer would go off and on. Of course the 1/4 - 20 threads were buggered and had to be chased.
Then the casting had been tweaked just enough so that when the attaching screws were tightened the lead screw bound up. No small wonder as the spindle bore was pointing back at the bed. Looking back at the bore the years of neglect had left the natural bearing surface black with baked on goo and smooge. This all had to be carefully removed while not taking so much that the spindle fit became a hotdog down a hallway.
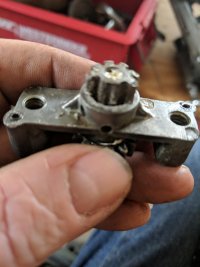
When we last visited the 141-023 Coupler, Direct Drive, it was resting in its as molested by flying monkeys with hammers state.
I didn't get pics of the process because getting the sweaty hands in and out of gloves was just a mess. Okay , I'm lazy. It just means I'll have to type more.

This, like many of the Atlas parts is Zamak or a close relative.
At some point the chuck had been stuck to the spindle.
The spindle shows some damage but the coupler took the brunt of it.
Inside that counter bore is an external snap-ring.
As received I didn't have the clearance to get the snap-ring out of the groove because the coupler was so badly squished. The snap-ring came out in pieces.
The spindle end was badly swollen, possibly from hammer blows, and not allowing the coupler to slide free. It took hours of patient rubbing to get the necessary clearance.
Then a condensed version of creating a bit more clearance for the drive pulley and bushings.
An entire afternoon of "smoking" the shaft and dealing with the high spots while checking with a mic to make sure I didn't go drastically undersized.
Then removal of the spindle back gear. This was an all day sucker.
So back to the coupler. It was unusable as it was and they seem rare as rooster teeth.
Inspiration.
I closed down the jaws of the 3 jaw and placed the damaged end of the coupler over them.
Rotate, expand, retract, rotate, expand, retract, rotate, repeat....
Major gains were made.
4 jaw.
Trade out the three jaw for the 4 jaw and place a woodruff key on one of the jaws in an attempt to more or less nearly circularize the remaining damage.
Rotate, expand, retract, rotate, expand, retract, rotate, repeat....
I then had clearance around the entire shaft for circlip installation.
It's still ugly as sin but it engages and disengages.
The ball detent even survived.
I doubt I'll ever do the tapered roller bearing conversion unless I have to do a bunch of fine facing operations.
Believe me, it is possible to the point of certainty that you can set up a high frequency resonance in the axial plane of the spindle simply by banging the roller bearings back and forth. The noise is rich in harmonics which distinguishes it from ordinary high frequency tool chatter.
Meanwhile , back to the flying monkeys with hammers.
The list of damage
Someone pounded on the headstock end of the lead screw thinking that it came out of the support casting that direction. Seems reading the parts breakdown wasn't an option. That or monkeys can't read.
While pounding on the lead screw end the end was so severely peened over that removal of the spacer behind the spindle drive gear was impossible. This resulted in hours of careful file and stone to restore the spindle diameter so the spacer would go off and on. Of course the 1/4 - 20 threads were buggered and had to be chased.
Then the casting had been tweaked just enough so that when the attaching screws were tightened the lead screw bound up. No small wonder as the spindle bore was pointing back at the bed. Looking back at the bore the years of neglect had left the natural bearing surface black with baked on goo and smooge. This all had to be carefully removed while not taking so much that the spindle fit became a hotdog down a hallway.
When we last visited the 141-023 Coupler, Direct Drive, it was resting in its as molested by flying monkeys with hammers state.
I didn't get pics of the process because getting the sweaty hands in and out of gloves was just a mess. Okay , I'm lazy. It just means I'll have to type more.
This, like many of the Atlas parts is Zamak or a close relative.
At some point the chuck had been stuck to the spindle.
The spindle shows some damage but the coupler took the brunt of it.
Inside that counter bore is an external snap-ring.
As received I didn't have the clearance to get the snap-ring out of the groove because the coupler was so badly squished. The snap-ring came out in pieces.
The spindle end was badly swollen, possibly from hammer blows, and not allowing the coupler to slide free. It took hours of patient rubbing to get the necessary clearance.
Then a condensed version of creating a bit more clearance for the drive pulley and bushings.
An entire afternoon of "smoking" the shaft and dealing with the high spots while checking with a mic to make sure I didn't go drastically undersized.
Then removal of the spindle back gear. This was an all day sucker.
So back to the coupler. It was unusable as it was and they seem rare as rooster teeth.
Inspiration.
I closed down the jaws of the 3 jaw and placed the damaged end of the coupler over them.
Rotate, expand, retract, rotate, expand, retract, rotate, repeat....
Major gains were made.
4 jaw.
Trade out the three jaw for the 4 jaw and place a woodruff key on one of the jaws in an attempt to more or less nearly circularize the remaining damage.
Rotate, expand, retract, rotate, expand, retract, rotate, repeat....
I then had clearance around the entire shaft for circlip installation.
It's still ugly as sin but it engages and disengages.
The ball detent even survived.
kopcicle
antidisestablishmentarian
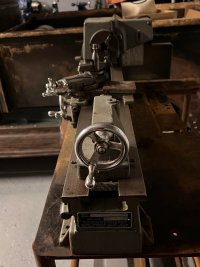
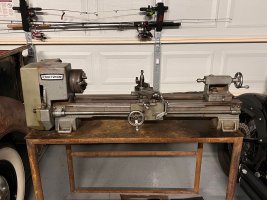
Nearly a lathe. Still missing a few fiddly bits but almost there. In fact I could run it now , just not very well.
Alignment and adjustment of a new or reborn lathe is so well documented around the web I won't be detailing it here unless I'm stealing hammers from flying monkeys and smashing their little dick beaters with the hammer for some specific reason.
A little personal history. I'm a retired millwright. I've moved things the size of your house.
I've made adjustments within 4 ten thousandths of an inch. I'd have no trouble doing the same here other than the bearings won't repeat that at running clearance. Alignment won't be the issue. I'll have to map each and every operation and compare intended with observed and indicated. I've had to farm out my valve guide work for more than a year and it's time to bring it home.


