bought! now a project!

does anybody have any suggestions on how to get the front left spacer in? its space is so little i cant seem to get the darn thing in? and i dont want to bend the frame. any suggestions?

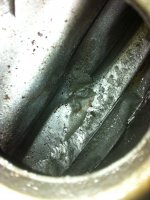
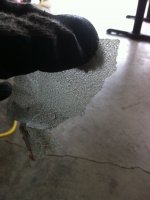
also the gas tank situation.

i have two options

1. i bring the gas tank to a radiator shop from what i heard so they can strip it of all the paint. gives me a fresh start, and its less work.

2. i can try to clean the inside with whatever the previous owner put on the inside. have no idea what it is and how i plan to get it out. beside paint stripper...? does anyone have any suggestions?

thats its for now i have all my parts ordered from dime city. order should be here next week. and should see the bike running in the next two weeks if everything goes as planned!! woohoo! 2 years of waiting !
 

Attachments

  • photo 3 (3).JPG
    photo 3 (3).JPG
    932.7 KB · Views: 212
  • photo 2 (3).JPG
    photo 2 (3).JPG
    873.3 KB · Views: 238
  • photo 1 (3).JPG
    photo 1 (3).JPG
    942.2 KB · Views: 220
  • photo 5.JPG
    photo 5.JPG
    754.2 KB · Views: 243
Get that tank acid dipped at a radiator shop. Last thing you want is all that crap in your carbs.
 
i have decided to dip my tank like suggested.

so far the progress is coming along. all i need left is

1.set up tires to hubs

2.get tank done

3. hook up wiring

then i should be getting the bike on the road

does anyone know if you need to keep the flimsy metal that is hooked up the the choke?
 

Attachments

  • carbs.png
    carbs.png
    703.8 KB · Views: 212
bought! now a project!

First time lacing rims. TUrned out to be very fun.
9cbe2f4df4424ef5358d97e9d464eed8.jpg
651fdb6faaa45bcc404aaf808e03ae68.jpg


Anyone know a good place in Portland to put tires on rims?

Sent from my iPhone using Tapatalk
 
The flimsy part on the carb should be the choke actuator for the other carb which has no choke lever.
The choke works this way:
If you take a look into the carb there are rotationable parts which 'block' the air stream to the engine,by blocking this air stream more fuel enrichening the air fuel mixture-- advantage for cold starts.
 
I was just wondering if it would be alright to just have the choke on one side of the carbs, but i'm guessing its inefficient.
thanks for the response ryan.
 
Just stumbled into this thread, and only read the first part up to the first pix.

I have only one thing to say:

AHRMA Novice Historic Production Lightweight.
 
Before you put the carbs back on the bike check if the choke mechanism works properly,opens and closes,it should be able to close and open entirely.
Then check if the carbs leak.
I do this by simlly connecting the carbs to a auxiliary tank with gasoline.i dont do this on the bike cuz its messy and you dont want the gas to mess with any paint on the bike.
Connect the tank then switch on the flow,of the carbs leak there is a needle/seat problem.
 
Thanks for the tips Ryan. The carbs don't show a problem with the choke but as for leaking I will try to get that sorted out once I get everything situated.


I went to motorcycle wheel and tire off of Alberta in Portland to get my rims trued and mounted. He's charging me 20-80 for truing each wheel and 20 for mounting each. I'm not sure if I messed up on telling him the side of my front brake. Does it matter if the brake side is on left or right?

All in all he seems really knowledgeable about vintage bikes, but definitely grouchy and short tempered lol.


Sent from my iPhone using Tapatalk
 
On a disc, it's preferable to have the caliper mounted BEHIND the fork leg.

On a single-leading-shoe drum brake, they have a specific direction of rotation.

Beyond that, almost any combination CAN be made to work, but may end up giving you problems, some potentially serious.
 
bought! now a project!

Sweet @grandpaul. I went back to tire shop to make sure I got the order correct for brakes and direction of tires just to make sure.

Well I finally got all motor mount put in finally! The left front spacer was a female dog to get in. front forks got rebuilt with new fork oil and bushings. I only did minor cleaning to them since i like the motor and most chrome parts to have a vintage look. They did get a clear coat though.

Next up is get tank hot tanked at macs radiator shop hope they don't charge too much .

I also want to buy a new throttle cAble since I forgot to order it with my last shipment. Sighhh. Well here are some pics of it.
515cef9765bd95613ebf76baac3ba8be.jpg
c3d0b623fbf3af51c40c20e630c81de9.jpg
0703160fa17302d05f6732f63a691a78.jpg


I plan to make my bike like this in future hopefully.
5e06ca79d61b8351a3426c1c1c9dff55.jpg


Sent from my iPhone using Tapatalk
 
any body know where there is a how to for the clutch construction? looking at the manual is kind of confusing and i don't want to mess it up.
 
Put mounted my old coils back on bike,mounted the bracket for my rear sets, and mounted my headlight on bike. I think it looks amazing. I can't sit to ride this thing.
cf507d269518c7defdbfd1e71743c038.jpg
996ebc9093e4d77e9821b1409fc4d030.jpg


Tomorrow I hopefully will work out wiring, clean oil filter change oil, work on clutch cable where the cover goes, and hopefully my tires are finished so u can mount them.
81581372dc95fae7440c6c2af4af5a22.jpg
do u guys know if I'm missing anything ?


Sent from my iPhone using Tapatalk
 
I'm working on my clutch crank case cover and was wondering if the weird double sided screw, screws into the ridged circular thing. I'm having a hard time getting the screw to go though. I don't wanna force it and strip it. So any answers would help! Thanks.
25dbcb174779a578152af013ea12e591.jpg
b0eb39e1696ff43e33f5ca8a82a56c7a.jpg


Sent from my iPhone using Tapatalk
 
It's held in place with a nut on the outside and the inside provides a race for the bearings that should be included in the second pic. The tension is used to adjust the pressure the clutch rod places on the clutch.
 
Okay so the screw shouldn't be screwed on the inside. It should just sit on top. Should the sequence be like the picture shown?
8449cfcdef49bc795551dfb86d500eb3.jpg


Sent from my iPhone using Tapatalk
 
that is the exact picture that i followed. but shouldnt #6 have the screwdriver side facing away from engine so that you can adjust it from the outside?
 
Back
Top Bottom