Follow along with the video below to see how to install our site as a web app on your home screen.
Note: This feature currently requires accessing the site using the built-in Safari browser.
We noticed you are blocking ads. DO THE TON only works with community supporters. Most are active members of the site with small businesses. Please consider disabling your ad blocking tool and checking out the businesses that help keep our site up and free.
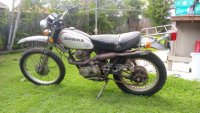
Time to start a thread for my old XL. I have had this bike for 14 odd years and it was the first "Big" bike that I ever rode. I moved on from my Z50A to this thing and was amazed at the power and confused by the clutch. Being a fairly tall 13 year old helped me get a leg over but I was still on the tips of my toes ever time I had to put my foot down.
I gave this bike hell and crashed it many a times before moving on to a Chinese copy of a CRF150 which I then destroyed by jumping. The old XL became my father's bike to follow my brother and I around on through the trails.
After my dad broke his ankle racing IRBs (inflatable rescue boats) the old girl sat in the back of the shed and gathered dust.
I had planned to restore her as a daily rider when I first got my licence but was convinced otherwise by my parents. Glad they did as I have learnt a lot and feel like I can give this bike what it needs now.
There is no set plans for her. Just get her running well and on the road again.
I have been leaning toward restoring her with a few period mods to match. For now just the essentials but hopefully a full rebuild for the 50th anniversary.
Anyway here will be the collection of sporadic ramblings to log the information I find about this bike or XLs in general.
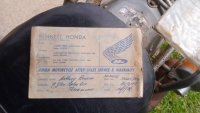
As for this old girl. She was bought on the 14th of January 1976 by a man named "Anthony Benson" from Bennett Honda in Fortitude Valley, Brisbane.
Some time between '76 and '05 she found her way to the Gold Coast. After that we bought her from a bloke who had planned to learn to ride but couldn't get her started. Enter my Pop who rebuilt the carb and changed the oil and we were off.
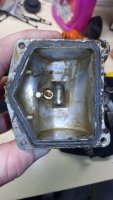
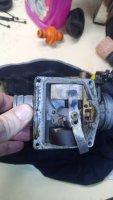
So far I have had her running very rough without doing a thing other than new fuel. After that I stripped and cleaned the carb followed by having the plug foul and ordering a carb rebuild kit.
After that I had a look at the petcock which was in a horrible state. Leaking no matter what. I opened it up and it was gunked to no end. Looks like all the years of paddock bashing was not kind. New petcock ordered as well.
From what I have read online the fouling is very common and a smaller pilot jet, #38 rather than #45, was found to fix the issue. We will see what happens after I rebuild with the new kit. A Mikuni VM carb between 28 and 32 were known to bring the XLs to life. Might be an option as the old Keihin is quite corroded.
Nice bike Brodie, those old motosports were the duck's guts in their day, and that one looks very original aside from the pipe and front mudflap. I'll certainly be watching this one with interest.
Thanks guys, it will be a slow build. I only get 1 day off a week and money is tight.
Interestingly enough the front mud flap is Honda branded. The pipe is an aftermarket pipe from the era that I hope to either keep or replicate.
Sonreir has a 6v reg/rec on trial at the moment that hopefully will work out so I can install one to update the charging system. Also toying with the idea of going to a electronic ignition like the Charles place module.
I have just read about how the XL350 swingarm is a handling upgrade so I will keep an eye out for a cheap swingarm for the full strip down.
The brass tube for the petcock had a split most of the way down. Good thing I ordered a new one.
My plan is to keep all the original parts in storage. I have found a 285cc over bore kit and feel as if that might be a good idea along with the needle bearing conversion for the cam.
Should be fun. I have a whole heap of house projects to get done first but I did just order a new sprocket kit and a new seat cover to replace the torn stuck together one on it now.
I have a few days off coming up that I will no doubt use to work on this instead of what I should be doing.
So I am trying to decide on what to do about the electrical system. The ignition side seems to be flawless but the lighting and charging side I would like to upgrade to 12v for the extra lighting options.
if you stick with the 6V lighting system, there are LED options available for head/tail/brake/indicator which will give the equivalent brightness of 12V
there are probably others that aren't on ebay but this should give you something to start with
i believe they're popular with the brit bike crowd as they not only work with crappy 6V but don't tend to blow due to shit electrical systems or vibration ( don't you own some nasty brit bike or other too....?, might be handy there too)
Yeah 6v with upgraded bulbs may just be the way to go.
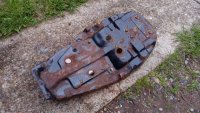
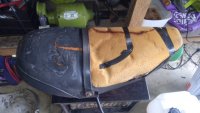
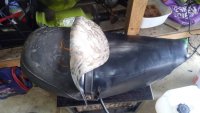
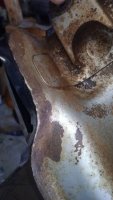
Spent a bit of time working on the seat pan today. Quite crusty with a few rust holes. Sadly the weather turned to rain and I had to give up for the day. I stuck a coat of rust converter paint on for the moment and will continue with the wire wheel tomorrow when I won't get flash rust from damp air.
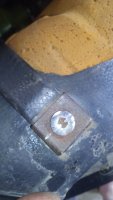
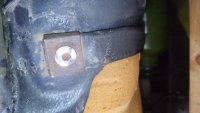
The cover was easy enough to to remove. On striped bolt needed a slot cut to remove it. Both promptly broke when I removed them. Oh well. Looks like I will need to cut them off and drill/tap a new thread in. Stainless bolt this time I think.
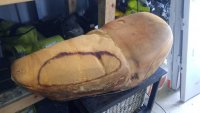
The old fake cover peeled off easy and the torn original just needed the a bit of a jiggle to get away. I managed to remove the original foam in one piece as well.
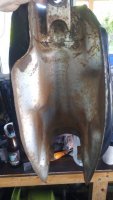
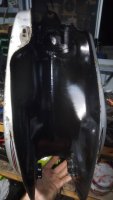
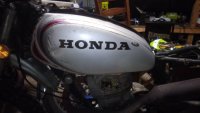
Did a bit of work on the tank today. I used a rust converter product on the outside of the tank but I used the rust converter paint underneath.
The rust converter is some kind of acid, didn't have any reaction to the paint when I trialed it so a good slather was put all over and wiped off. Amazing stuff I wish I had tried earlier.
I sanded it down with 600 grit and then gave it another coat of converter. Then a wipe off with turps and a few coats of gloss clear.
I would like to do a full respray but that will be a while away so I opted for preserving the "patina" as inspire by Irk with his XL tank.
This site uses cookies to help personalise content, tailor your experience and to keep you logged in if you register.
By continuing to use this site, you are consenting to our use of cookies.