Cb450/500t track bike

Their high-current connectors are good. I'm using some on the infamous "three yellow wires" connector from the alternator on my GL1000s. Honda just used plain 6.3 mm connectors there, and they are usually the second thing after the belts that need replaced on an oldwing. The Hobby King connectors are good for much more current, have tight solid contacts, are gold plated, and easily shrink-wrapped to keep dry.
 
Is 14-16v to much but? I’m lost when it comes to this. What bike are you running the turnigy 4s in mate?


Sent from my iPhone using DO THE TON
14v - 16v can give more spark energy with an inductive ignition, but as mentioned before inductive isn't the best choice if battery life is important. CD isn't normally fussy about supply voltage as it steps the primary voltage up to 400v or so anyway. I run Turnigys on a Bultaco.
 
Got the wheel centred disk spacers sorted and calliper mounts cnc as well as a fork brace done.
Image1615096493.193298.jpg
Image1615096509.287379.jpg
Image1615096522.601585.jpg
Image1615096531.322570.jpg
Image1615096541.290134.jpg
Image1615096552.328560.jpg


Sent from my iPhone using DO THE TON
 
Rear set mounting progress and fab work. Slow progress with this old girl I really want to get a move on. Front end in also. New bearings ordered.
Image1619946106.102818.jpg
IMG_5441.JPG


Sent from my iPhone using DO THE TON
 
Nice rearsets, but they will drag if you don't raise them an inch or two. I like them basically in line with the swingarm to avoid digging them into the tarmac.
 
Nice rearsets, but they will drag if you don't raise them an inch or two. I like them basically in line with the swingarm to avoid digging them into the tarmac.

I have two more settings on the brackets and was going to see how these ones go before I raise them up a bit. I think they can go up 25-30mm or so.


Sent from my iPhone using DO THE TON
 
Made some larger spaces and finished the rear brake line and mounts adjustments etc. Next stop battery box and ignition box. Ordered a steering damper too.
Image1621760256.574200.jpg
IMG_5636.JPG
IMG_5639.JPG


Sent from my iPhone using DO THE TON
 
Nice battery tray and that brake torque arm is the dog's bollocks. Is the rear brake plate fully floating? That will be much more effective that way if it is. I usually float the rear brake plate but if truth were known I don't use the rear brake much on the track.
 
Nice battery tray and that brake torque arm is the dog's bollocks. Is the rear brake plate fully floating? That will be much more effective that way if it is. I usually float the rear brake plate but if truth were known I don't use the rear brake much on the track.

Hahahahaha its just a lot neater and half the weight of the old steel one. Not floating. It’s off an old H1 I think. What do you mean by float it? Any pics of how you did that?


Sent from my iPhone using DO THE TON
 
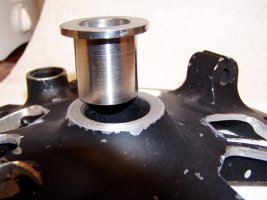
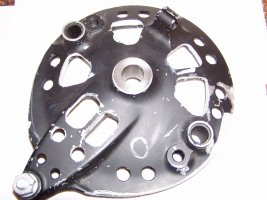
The idea is to allow the backing plate to rotate, so, the center has to be bored out and a spacer/center is slipped onto the axle with enough clearance to allow it to move freely. The torque arm is then tied to the frame rather than the swingarm.

As the rear brake is applied, the braking force creates a downward force at the rear end which helps to keep the back end down and braking.

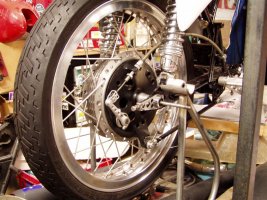
It doesn't do much if the rear end is in the air, but right up to the pint of a stoppie, it helps. It's not easy to see but if you look carefully, you can see a steel spacer between the brake plate and the alloy spacer. That's a sleeve inside the backing plate and allows the plate a small enough movement to pivot easily and it also allows it to self center.

The first picture is on a CB160 racer and the other two are a CB77 350 race bike. Same idea though. That sleeve can be straight (without the end flange) if it's large enough, but if teh wheel spacer OD is much larger than the backing plate center, a top hat works better.
 

Attachments

  • CB175 rear floating brake.jpg
    CB175 rear floating brake.jpg
    143.9 KB · Views: 198
  • P1010071.JPG
    P1010071.JPG
    610 KB · Views: 195
  • P1010069.JPG
    P1010069.JPG
    696.7 KB · Views: 181
Great looking bike!

Love the rearsets and linkages. You running reverse shift pattern by the looks of it? I have never tried this, I wonder how hard it is to break the current muscle memory pattern! I really like the rear brake cable set up as well - that is something I should have done for my build and may look into in the future.

Thanks mate. I know it will be a bit odd, we will have to see how we go. It’s a new one for me.


Sent from my iPhone using DO THE TON
 
Last bit fab work complete and bike is now stripped. Few parts on order:
Sprockets
Swingarm dust seals
Kill switch
Tacho plug
Chain and I’m sure I have forgotten a few more.

Tank and seat at paint with fork legs.

Exhaust on its way to be ceramic coated

Steel bits off to the platers

Waiting for the final bits of alloy so they can be anindised.

Still need to dress frame before it’s powder coated.

Hubs are going to soda blaster

Rims and clip ons will be polished. Rims de laced ready to go.

Lots apart lots to do

Didn’t take pics I’m afraid was in a mad rush before we got locked down to take her all apart.


Sent from my iPhone using DO THE TON
 
Back
Top Bottom