Follow along with the video below to see how to install our site as a web app on your home screen.
Note: This feature currently requires accessing the site using the built-in Safari browser.
We noticed you are blocking ads. DO THE TON only works with community supporters. Most are active members of the site with small businesses. Please consider disabling your ad blocking tool and checking out the businesses that help keep our site up and free.
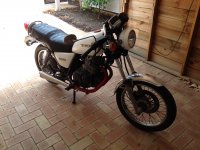
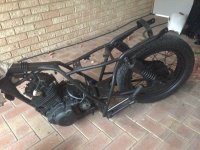
Hi All, I'm in sunny Perth Western Australia, I bought a stock 1983 GN250 from a mate, it kinda ran (as in he said it did, but it didn't), paid $500 for it and trailer'd it home.
Somehow, I remotely fixed it during the drive and it started right up when it came off the trailer. I was so excited to cafe racer this thing, i'd turned the handlebars upside down before taking the first pic.
My mate also gave me a box of parts to chuck on there...lets see how it goes.
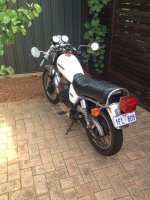
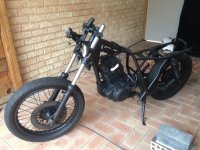
One bit of advice I can give you is ditch those upside down handle bars. They aren't worth the pain of a dent in your tank.
Check out some drag bars or super bike bars. I had some clubmans on my SR for about a month before my wrists told me to F off. Went back to standard bars.
Also if you plan to cut the rear frame make sure you leave ample room for the tyre to swing fully upwards. Last thing you want is a sudden lock up after a large bump.
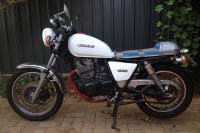
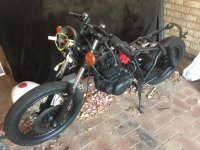
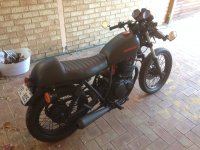
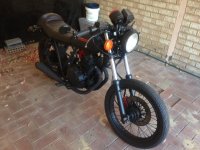
Ahh now that looks better. I don't mind the red and white scheme, not so sure about the gas cap. Good to see you are going to give making your own seat a go, your braver than I am!
OK, now you've made me feel bad. I was hoping to upload the details of the fastest bike build in history, and make it out like I'm doing it all now...and you're being all helpful and stuff...
..but yeah, the bike is finished.
And funny you mention the fuel cap. It's the only part that didn't get some paint treatment.
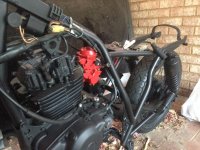
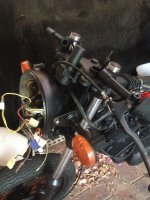
I was lazy, i know. Painted that photo above like it was. Didn't remove the back wheel and just painted the rear springs, motor and frame as it stands. Sanded back and primed however.
The engine was primed and painted with high temp (and very high temp) paint. If I get a couple years out of it, i'll be happy.
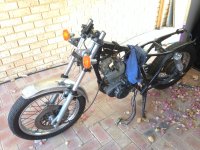
Removed the front forks and taped up the bottom.
Cleaned up and repainted the fork grabbers (triple trees?). All looks pretty neat.
Little bit of overspray on the front disc (that'll come off), and painted the chrome indicators. The box my mate gave me had chrome bar end mirrors which are now black also.
With lower handlebars comes tighter turns on the cables and hoses.
I ended up using quite a few cable ties to keep all the wiring in check.
I'm heading home for the evening (from work). PART 2 tomorrow.
Painted carbs can be a pain in the butt. When you service it be sure no flaking paint gets inside. The smallest flake will clog jetting. Re-open to re- clean...more flakes get in. ugh.
Actually, I could have just finished this yesterday. I only had a couple more pics. I didn't take many during the build and wish I took more.
I had a go at the seat with a borrowed sewing machine and gave up quickly. Ended up getting it done properly and I love it. Turned out perfect. I shaped the original seat base and they built the foam shape I wanted on that...then covered it in black (p)leather and red stitching.
Other red parts include the front brake and dial surrounds. Fuel cap and SUZUKI logo on the tank.
Battery is an Antigravity unit. The 4 cell and is super tiny...I'll add more pics that show where it is. I'm surprised by how much it puts out.
This site uses cookies to help personalise content, tailor your experience and to keep you logged in if you register.
By continuing to use this site, you are consenting to our use of cookies.