
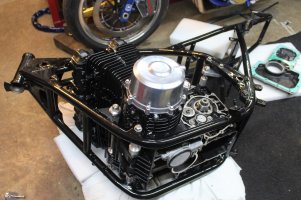
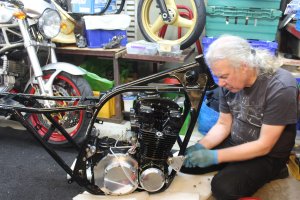
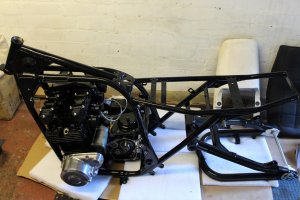
Finally got the Gpz1170 engine in the Z650 frame, though it put up a fight. We had to remove the sump and cut back a tab that had been added to mount the Z1 side panel. The latter being done after the engine had gone off to be rebuilt. There's enough left of the tab that I can drill and mount a replacement for the piece we had to hacksaw off. Thankfully it behind the side panel so will be hidden from view. Note that the front rubber engine mount has been replaced with a solid mount, using top hat spacers.
We noticed you are blocking ads. DO THE TON only works with community supporters. Most are active members of the site with small businesses. Please consider disabling your ad blocking tool and checking out the businesses that help keep our site up and free.
You are using an out of date browser. It may not display this or other websites correctly.
You should upgrade or use an alternative browser.
You should upgrade or use an alternative browser.
Kawasaki Z650 Seventies Special
- Thread starter Bevelheadmhr
- Start date
Got the fibreglass seat base back from a local upholsterer, turned out ok, though haven't seen it fitted to the frame with the tank and duck tail yet..

Finally got the engine/frame back home today, so started to test fit parts, to see how it all looks.. when I hit another unexpected problem, this time the lovely upholstered seat - with its fibreglass base which was made on the frame - doesn't fit on the frame anymore, not by a little, but by a lot. Took a few seconds before I realised what had happened.. it'll have to go back to the upholsterer to be completely redone. My fault, as I'd made an assumption, which wasn't the case.
Can you guess why the seat wouldn't fit the frame??
Can you guess why the seat wouldn't fit the frame??
Attachments
CarbsAndCylinders
Careful With That Axe Eugene
Is it because you widened the frame?
n
no, the fibreglass seat base was made to fit the widened frameIs it because you widened the frame?
The problem with the seat... was that it had been upholstered back to front! I'm assumed it was clear which end was the front and which was the back, but it seems not. Its going to have to be completely redone by the upholsterer.
Moving on, decided to rebuild the bolt up rear wheel, with new fasteners, only to find the cap head bolts holding the hubs in place wouldn't fit.. sigh. turns out the old cap heads had been machined to fit snugly into the recesses made for them in the hub. So had to machine all 12 bolts the same way. Its done now.
Meanwhile mounted the Dyna coils, once I'd made 4 stand off spacers. They are very close to the cam cover, but can reduce the spacers by a couple of mm to gain a tiny bit more clearance.
Pre covid we made a one off swing arm spindle for the bike, which has gone missing, cant find it anywhere, and boy I have searched high and low for it. Oh well, lets make another. Still had a length of EN24T 20mm bar, so passed it through the frame to see where I need to cut it to length.
Only to dismayed to find another problem.
The bar, which is straight, wouldn't pass through the second swingarm mounting hole in the frame. Looks like the frame is slightly twisted!!
No idea how this could be, as it was straight before it went off to be powder coated.
Not that it matters, as now I need to find a solution, hopefully without fully stripping the bike down and putting back on a frame jig... never had a bike give me so many problems...
I've since spoken to a couple of folks, who both say the same thing.. don't panic, the frame can be tweaked back into alignment. I did try loosening the engine mounts, but it made no difference.
Meanwhile, I carried on with the build and tried not to worry about the frame.
Fitted the stainless under tray and splash guard, the latter may need to be cut back a bit, once I know the upper chain run.
Plan A to fix the swing arm pivot on the frame failed. We used a length of 20mm steel bar and a big hammer to tweak the frame straight. Had zero effect on the frame.. we did a good job on bracing it.
But we did manage to bend the 20mm steel bar !
Plan B was attempted today with success. I used a 20mm flap wheel in my hand drill to carefully alter one of the pivot holes to allow the spindle to line up. Took over an hour of slow work and careful checking, but it worked and the spindle is still a good fit in the frame.
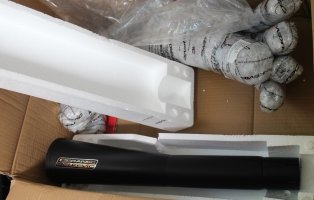
Got confirmation today that the exhaust I ordered will arrive on Monday, never seen one in real life, only in pics, so hope I like it on the bike.
But we did manage to bend the 20mm steel bar !
Plan B was attempted today with success. I used a 20mm flap wheel in my hand drill to carefully alter one of the pivot holes to allow the spindle to line up. Took over an hour of slow work and careful checking, but it worked and the spindle is still a good fit in the frame.
Got confirmation today that the exhaust I ordered will arrive on Monday, never seen one in real life, only in pics, so hope I like it on the bike.
The front forks have gone off to be rebuilt with new seals, and the fork lowers are to be powder coated satin black. Oh, and got a new billet bolt up wheel for the front end.. my mate Jeff had it gathering dust in the back of the shed.
Finally got around to making up the dyna ignition leads, bit tricky as there isn't much room between the coils and the cam cover, but got there in the end.

Finally got around to making up the dyna ignition leads, bit tricky as there isn't much room between the coils and the cam cover, but got there in the end.
Decided the billet yokes would look better finished satin black rather than polished. But first had to carefully round off all the sharp edges and corners, as paint doesn't adhere too well on such sharp edges. Slow, tedious work using a small hand file followed by wet n dry sandpaper. That done, sprayed them with etch primer followed by satin black 'tough' paint. Don't know how durable it'll be in use, but can always get them hard anodised in the future if its a problem.


These are the home made wheels I'm using the front discs are from an R6 with adaptor plates to fit the wheel hubs, while the rear wheel uses a disc from an old GSXR 1000, with a new Brembo caliper on a one off mount, fitted to a ZRX1200 swingarm.

With a new homemade spindle I could finally fit the rear end, though the bearing kit I bought for the swingarm didn't include any spacers, so need to find or buy whatever is required. Life would be easier if I could lift the bike off the ground, and onto a bike lift, but nearly put my back out trying on my own, so it can stay on its sump for now.
Made a start on the foot controls, chain drilled the mounts from 10mm alloy plate, test fit on the frame, showed I'd made another mistake. The brackets put the foot pegs 40mm lower than the standard position, so the gearchange side will need to be remade, while the brake side can be saved I think.
With the 43mm R6 forks off being rebuilt, I dug out an old pair of ZRX stanchions to try out the head light mounts. We weren't sure how big to make them, so they turned out to be way too long. So need to cut them back to bring the headlight back much closer to the headstock.
The LHS bracket is an equilateral triangle, so cant flip it. No problem, just make another. I'm used to rear sets, these will be ok for me.Can you flip the left side to move the peg higher? Btw that peg location looks really far back. The tarozzi’s that are made for these bikes are fairly aggressive and they aren’t that far back.
Shortened the headlamp brackets, which let me try a test fit of the R90S fairing.. it'll need a few mm cutting off at the lower edges where it just hits the tank on full lock. The bars in the pic are set wrong, they need rotating back, so they wont touch the fairing.
The instrument pod.. tacho/speedo/idiot lights arrived, along with the handlebar switches from Motogadget, which work well with the M-Unit. Finally went for something I've not tried before.. the speed sensor for the speedo works via GPS. No need for any wires/magnets on the front wheel.
Next job is to make a mount for the speedo/tacho and work out how to mount the fairing.
The rear sets are almost finished, now need to decide on their finish.. probably going to have them hard anodised satin black..


While later, a side stand finally arrived in the post.. and I wasn't too surprised when it caused a problem with the gearchange lever.. The side stand will have to be modified.

While later, a side stand finally arrived in the post.. and I wasn't too surprised when it caused a problem with the gearchange lever.. The side stand will have to be modified.
cb250nproject
If you can make it better do so
Loving this build, haven’t been on DTT for a while, this build is really coming along.
Sent from my iPhone using DO THE TON
Sent from my iPhone using DO THE TON
After a lot of hassle, the bike is finally on its wheels for the first time..
The speedo mount is almost done, just need to shape the lower part and paint it satin black. The front end will be getting all new fasteners and brake lines, though still need to buy the clutch and brake master cylinders.
Waiting for a couple of blank rear sprockets to arrive, which will then need to be drilled to fit the rear wheel hub. The latter being drilled unlike any standard bike.. sigh !
Hope to try fitting the 4-1 exhaust tomorrow, and no doubt a hundred other jobs that still need to be done. BTW the bars are titled back as the fork preload adjusted get in the way of tilting them up. Shouldn't be a problem when the forks are dropped in the yokes correctly, but we'll see.
https://imgur.com/t792qFh] [/url]
https://imgur.com/YdlXVnp] [/url]
https://imgur.com/i4wnrN3] [/url]
The speedo mount is almost done, just need to shape the lower part and paint it satin black. The front end will be getting all new fasteners and brake lines, though still need to buy the clutch and brake master cylinders.
Waiting for a couple of blank rear sprockets to arrive, which will then need to be drilled to fit the rear wheel hub. The latter being drilled unlike any standard bike.. sigh !
Hope to try fitting the 4-1 exhaust tomorrow, and no doubt a hundred other jobs that still need to be done. BTW the bars are titled back as the fork preload adjusted get in the way of tilting them up. Shouldn't be a problem when the forks are dropped in the yokes correctly, but we'll see.
https://imgur.com/t792qFh]
[/url]https://imgur.com/YdlXVnp]
[/url]https://imgur.com/i4wnrN3]
[/url]I really can't get over how nice those wheels are.


