
BTW the build is on YT, if your really bored..
We noticed you are blocking ads. DO THE TON only works with community supporters. Most are active members of the site with small businesses. Please consider disabling your ad blocking tool and checking out the businesses that help keep our site up and free.
You are using an out of date browser. It may not display this or other websites correctly.
You should upgrade or use an alternative browser.
You should upgrade or use an alternative browser.
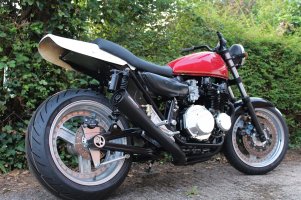
Kawasaki Z650 Seventies Special
- Thread starter Bevelheadmhr
- Start date
Got the Mk2 foot peg hangers back on the bike, now they've been shaped and machined.. much better than the slab like plates they started out as. The hangers will be hard anodised black later.
Now in the middle of the dreaded electrics.. making the wiring harness from scratch.. all good fun..


Now in the middle of the dreaded electrics.. making the wiring harness from scratch.. all good fun..
I'd been putting off building the wiring harness, but once I get my head in 'wiring mode' its not too difficult, I'd already drawn up a detailed wiring diagram, so just had to follow it and try to run the wires as neatly as I can.
The bike has a 'Basic' M-Unit which simplifies the wiring, along with matching switches, with wiring going through the handlebars. Ignition is Dyna S and Dyna coils, while I'm using a combined Speedo/tacho/idiot lights made by Daytona. Also trying out a GPS speed sensor for the first time, as it means the bike doesn't need a lead going down to the front wheel.
Probably took about seven or eight hours in total, spread over a couple of weeks to build the wiring harness, though I could spend more time trying to make it all a bit neater.. some wires are a little too long, or could be routed slightly differently.
BTW I wire up the bike in a 'modular' way, so the main loom which goes from the front to the back of the bike isn't sleeved in one big bundle, as it would be on a standard bike. Because I often change and modify my bikes, the wiring is sleeved by function.. so I can for example change the instrument pod and all its wiring, without upsetting any wiring for other parts of the bike, such as the headlight or switchgear.
Spent a frustrating hour or two making the exhaust hanger from 3mm stainless plate.. took ages. Still needs more work to shape it, then it can be powder coated black later.
Got the exhaust how I want it now, still need to trim and shape the hanger. Also sprayed the welded bit of the 4-1 collector with HT paint.. pity its a matt finish, as it doesn't quite match the satin black of the rest of the exhaust. Just ordered a can of satin black PJ1, which should look better.
Got the exhaust how I want it now, still need to trim and shape the hanger. Also sprayed the welded bit of the 4-1 collector with HT paint.. pity its a matt finish, as it doesn't quite match the satin black of the rest of the exhaust. Just ordered a can of satin black PJ1, which should look better.
Attachments
Yep, you can really tell the difference between SS and mild steel, the latter is so much harder to cut.
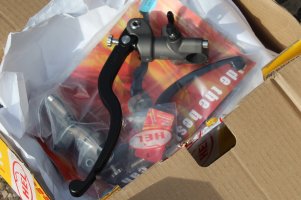
Received the clutch and brake master cylinders, made in England by a company called HEL. They are machined from billet alloy, as is the lever, while they have a variable piston size.. in my case 14/15/16mm. The clutch and brake are identical, as they are made so they can be used on the left or right. The bleed nibble and banjo threads are the same, so they can be flipped over.
Received the clutch and brake master cylinders, made in England by a company called HEL. They are machined from billet alloy, as is the lever, while they have a variable piston size.. in my case 14/15/16mm. The clutch and brake are identical, as they are made so they can be used on the left or right. The bleed nibble and banjo threads are the same, so they can be flipped over.
Attachments
With the paintwork away, been slowly ticking off the long list of jobs before I can try to start the engine for the first time. Drilled and mounted the blank rear sprocket, had to be blank as the rear hub was drilled to match no other wheel in the known universe.. With that done could check on the chain alignment, with the ZZR1100 front sprocket, which in turn has a 5/8ths built in offset. Turns out that's not enough and its still 10mm out of alignment. Been trying to source a 1 inch offset front sprocket, but no look just yet. Another option is to remove and dismantle the rear wheel and machine down the LH hub by 10 mm.. luckily there is plenty of room between the chain run and rim/tyre.
The next job proved to be very frustrating, trying to fit the one off outrigger bearing support.. the inner plate wouldn't fit over the gearchange shaft, as the side stand spring tang got in the way. Something that should've been spotted long ago. But with the various C19 lockdowns it wasn't possible, as the engine and frame were in different workshops.
The answer was to fit the shaft through the plate, then fit its mechanism to the engine.. while the plate was in the way.. took a lot of attempts before I felt confident enough to fit the handmade gasket and fit it for real. Got there in the end. Though its support spacers for the outer plate need a little machining to get them to fit just right.
I painted the alloy foot peg hangers satin black, just to see how they look, they'll need to be hard anodised later, as even the so called 'tough' paint will soon be scratched otherwise.
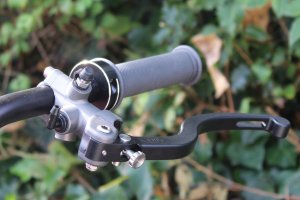
Also fitted the duel cable throttle with a cable kit from Venhill, and measured and ordered the brake and clutch lines from HEL.


The next job proved to be very frustrating, trying to fit the one off outrigger bearing support.. the inner plate wouldn't fit over the gearchange shaft, as the side stand spring tang got in the way. Something that should've been spotted long ago. But with the various C19 lockdowns it wasn't possible, as the engine and frame were in different workshops.
The answer was to fit the shaft through the plate, then fit its mechanism to the engine.. while the plate was in the way.. took a lot of attempts before I felt confident enough to fit the handmade gasket and fit it for real. Got there in the end. Though its support spacers for the outer plate need a little machining to get them to fit just right.
I painted the alloy foot peg hangers satin black, just to see how they look, they'll need to be hard anodised later, as even the so called 'tough' paint will soon be scratched otherwise.
Also fitted the duel cable throttle with a cable kit from Venhill, and measured and ordered the brake and clutch lines from HEL.
Pretty much, expect the paintwork back sometime in late December. Just fitted the brake and clutch lines, made the throttle cables etc, lots of small jobs to do. Got an issue finding a suitable 1 inch offset front sprocket. No one seems to sell them. So having to make one..Hi there,
hows the progress going on that machine?
waiting for the painters?
cheers
Grant
Just done the static timing for the Dyna S ignition.. surprisingly easy, once I'd watched a good vid on YT on how its done. Should be able to try to start it over the weekend, if I have time.
Calsco985
New Member
Good ol you tube, it’s certainly a good backstop. It’s a beautiful job you’re doing there,can’t wait to see it finished with the panels on painted. Any chance of a short vid when you get it running,would love to listen to how your pipe turned out. Keep up the brilliant work.
‘Cheers
Grant
‘Cheers
Grant
Good ol you tube, it’s certainly a good backstop. It’s a beautiful job you’re doing there,can’t wait to see it finished with the panels on painted. Any chance of a short vid when you get it running,would love to listen to how your pipe turned out. Keep up the brilliant work.
‘Cheers
Grant
Yes of course. the whole build is on YT
With the ignition statically timed.. pretty easy once I'd watched a good vid on YT, sorted out a temporary fuel supply, and in a rush to start the engine for the first time, started to add the oil... it didn't go as planned.
Todays lesson - Ensure the sump plug is fitted before pouring in the engine oil... I'm an idiot !

Todays lesson - Ensure the sump plug is fitted before pouring in the engine oil... I'm an idiot !
Calsco985
New Member
That’s gold, I’ve done that before too, it’s funny how you build up a bike working out all the technical details to get it perfect & then get a rush of blood to the head cause we can’t wait to hear it going & what it sounds like.
Cant wait to hear what it sounds like.
Grant.
Cant wait to hear what it sounds like.
Grant.
Finally got around to fitting the ignition barrel.. one from the HD aftermarket, as I like them. Used a 20mm holesaw to cut a hole in the side of the stainless electrics box, in line with the keyhole in the back of the side panel, which would normally be used for the seat lock. All went ok, but as expected , with the side panel in place, the key is a bit short to fit into the lock. No problem, will mod the key to make it a bit longer.. a restomod key.
With the sump now oil tight, the engine was refilled, but before I could attempt to fire up the bike for the first time.. another oil leak..

This time from the inner sprocket plate, which is part of the out rigger.. which was a pita to fit. Thought that the paper gasket must have moved a bit when I was struggling to fit the plate. But no, with the plate removed, all seemed well. So don't know why its leaking.
Going to make another gasket, this time with a slightly thicker paper, and next time use a bit more RTV silicone sealant. If that doesn't work, will bin the out rigger (for now) and just fit a standard part instead.


With the sump now oil tight, the engine was refilled, but before I could attempt to fire up the bike for the first time.. another oil leak..
This time from the inner sprocket plate, which is part of the out rigger.. which was a pita to fit. Thought that the paper gasket must have moved a bit when I was struggling to fit the plate. But no, with the plate removed, all seemed well. So don't know why its leaking.
Going to make another gasket, this time with a slightly thicker paper, and next time use a bit more RTV silicone sealant. If that doesn't work, will bin the out rigger (for now) and just fit a standard part instead.
porcelanowy
Active Member
Hello
I enjoy very much your threads.
Complete builds, clean and very inspiring")
I am way below your level, but it is pushing me to do a bit better job than intended
As fot the oil Two weeks ago i was making a side panel.
Made the mould: forming, sanding, gel coating.
Prepared a fiberglass mat and epoxy resin.
Well, 14+ days in and it didn't cure: apparently I din not add the hardener
I enjoy very much your threads.
Complete builds, clean and very inspiring
I am way below your level, but it is pushing me to do a bit better job than intended
As fot the oil
Two weeks ago i was making a side panel. Made the mould: forming, sanding, gel coating.
Prepared a fiberglass mat and epoxy resin.
Well, 14+ days in and it didn't cure: apparently I din not add the hardener
Guess we all make mistakes, though I'm told its not a failure, but a learning experience lol..Hello
I enjoy very much your threads.
Complete builds, clean and very inspiring
I am way below your level, but it is pushing me to do a bit better job than intended
As fot the oil
Made the mould: forming, sanding, gel coating.
Prepared a fiberglass mat and epoxy resin.
Well, 14+ days in and it didn't cure: apparently I din not add the hardener
Hate working with fibreglass, its so messy and takes so so long to get a decent finish. Good luck with your mark 2 side panels.
Since I couldn't find a suitable offset front sprocket, had to make one. Using a standard flat Kawasaki sprocket and a centre bore simplex sprocket (made by Dunlop). The standard sprocket.. an old one, had its teeth machined off, leaving a disc with the splined centre. The Simplex sprocket had its centre hole drilled out to fit over the gearbox output shaft, then the rear section was drilled out even wider, so that the splined centre disc would fit snuggly inside. The two were then welded together. Lot of work, but its done now.


The centre was a tight fit in the simplex sprocket, then bolted it together tightly before getting it welded. Runs true thankfully.Must be fun keeping that centered to weld it. Nice job
After a long long wait the paint is finally being done. The delay was caused by a pigment being on back order for months. First few coats of a pearl red done, next is the other coloured bits. The phone pics don't give a true idea of the colour, it looks too dark / orangey in these pics..


