
We noticed you are blocking ads. DO THE TON only works with community supporters. Most are active members of the site with small businesses. Please consider disabling your ad blocking tool and checking out the businesses that help keep our site up and free.
You are using an out of date browser. It may not display this or other websites correctly.
You should upgrade or use an alternative browser.
You should upgrade or use an alternative browser.
MB5 rebuild
- Thread starter doublej
- Start date
 my slush fund is getting low I need some for Paris lol
doublej
Active Member
Oh well, hope it works for you. Run it rich for break in and no synthetic. Are you sure the oil pump is working properly. check the set up in the manual.
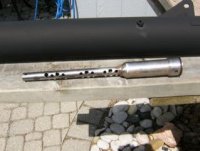
I am going to be running the OEM pipe but I will drill the holes in the baffle larger so the exhaust will scavenge faster compensating for the more air introduced on the other end. 12 of 30 drilled from 3/16" to 5/16" It is cleaned out now with the caustic soda wash. Will paint/coat with high heat rattle can (1500*F) and wrap the header pipe from the head to the chamber.
I am going to be running the OEM pipe but I will drill the holes in the baffle larger so the exhaust will scavenge faster compensating for the more air introduced on the other end. 12 of 30 drilled from 3/16" to 5/16" It is cleaned out now with the caustic soda wash. Will paint/coat with high heat rattle can (1500*F) and wrap the header pipe from the head to the chamber.
Attachments
looking good! I love a nice MB5. keep it up.... you planning on doing any further motor work? Theres a very extensive guide on modifying the ports on the stock motor for more power. Not sure what the 70cc kit looks like, but I'm sure there is room for improvement.
doublej
Active Member
Have a 70cc kit is in the shed and will port match the motor and massage the inlet and outlets some. The motor will be the last piece of the pie to do. After clearing the red bits I will be going over the wiring and hanging it on the frame. Will need to overhaul the master brake reservoir and caliper sometime soon. First entry in this post has a link to the bike.
See you are a young one, are you into mopeds? Big ride at Port Murray, NJ next week end. I will be coming down for a few days.
See you are a young one, are you into mopeds? Big ride at Port Murray, NJ next week end. I will be coming down for a few days.
HerrDeacon
Over 1,000 Posts
The paint looks awesome!
HerrDeacon
Over 1,000 Posts
Looking forward to the pics. I'm envious that you have the wiring done, I hate that part.
doublej
Active Member
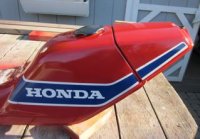
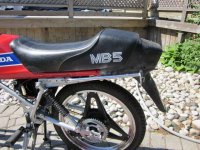
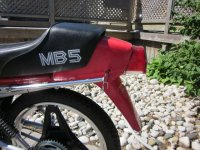
A couple of quick shots, one with the red tail section and another one with it in black. May lean toward a black tail and black front fender.
Looking for two red round screw on reflectors for the license plate holder, also a black front fender and a battery strap.
Looking for two red round screw on reflectors for the license plate holder, also a black front fender and a battery strap.
Attachments
HerrDeacon
Over 1,000 Posts
I like the red best.
doublej
Active Member
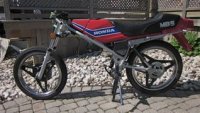
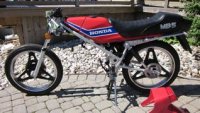
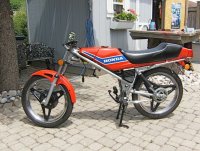
Getting there! Metal parts in red is Home Hardware rattle can red enamel with clear. Silver is motor ceramic and cleared. Krylon Fusion #42328 red pepper on the mud guards. Bobbed the mud guard. Clubman bars are black powder coated. Seat rattle canned upholstery/vinyl paint
Attachments
intrudin
Coast to Coast
Looking good John ,, where did you get the side stand??doublej said:Getting there! Metal parts in red is Home Hardware rattle can red enamel with clear. Silver is motor ceramic and cleared. Krylon Fusion #42328 red pepper on the mud guards. Bobbed the mud guard. Clubman bars are black powder coated. Seat rattle canned upholstery/vinyl paint


