Follow along with the video below to see how to install our site as a web app on your home screen.
Note: This feature currently requires accessing the site using the built-in Safari browser.
We noticed you are blocking ads. DO THE TON only works with community supporters. Most are active members of the site with small businesses. Please consider disabling your ad blocking tool and checking out the businesses that help keep our site up and free.
Surprisingly havent injured myself too bad on this build. Couple razor blade cuts as usual. Worst one was when I was using the angle grinder with a cutoff wheel to cut something off. Dont remember what it was. It took awhile to cut through and the piece I was cutting off ended up dangling off like it always does and without thinking I started pushing it with my finger. Not realizing that little dangling piece was 13000 degrees it ended up melting a nice hole in my finger.
Was weird at first cause it hurt like hell but there was no blood. Then I was like OHHH....nice sealed melted hole in my finger. Hurt for like a month.
I’ve enjoyed reading your build, and also seeing what you have done/are doing gives me inspiration for my bike. One thing I’m looking into now is tires. Could you tell me the brand of tire you are using, the sizes and where you found them. Thanks in advance
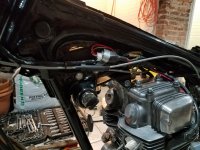
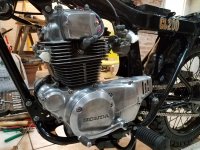
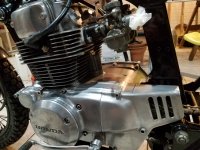
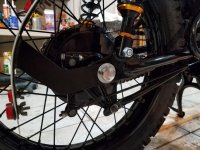
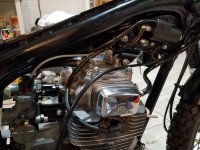
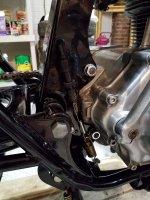
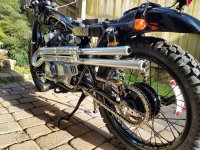
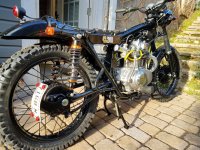
Here are just a few detail shots to show how I ran cables and wiring. I tried forever to get someone local to me to CO2 blast the engine but could never get anyone to commit. So I bought some Aluminum Brightener from Napa and gave that a shot. It kind of worked. It etched into the aluminum despite me only leaving it on there 20-30 seconds. I ended up having to polish it all back out. I also made the decision to trust my 16 year old self and run the engine as is. I had only put 100 or so miles on it back when I was that age after I rebuilt it. Then it sat forever (25 years?). It is still up in the air as to whether or not that was a good decision. Did a full service though. Cleaned oil filter, set valves, adjusted cam chain, etc.
Coming along nice, I don't add shit up anymore, I don't want to know what I've sunk into my bike. And the angle grinder itself makes a neat Cauterized hole in thumbs when tapped into it. Beer was involved and more was consumed to help the pain go away, but no bleeding LOL.
Bunch of new seals on both sides of the engine, new rear brake switch, kick starter seal, etc. Had to replace the left side points base as mine was cracked on the bottom for some reason. The bearing surface was still very nice on the one I pulled off. Surprisingly the bearing surface was also very nice on the replacement I bought on ebay. Made up a new starter cable and ran it all the way back to the relay. Glad I still had the tabs and brackets to hide the cable properly.
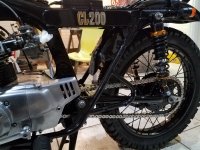
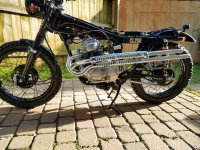
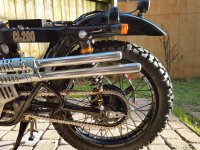
Got the exhaust back from ceramic coating and got it installed. Installed the baffles without issue. They fit perfect. Did a bunch of other stuff and rolled it outside to start tuning.
Forgot to mention, you can see how I hid the exhaust-to-frame bracket in the 4th and 5th pics above...the mount is insulated off of the frame with a rubber spacer
I was gonna mention something about a hanger. I think I had 3 break off and replaced w three different welded designs solid and through bolted, before I came up w a design that employs a rubber hanger. It’s been good for several years now.
I see you are through bolted to the frame. Should work great.
Yep. Bolted through the frame. You got me thinking though that over time the vibration might damage something. Maybe I need to add another thick rubber washer so I have them on both sides of the bracket. A rubber sandwich instead of just a heat insulation point like I have now. That would help dampen the vibration through that bolt and the frame.
So I got the bike fired up pretty easily. At first it was running pretty rough and couldnt really rev much past 5-6K without stumbling. It idled pretty well though. I started out with the original jet sizes for the CL200. I knew that this wouldnt work long term since I changed both the exhaust length and intake system. I pulled the plugs and they were pretty dark. At this point I realized I had the #88 mains from the carb rebuild kits I bought. Checked them real good for any burrs, etc and tossed them in. Cleaned the plugs too so I could get another reading.
Ran much better this time but there was still a little stumble when revving. I didnt have any smaller jets than the 88s so I decided to drop the needle circlip down to the last spot.
Ran even better this time but I was now worried I might be running too lean. Burned a decent amount of gas through it and checked the plugs again. I noticed some tiny white specs on the ceramic so I decided to pull the needle back up 1 notch from the bottom. Cleaned the plugs again and burned some more gas. Checked the plugs again and now they are a nice coffee color.
The white specs could have been anything that was stuck inside the combustion chambers for the last 25 years, but I felt better about leaving the needle where it is for now. I did a MMO soak a few times while I was building to help free up any stuck rings or anything so the white stuff could have been deposits burning off. Anyway, Ill run it as is for now and put some miles on it and keep checking the plugs.
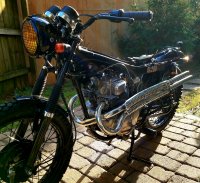
Havent forgotten about this thread. Ive been waiting for the tank to get real nice and dry before wetsanding and polishing. I did that this past weekend. Still might need a little more polishing, but it looks pretty damn good. Then I need to mount the emblems back on the tank and Ill post some more pictures.
This site uses cookies to help personalise content, tailor your experience and to keep you logged in if you register.
By continuing to use this site, you are consenting to our use of cookies.