
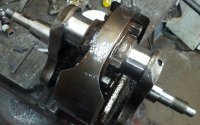
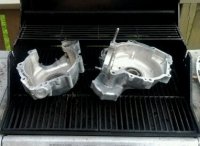
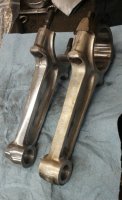
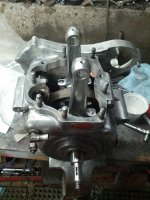
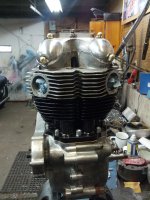
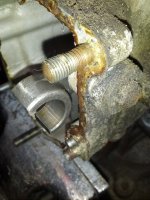
Made some good progress this week...started by putting the flywheel back between the crank halves, giving it a really good cleaning up and finally slathering it with oil. I had to clean up the oil seal journal since it had been damaged by water. I've had to conduct some much more extensive repairs to these things on past builds, , but this time I got lucky: I only had to shave about 0.003" off to get a smooth surface, and since there is still plenty of stretch on the crank seal, I'm sure it will be fine. The connecting rods were cleaned and polished and I checked the clearance with Plastigauge before fitting them. The cases needed a lot of careful cleaning, as some of the lower passages had become completely clogged with aluminum oxide (more water related problems), but eventually I was satisfied with the results. After that I heated the cases in the BBQ to remove the old ball and roller bearings (they fell right out on the grill, YAY!!!), then a new set of Superblends were fitted. A crank end play of 0.005" was easily established with only one 0.010" shim under the timing side inner bearing race. The breather plate and camshaft were slipped into the drive side case along with the crankshaft assembly. Following a light coat of Threebond on the mating surfaces the timing side case was slipped on over the whole lot and the two case halves were bolted together. Next I will turn my attention to the pistons and cylinders.
We noticed you are blocking ads. DO THE TON only works with community supporters. Most are active members of the site with small businesses. Please consider disabling your ad blocking tool and checking out the businesses that help keep our site up and free.
You are using an out of date browser. It may not display this or other websites correctly.
You should upgrade or use an alternative browser.
You should upgrade or use an alternative browser.
Norton Dominator 99
- Thread starter goldy
- Start date
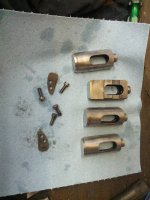
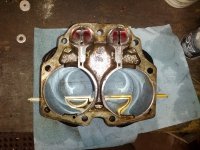
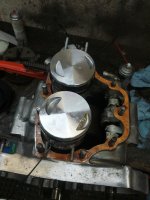
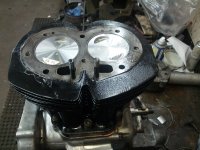
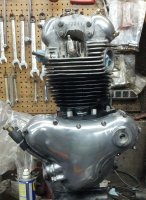
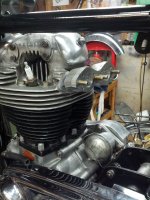
I had to fix a broken fin on the replacement cylinder and later on found out that this cylinder definitely came from a Commando, not an Atlas as advertised. In any case it didn't really matter much as the bolt patterns were the same and I only needed to drill out four of the cylinder head holes to take the larger Commando bolts. I gave the cylinders a final hone, cleaned them up along with the tappets and got them ready to slide down over the pistons. The new pistons went on text book perfect and the cylinders followed suit. After that I got the cylinder head all cleaned up. Three of the valves were in really good shape, but one intake valve was so severely pitted that I decided to hunt around for a replacement. I came across an old intake valve from the first engine job I ever did on my Commando and decided it would be suitable to return to service. After reconditioning the valves on the old Van Dorn valve grinder and cutting the valve seats, they were lapped in and the the seats checked with machinists bluing. The old cast iron valve guides were just like new, so no need to replace them...so the whole lot got reassembled and it was ready to bolt on to the cylinders....a new gasket, along with the four pushrods and the head was finally torqued down. Ready to install the bits and pieces in the timing chest.
Attachments
This week I finished up the timing side.
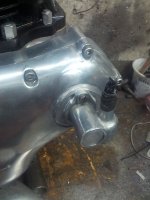
I'm sorry about the lack of pictures, but I was so 'into' getting it back together that it just slipped my mind. Anyhow, putting the chains, oil pump and and adjuster in place was a pretty straight forward affair. The timing cover needed to have some cracks welded up around two of the lower bolt holes. I know a fellow who is a wizard with a TIG machine who took care of it for me. After that, I just needed to clean it up and put it in place...a new crankshaft oil seal and oil pump 'O' ring were used, of course. The ignition system was cleaned and lubed and fitted back into the ignition case and the oil lines installed.
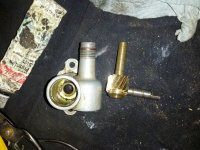
With that all ready to go, I decided to work on the 'little gearbox' ( the tach drive unit)...the engine had come with the drive case, but no guts inside it. Not wanting to drop $300.00 on a replacement, I managed to track down the drive worm, then decided to try making up a gear by hand. I had to take a couple of tries before I was successful, but in the end I got it right, installed the guts and fitted new end caps. After spinning it with a drill for about ten minutes, I declared it fit to use and bolted it to the outside of the timing cover. Now it's on with the big gearbox.
With the winter solstice having arrived today, let me say Merry Christmas to one and all and best wished for a happy and prosperous 2020!
I'm sorry about the lack of pictures, but I was so 'into' getting it back together that it just slipped my mind. Anyhow, putting the chains, oil pump and and adjuster in place was a pretty straight forward affair. The timing cover needed to have some cracks welded up around two of the lower bolt holes. I know a fellow who is a wizard with a TIG machine who took care of it for me. After that, I just needed to clean it up and put it in place...a new crankshaft oil seal and oil pump 'O' ring were used, of course. The ignition system was cleaned and lubed and fitted back into the ignition case and the oil lines installed.
With that all ready to go, I decided to work on the 'little gearbox' ( the tach drive unit)...the engine had come with the drive case, but no guts inside it. Not wanting to drop $300.00 on a replacement, I managed to track down the drive worm, then decided to try making up a gear by hand. I had to take a couple of tries before I was successful, but in the end I got it right, installed the guts and fitted new end caps. After spinning it with a drill for about ten minutes, I declared it fit to use and bolted it to the outside of the timing cover. Now it's on with the big gearbox.
With the winter solstice having arrived today, let me say Merry Christmas to one and all and best wished for a happy and prosperous 2020!
Attachments

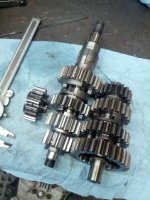
On with the big gearbox. Despite the busy Yuletide season and a rotten cold, I managed to get it apart and back together. The first thing that caught my attention was a broken stud holding the inner cover in place. All the other internal studs were seriously necked down/ stretched from being over-torqued and in danger of breaking too...the worst one had been necked down by almost 0.040".
At first glance the gear cluster didn't look too bad, but on closer inspection, I discovered that the 2nd gear on the mainshaft was badly spalled on the thrust faces...something that I have often seen on the 1st gear in these machines. I'm going to blame this on a combination of abuse and the PO using ATF instead of proper gear oil. While I waited for a replacement to arrive, I got busy on the lathe and cut a new set of studs for the inner gearcase and replaced all those stretched out ones that were ready to break. With the new gear finally in place, I assembled it with new seals, new gaskets and it's ready to go.
At first glance the gear cluster didn't look too bad, but on closer inspection, I discovered that the 2nd gear on the mainshaft was badly spalled on the thrust faces...something that I have often seen on the 1st gear in these machines. I'm going to blame this on a combination of abuse and the PO using ATF instead of proper gear oil. While I waited for a replacement to arrive, I got busy on the lathe and cut a new set of studs for the inner gearcase and replaced all those stretched out ones that were ready to break. With the new gear finally in place, I assembled it with new seals, new gaskets and it's ready to go.
Attachments

AgentX
Over 1,000 Posts
Wow. Can't believe I missed this.
Glad to be following along. Also had a Smith's tach drive issue myself, luckily not requiring a replacement or new gears...
Someone with the right setup might be able to make no money if they sold the gears for $75 each or so, so people could fully rebuild an original for $75-150 rather than needing the expensive, non-original repops.
A guy on another forum cut a gear by hand using needle files. (Wasn't you, was it??)
AgentX
Over 1,000 Posts
Man, can't recall--it was during my search for info on the gearboxes in general when I thought mine crapped the bed, not a forum I follow. (But I only popped the cover out of place and froze...worked again when I put everything back in alignment.)
Looking forward to seeing your progress!
Looking forward to seeing your progress!
It's a beauty Goldy. I'm glad you are posting it up here. It gives me some more inspiration for mine.
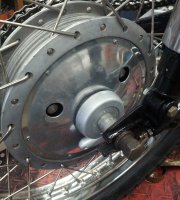
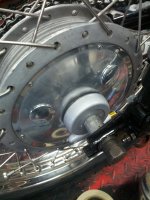
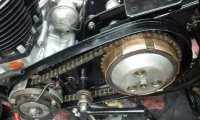
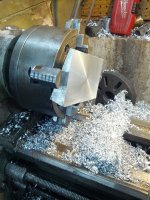
This weeks progress...primary drive, clutch etc. cleaned up and back together, complete with a new chain (the old one had eight or nine cracked plates). Machined some new plugs for the rear wheel hubcap. Got the ignition timing sorted out, a new rear chain and a new headlight installed.
Attachments

AgentX
Over 1,000 Posts
I am a big fan of the Lansdowne cartridges I just put into my fork...highly recommend.
If not them, at least the JSM or other kit to help the top/bottom-out problems of the Roadholder design. Have the JSM bushings in mine, too. Very smooth.
Can't wait to see this progress further! Awesome work.
If not them, at least the JSM or other kit to help the top/bottom-out problems of the Roadholder design. Have the JSM bushings in mine, too. Very smooth.
Can't wait to see this progress further! Awesome work.
Last edited:
Interesting fork mods...may be something I consider in future.
The carb bodys and manifolds were missing from the boxes of parts, so I decided it would be fun to make my own manifold. Started with a 1" thick chunk of aluminum, got busy with the lathe and band saw. I decided I wanted to see the carburteors sit closer to level than the stock mounting arrangement. I'm pretty pleased with what I came up with. The carburetors sit at a similar angle to those on a commando rather than the 18 degree tilt the Atlas uses. Only thing left to do is fit ballance tube connections. I know this isn't original, but I don't think it will detract too much from the overall look of the machine....besides, my bikes are riders, not trailer queens.
The carb bodys and manifolds were missing from the boxes of parts, so I decided it would be fun to make my own manifold. Started with a 1" thick chunk of aluminum, got busy with the lathe and band saw. I decided I wanted to see the carburteors sit closer to level than the stock mounting arrangement. I'm pretty pleased with what I came up with. The carburetors sit at a similar angle to those on a commando rather than the 18 degree tilt the Atlas uses. Only thing left to do is fit ballance tube connections. I know this isn't original, but I don't think it will detract too much from the overall look of the machine....besides, my bikes are riders, not trailer queens.
Attachments


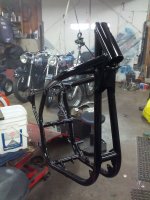
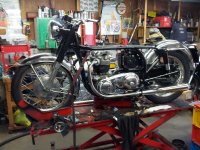
Got a few more things done since the last posting. Got the front and rear fenders in place. Straightened out most of the kinks in the number plate bracket and fitted a new/ old tail light. Straightened and painted the brake pedal, then machined up a new ss brake rod and adjuster nut. After that I decided to drag out an old Triumph chain guard I had been saving for a rainy day. Turned out the main bracket fitted perfectly over the rear shock bolt. Filled a couple of holes with lead, then drilled a couple of new ones to fit the Norton swing arm mounts. Some dent removal, some sanding, some paint and presto! It might not be exactly like the Norton chain guard, but it's pretty darn close. Then I decided to fit the exhaust system...that was pretty uneventful, although I had to slightly modify the original head pipes. I like the way the new mufflers look on this bike...not original, but period correct, none the less. Frankly I think they look nicer than the original type mufflers, but then again, "beauty is in the eye of the beholder". I've GOT to take a short break from this project to work on another one that I have been neglecting, but I'll get back to it REAL soon.
Attachments
It looks great Goldy.
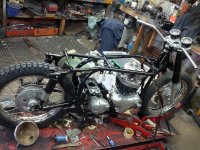
Well, well, well...life can sure throw some nasty surprises at you sometimes. I came very close to losing my wife a few weeks ago. She suffered an aotic dissection and had to be rushed into the OR for open heart surgury....all this during the hospital lockdown due to all this coronavirus crap. No visitation allowed. It was a rough few weeks, but I kept myself busy working on the Norton after things settled down enough for me to be able to think straight. Got the wiring harness built and the carbs installed, even fabricated a new air filter from a pair of old amal filters I had laying around. My girl is now back home where she belongs and needs a lot of attention, which I will gladly lavish on her, but I'm sure that before too long I'll be able to find a bit of time to tinker with that old Norton again.


