The 'leftovers' project - XS650

There was a scooter club in Richmond, VA called "Chain of Fools". One of the members had an old beater Vespa with the same exposed spring seat. He rode it around with no cover. Every time I saw it I though how great it would look with the frame painted to match a bike/scooter and the springs nickel or chrome plated. You can hate me for putting this idea in your mind!
 
The seat is a little rough to think about plating but I will clean it up some. I may wrap the springs in leather sleeves to dress it up but will see how things come together.
 
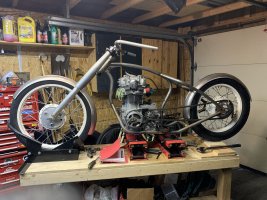
OK - I tried and tried to sell this project, with no luck which shocks me but so be it. The frame is up to USD$1600 from Voodoo Vintage these days which isn't much lower than the price I was asking for the full project.

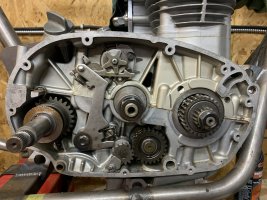
Anyhow - I'm digging back in and am nearly complete with the engine assembly (clutch etc. was all still off) and I'm sorting out a set of carbs. Sprockets, chain, throttle, cable etc. are all on order.

I'm working towards getting the motor running, but will start tacking mounting tabs onto the frame for foot pegs, fender struts and seat mount in the next week or two. Once I sort out a fuel tank and battery/electronics box, I'll get those mounts sorted then take the frame in for professional TIG welding.

Once I have the sprockets and chain, I can line up the rear wheel and get the spacers machined for it. My eyeball tells me the stock XS right side spacer puts the wheel dead centre with the sprockets aligned, but need the sprockets and a long enough chain to confirm.

Front wheel brake hub needs to be machined out to 17mm to fit the axle and then I can stack some washers in there to center it / have spacers made up.

Exhaust will be tricky - will try to find some junker headers around somewhere and see what works before I go ahead and try to make one or order something.

I'm hoping things sort of fall into place now that I've emptied a couple of boxes of clutter getting the engine back together and get some of the fiddly bits taken care of.

I've been pleasantly surprised at how quickly I've found all the tiny shims/springs I needed to put the starter gears and clutch back on.
 

Attachments

  • IMG_0589.JPG
    IMG_0589.JPG
    2.9 MB · Views: 134
its about dang time!

Bring it across the border sometime and we'll spend a weekend in the garage and get all the fab work done.
 
Strange that this build has been around since 2012 and I just saw it this evening. Nice work, Tim, keep at it, you've got something good going.
 
Some progress. Clutch all dialed in, wheel spacers, sprockets, chain lined up.

Throttle and cables set up - working on the TM34 carbs.

Need to do some fabrication work - tabs welded on for foot pegs, rear brake etc. and need some ideas for a gas tank.
 

Attachments

  • 399405E5-C37A-4381-B3C4-13FEA5B7A684.jpeg
    399405E5-C37A-4381-B3C4-13FEA5B7A684.jpeg
    3.4 MB · Views: 118
Doesn't look like much progress but the rear wheel/brakes/chain are dialled in, centred and spinning freely.

Front wheel is close - the TT500 hub is missing a couple of bits for the speedo drive and I need to likely have some spacers made to centre it perfectly, but it's mounted and solid.

If it was on the ground I'd have my wife pushing me down the road ;)

I'm looking at a variety of 'Wassel' tanks - will probably go with the Lowbrow mid-tunnel P-Nut tank. It looks like it will fit on the backbone properly and keeps the ball rolling.

https://www.lowbrowcustoms.com/prod...gas-tank-wassell-style?variant=31147773820975

IMG_0778.JPG
IMG_0779.JPG
IMG_0780.JPG
Screenshot 2022-11-07 at 4.48.41 PM.png
Screenshot 2022-11-07 at 4.49.10 PM.png
 
Tank and bits arrived. Ordered the wrong fuel cap but the levers and petcocks are on-point.

The curved backbone causes a bit of a headache - I'll need spacers to lift the tank up about 1/2 to 3/4 inch to clear the arch.

IMG_0828.JPG
IMG_0829.JPG
IMG_0830.JPG
 
You did such a great job on the frame and especially the top - what if you did a Harley-Type oil tank setup (but it's really a fuel tank) and use low-pressure electric fuel pump to get it to the carb. It seems like plenty of room in the "oil tank area" for that?
Oh, and NEVER MIND. I just read the updates and you are well-past that decision!
 
Seat to tank gap is huge

Yup. I could make a joke about needing the room, but it is what it is. Without a fully custom tank and seat setup, this is what fits.

I have about 14 inches of backbone to work with. Can't go any longer than this tank - I need to confirm fork clearance when I get back into the garage one night (it's getting cold so need to fire up the heater).

This is my crude rendering of what the exhaust will look like - it's on the way, just simple headers that I can cut and add silencers to or just run as is possibly with baffle inserts. I expect it will run closer to the frame rails - this is a crappy photoshop job.

IMG_0800 2.JPG
 
You did such a great job on the frame and especially the top - what if you did a Harley-Type oil tank setup (but it's really a fuel tank) and use low-pressure electric fuel pump to get it to the carb. It seems like plenty of room in the "oil tank area" for that?
Oh, and NEVER MIND. I just read the updates and you are well-past that decision!
This was and still is in the back of my mind. Another option I considered was running a cylinder tank on the rear fender which would allow for a gravity feed. And a steel jerry can 'pannier' with a pump was considered.

But for the moment, I just want to push forward and get this thing 'done'. If as I continue to mock it up a better tank option presents itself I'll change direction. Ultimately there will be some drilling and welding of bungs into the backbone to secure the tank but until then the options are open.
 
OK OK OK here's a mega update!

With massive help from @Hurco550 (Levi) at his place in Ohio, my bike is now officially a roller with all the critical tabs and mounting points welded on.

Everything in the photo on the bike is actually bolted down. Need to carve some rubber bushings for under the tank, but it's all bolted on and ready to roll. Some brake stays, tweak the exhaust a bit, clutch and brake cables and wiring left to do.

Still a ways to go, but this was a major block on the project that I needed help with from a professional friendly fabricator.
IMG_0366.jpeg
 
Back
Top Bottom